The Domain Name System (DNS) is the system that converts domain names (domain.com) into IP addresses (1.2.3.4). The DNS system is built around three main components; Parent Nameservers (of which there are 13 in the world), your domain name registrar (where you buy a domain) and your Nameservers (where you control the DNS values of a domain) which would be at your domain registrar.
With DirectAdmin you can easily create your own Nameservers and manage your own DNS Records using the in-built named (bind) system or create an external DNS cluster with your other DirectAdmin servers using the built in multi server DNS clustering tool. However, sometimes you may want to use an external DNS provider such as Cloudflare for your domains. When using an external DNS provider you can ensure that your DNS Records will remain active and accessible even if your VPS or Dedicated Server is down. This will mean that any external services you may use, for example, email with Google Apps or MXRoute, will still continue to function and you’ll be able to continue receiving emails but your actual website will be inaccessible.
Most will choose to host their DNS on their own servers due ease as the local DNS Zone is automatically created and populated by DirectAdmin when the account is created or amended. However, if you used an external DNS provider and added a subdomain or changed any other DNS records with your main domain, you would need to manually copy the new DNS records for the subdomain to the external DNS provider.
Note
This guide has been updated due to the changes made to the script that allowed us synchronise the DNS records between DirectAdmin and Cloudflare that we had previously used. The script creator (Paul Jones) has now released the script as an installable plugin where the settings can be managed using a GUI from the DirectAdmin dashboard directly.
In this guide, we will show you how you can update your DNS records using the DNS Management panel in DirectAdmin and automatically synchronise the DNS records to Cloudflare. We will start by creating a new API Key in Cloudflare that will enable our DirectAdmin server to communicate with Cloudflare to sync the DNS records. Then we will install and setup the DAFlare plugin in the DirectAdmin dashboard to enable the automatic synchronisation of DNS records when you add new domains or edit existing ones with DirectAdmin. The plugin will ensure that DNS records are kept synchronised between your DirectAdmin server and Cloudflare using continuous synchronisation.
Important
In order to enable automatic DNS synchronisation between your DirectAdmin server and you Cloudflare account, we will be using an externally provided plugin. While the plugin should not interfere with your current services or server, as always, we would recommended that you test it on a new system first and make sure to take backups before implementing this into a production environment.
How to Automatically Sync DNS Records between CloudFlare and DirectAdmin
Setup Cloudflare
The first thing we will need to do is setup Cloudflare. The process you will need to follow will depend on whether you have an existing account with Cloudflare or not.
If you don’t have an account with Cloudflare, don’t worry, just simply sign up for a new account with Cloudflare and then follow the Cloudflare Nameservers (New) section of this guide.
If you have an existing account and are unsure of your existing Cloudflare nameservers you can find them by following the Cloudflare Nameservers (Existing) section of this guide. If you already know your Cloudflare nameservers, you can skip this section and continue with the Backup Existing Cloudflare DNS Records section of the guide.
Cloudflare Nameservers (New)
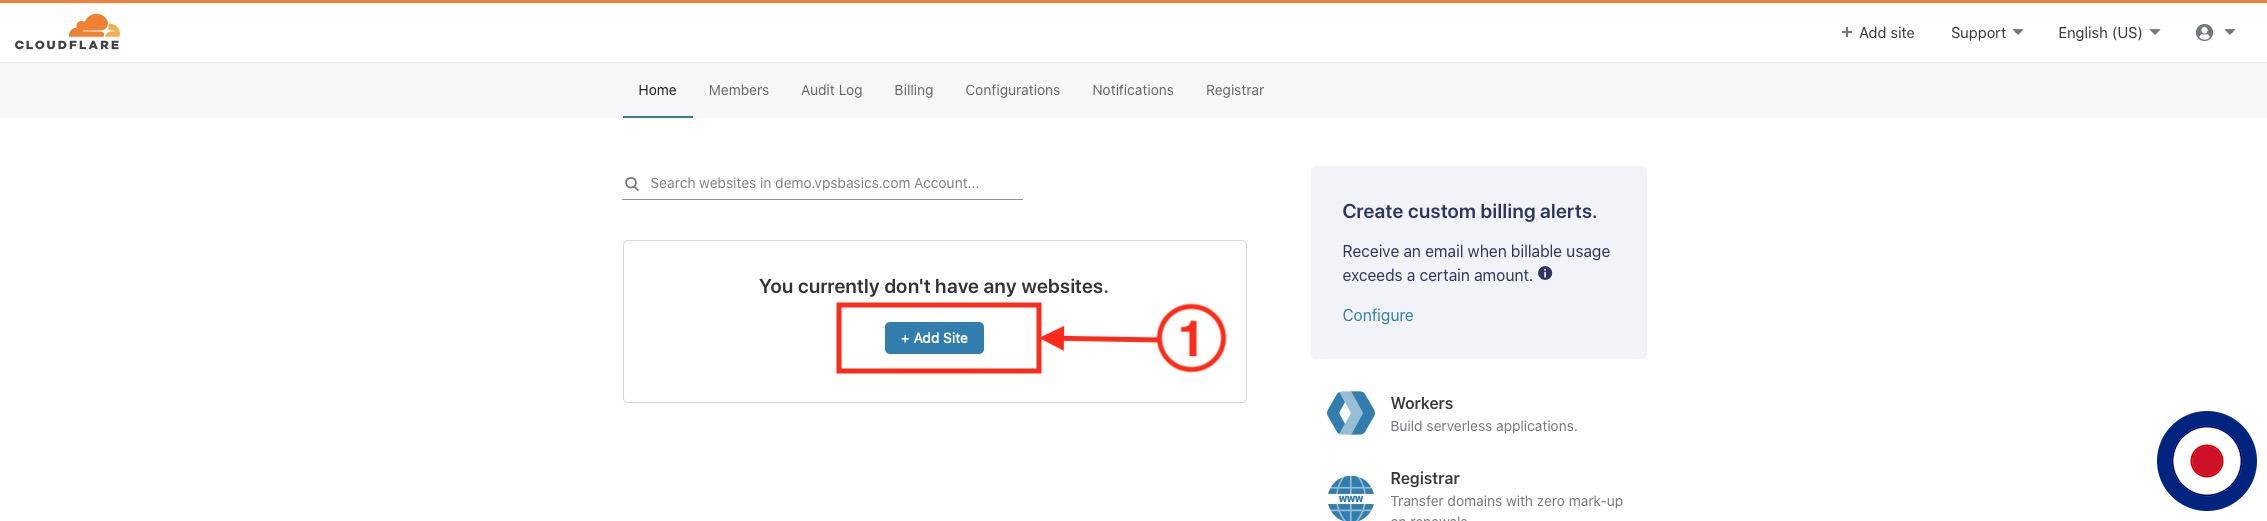
After signing up for your new Cloudflare account, you will need to add a new website to your account. From your Cloudflare dashboard select the blue + Add Site button.
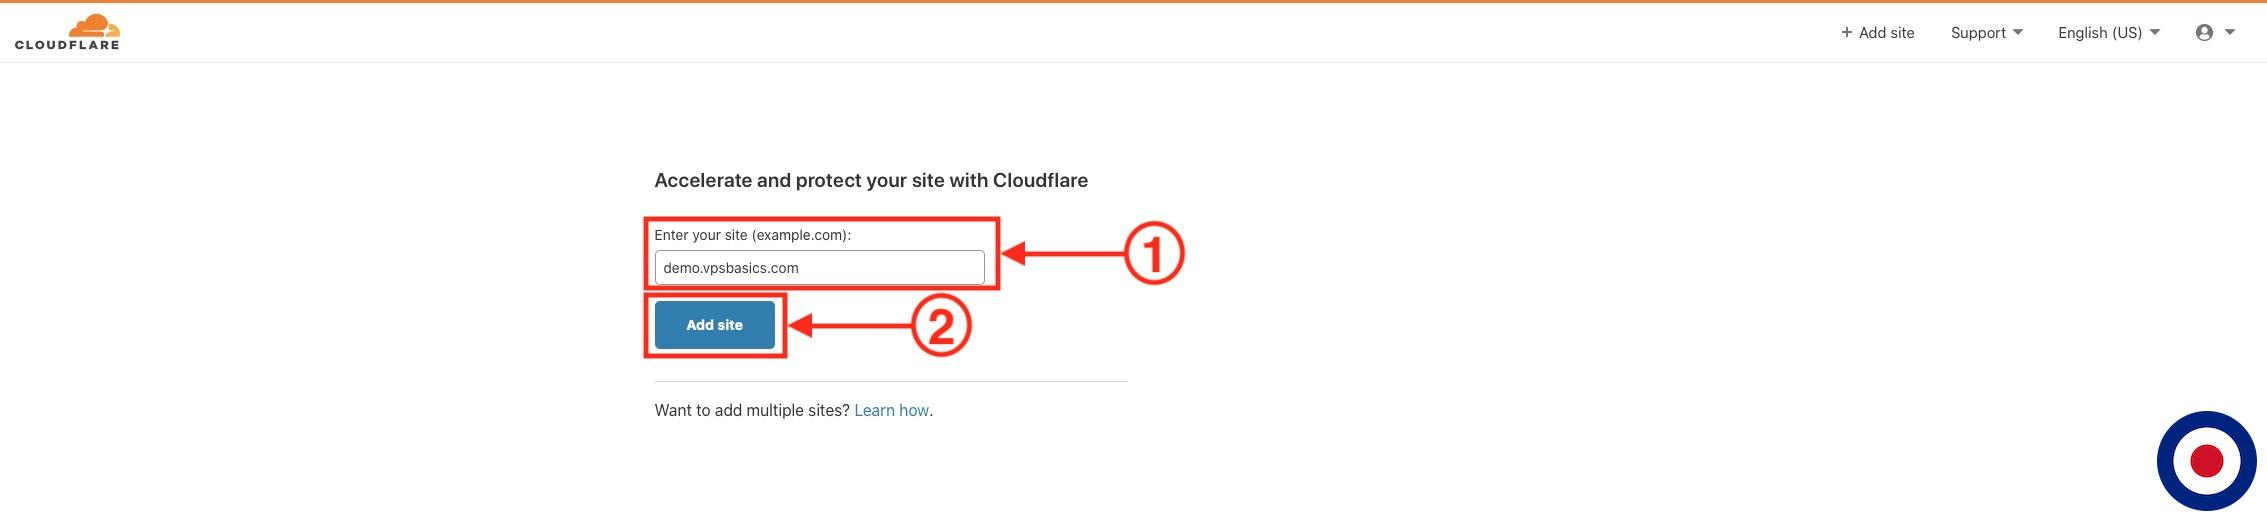
Now enter your domain name in the Enter your site (example.com) box. This needs to be your root domain (vpsbasics.com) and not a subdomain (demo.vpsbasics.com). Then click the blue Add site button.
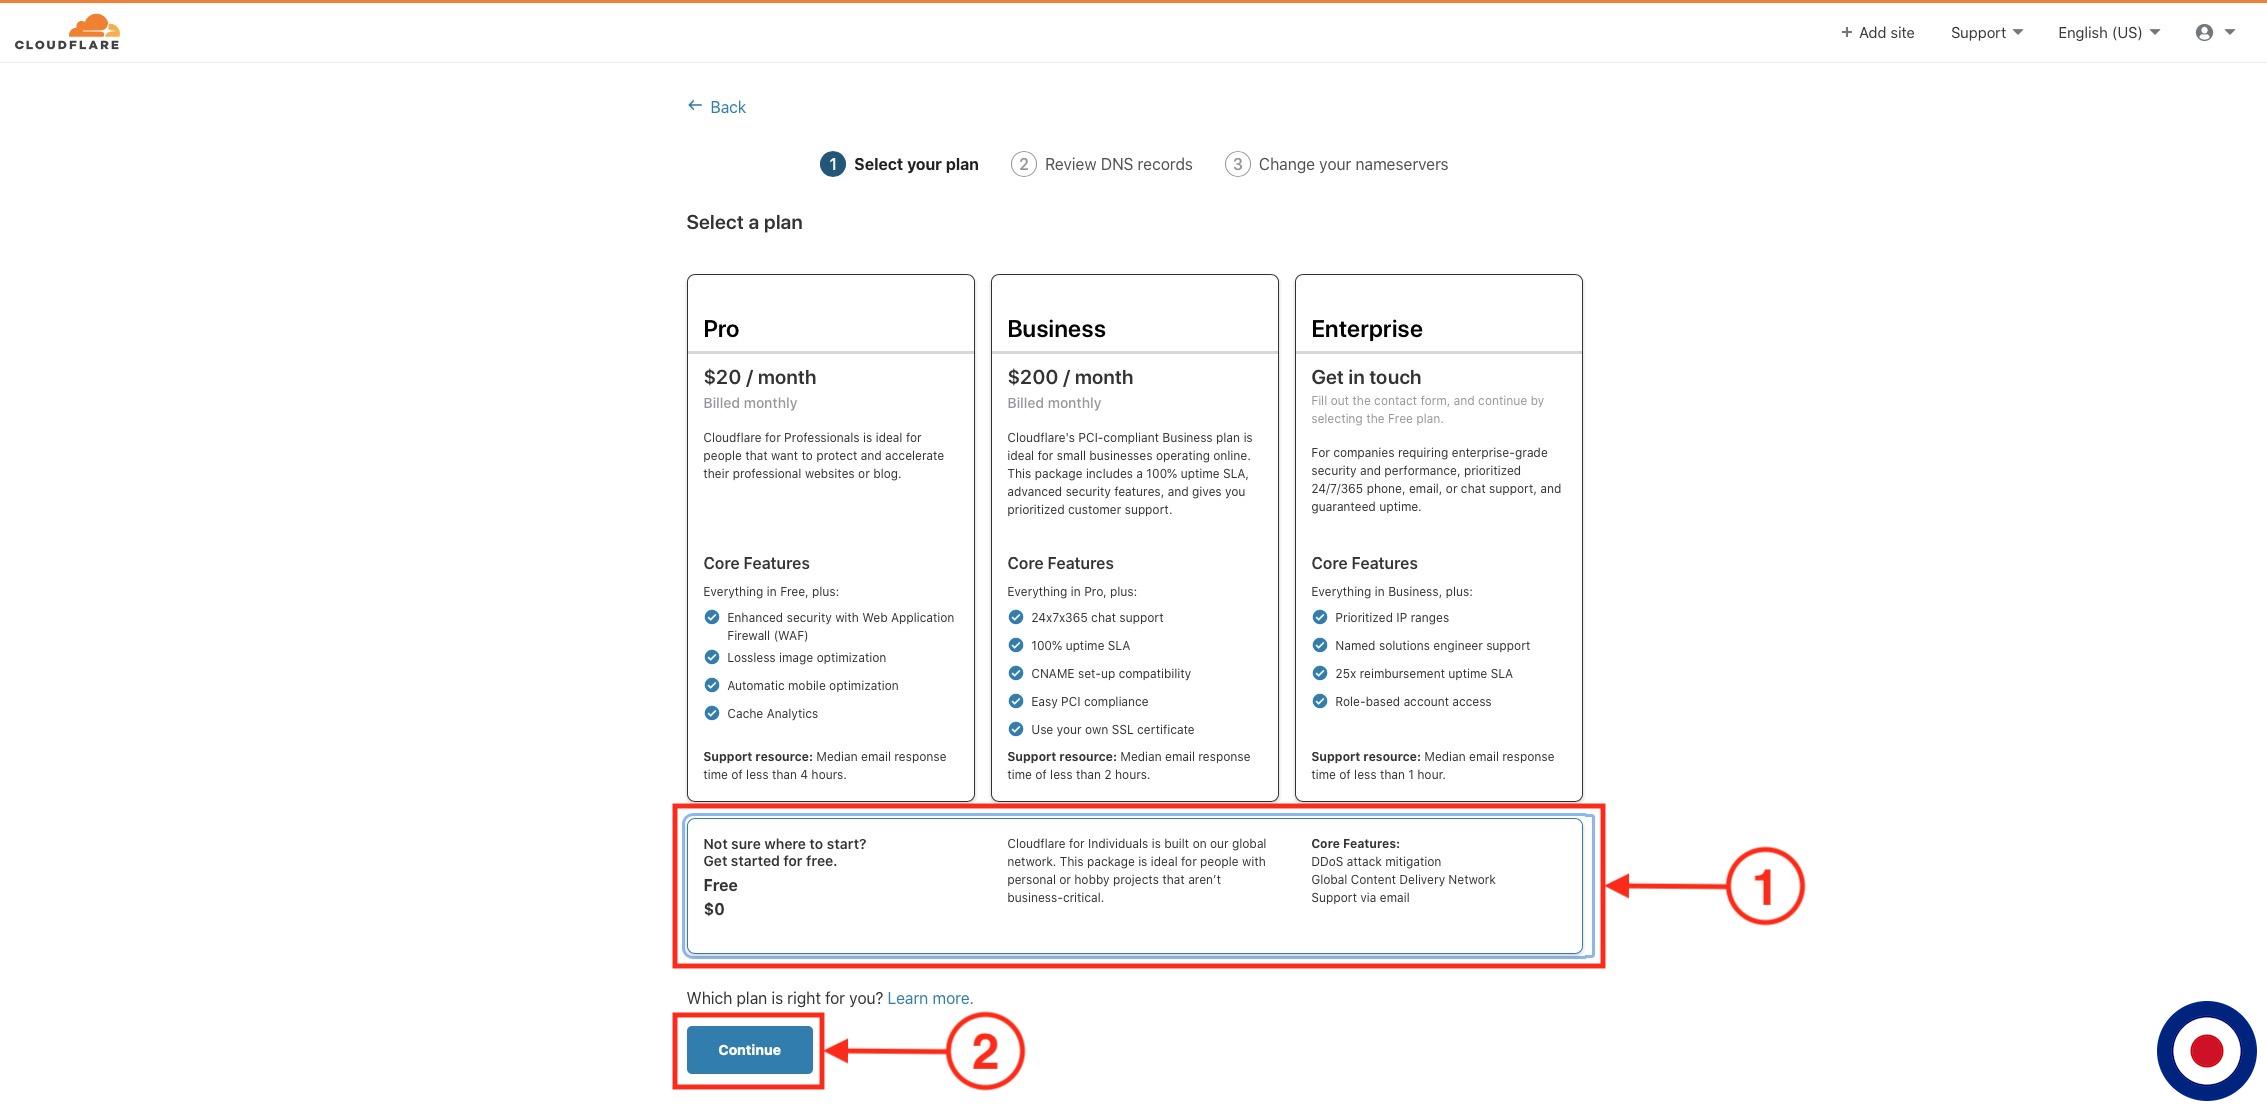
You will now need to select your Cloudflare account plan. You can choose between the Free, Pro, Business or Enterprise plans which come with different features. However, for this guide and to enable DNS synchronisation the Free plan is sufficient. Then select the blue Continue button.
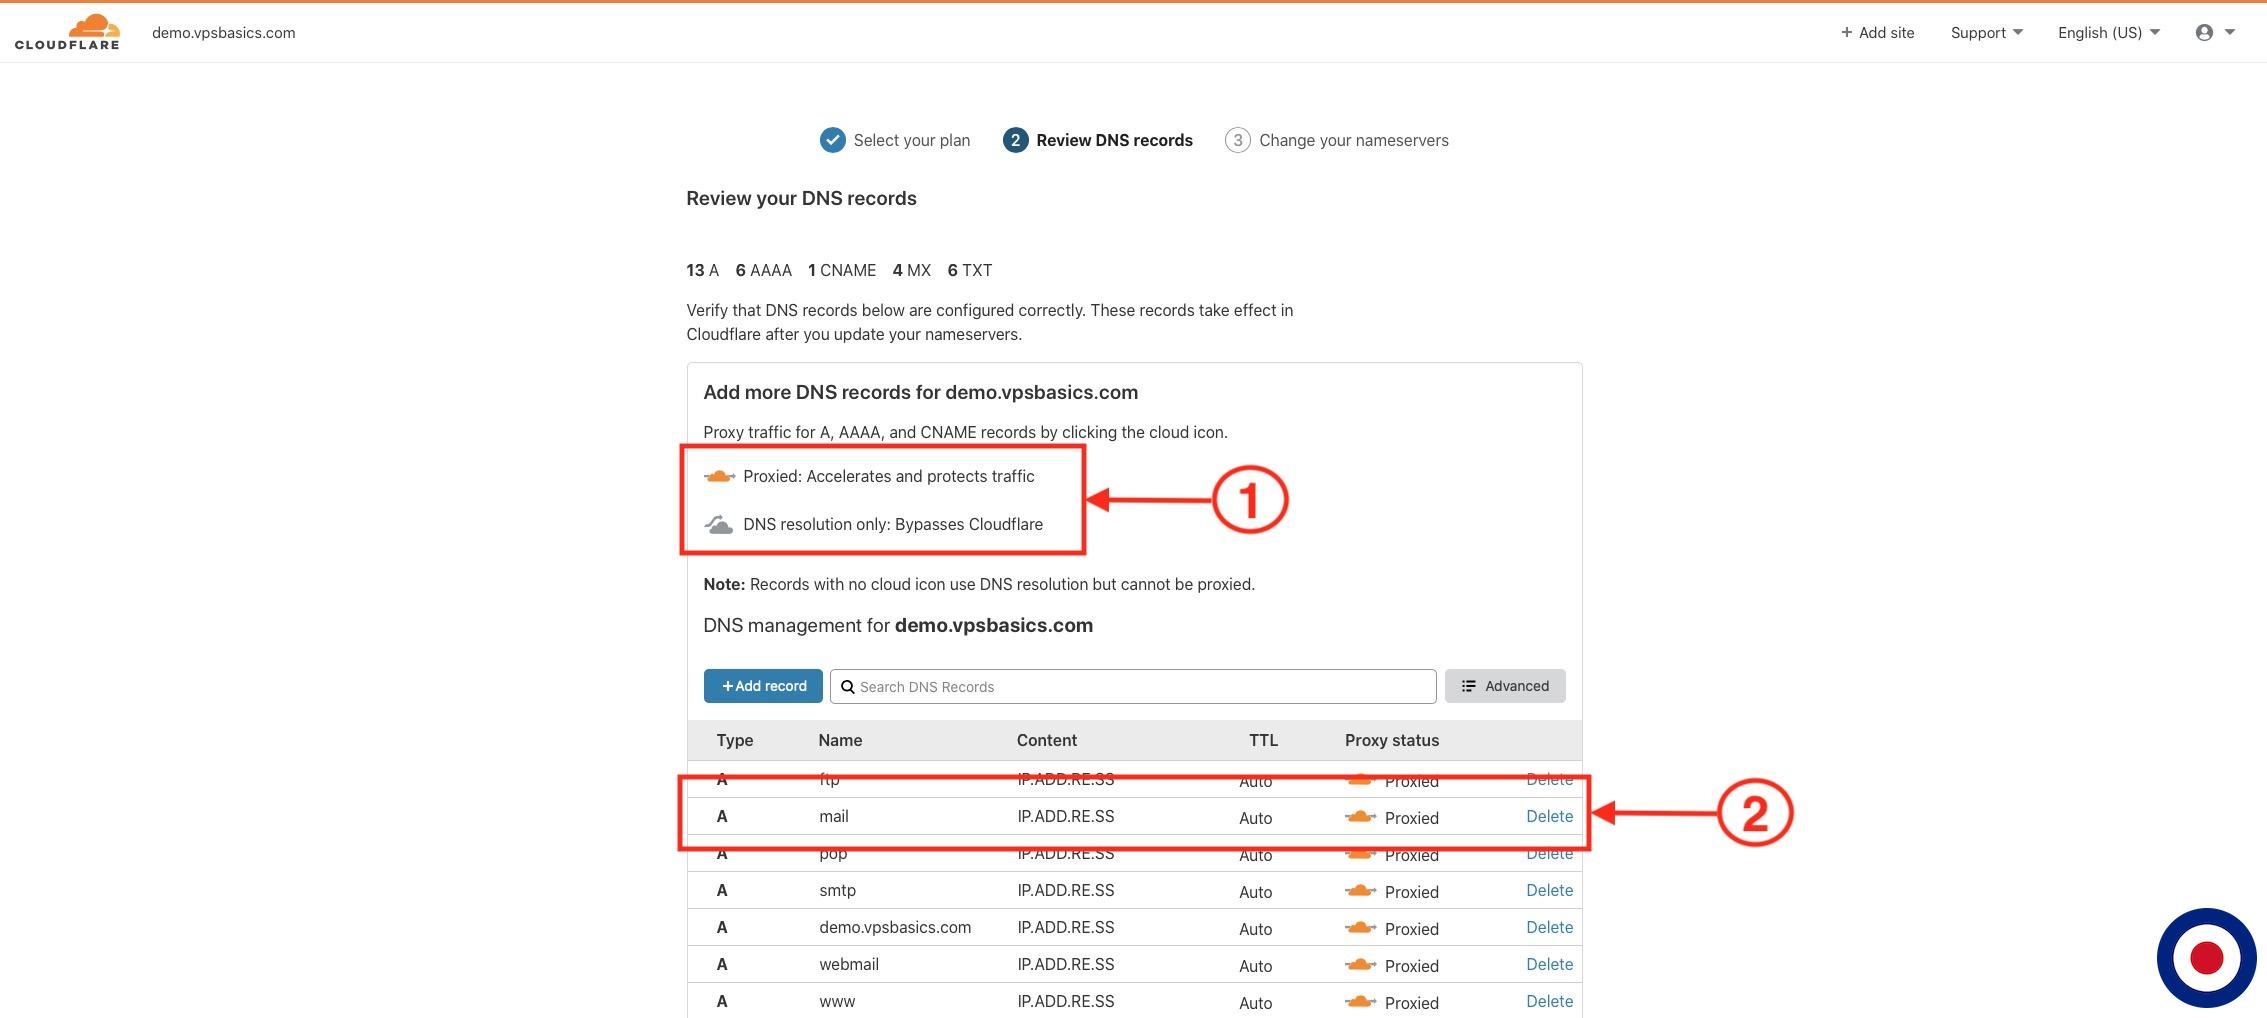
Cloudflare will now scan your domains existing DNS records and list them below. Cloudflare will automatically proxy your DNS records (Orange cloud) and use their default Time To Live (TTL). Ultimately the records here will not be pulled through to DirectAdmin so will not have an impact if they are slightly wrong at this point. Now select the blue Continue button.
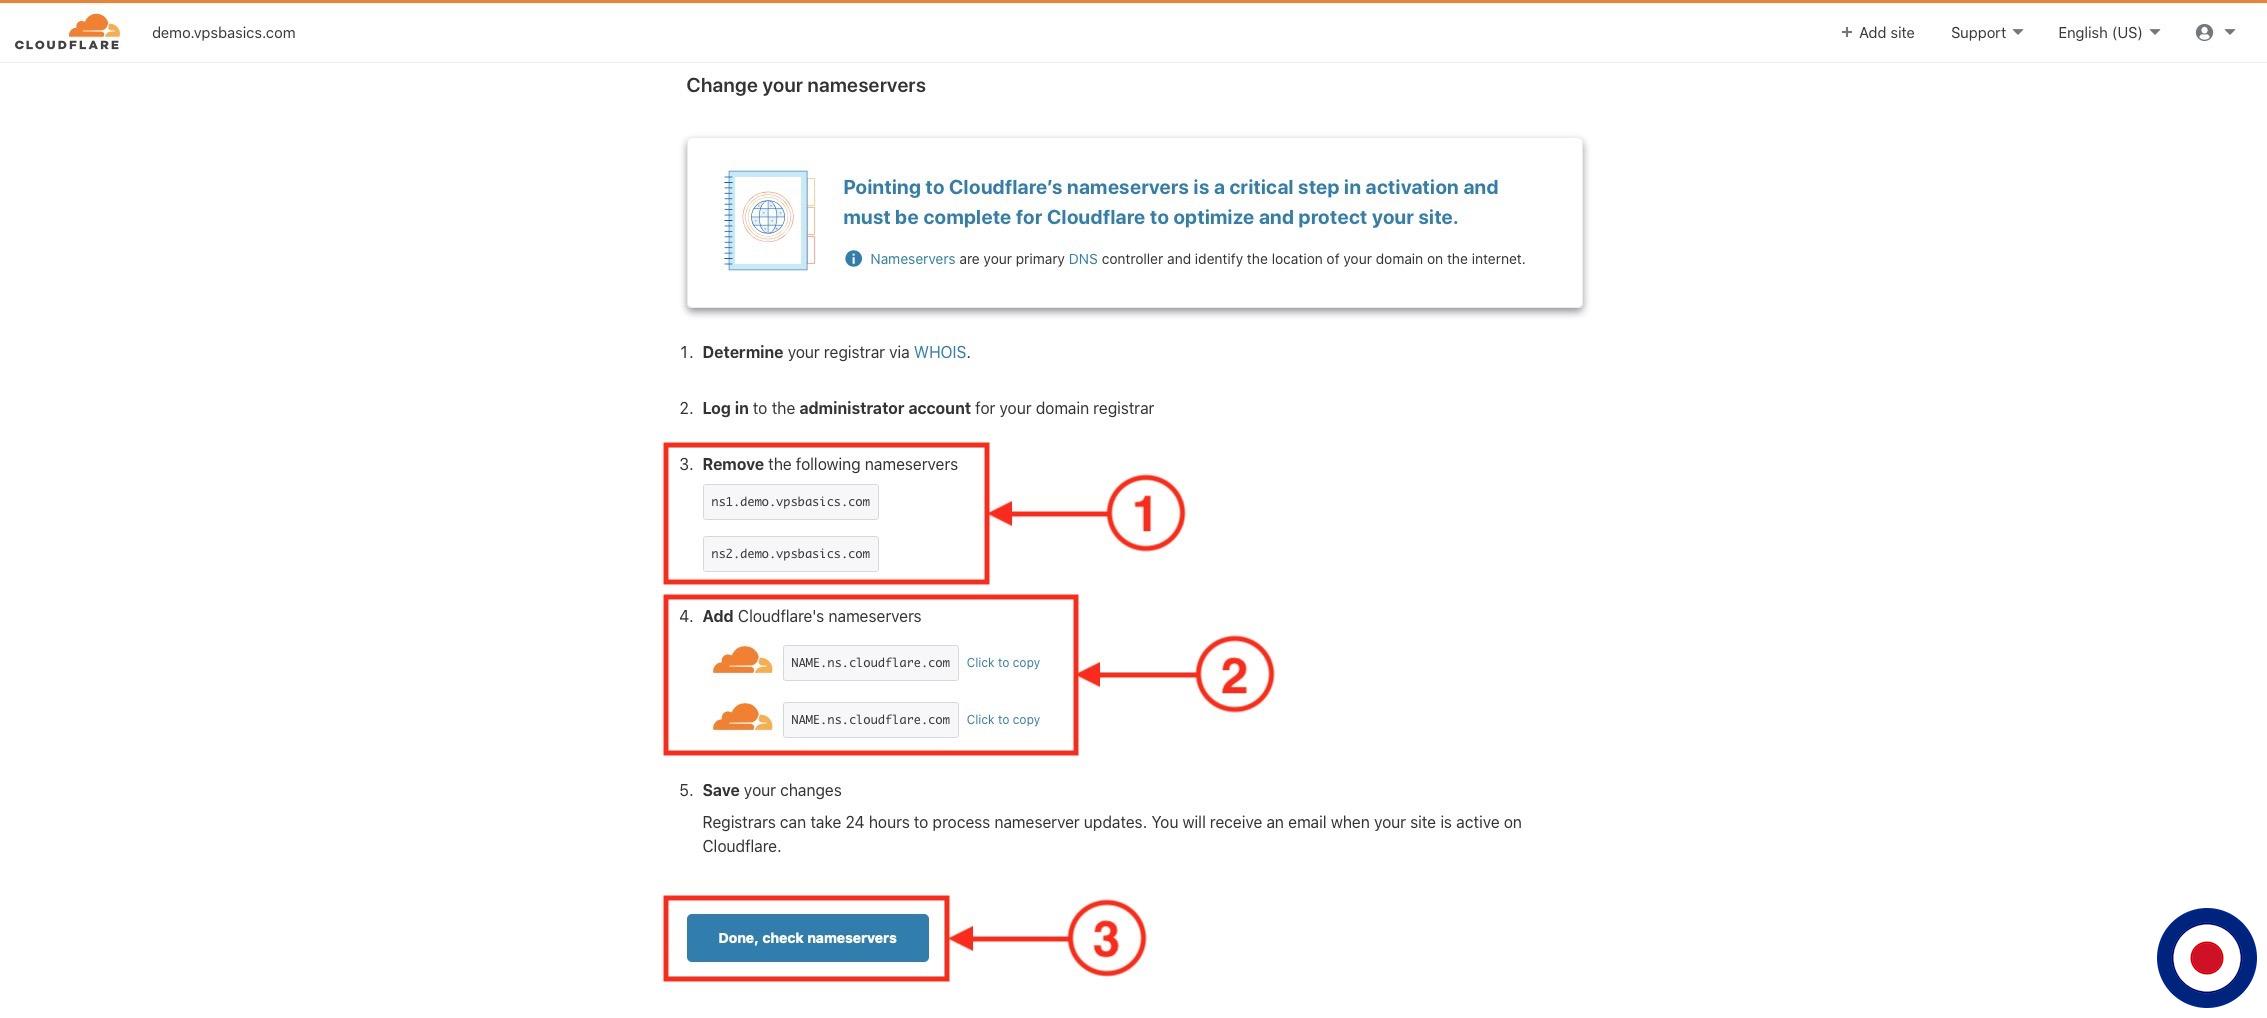
Now you will be at the Change your nameservers screen where it will display your existing domain nameservers and your Cloudflare account nameservers. You will need to make a note of these as we will need these later to setup and configure the DNS records in DirectAdmin. Now click the blue Done, check nameservers button.
After clicking the Done, check nameservers button you will be presented with the Quick Start Guide screen where you can simply click Finish later to be taken to the Cloudflare dashboard.
Note
Now you know your Cloudflare nameservers you will need to update your domain nameservers to point towards Cloudflare by logging into your account at your domain registrar and changing the nameservers to the ones assigned by Cloudflare. Depending on your registrar full DNS propagation around the world can take anything up to 72 hours. You can check DNS propagation using the tool provided by DNS Checker.
That’s it. You have successfully created a new account with Cloudflare, added your first domain and found out your Cloudflare nameservers. Now we will need to create a Cloudflare API Token to enable communication between your DirectAdmin server and your Cloudflare account.
Cloudflare Nameservers (Existing)
In order to setup the automatic synchronisation of a domains DNS records between DirectAdmin and Cloudflare, you will need to know your existing Cloudflare nameservers.
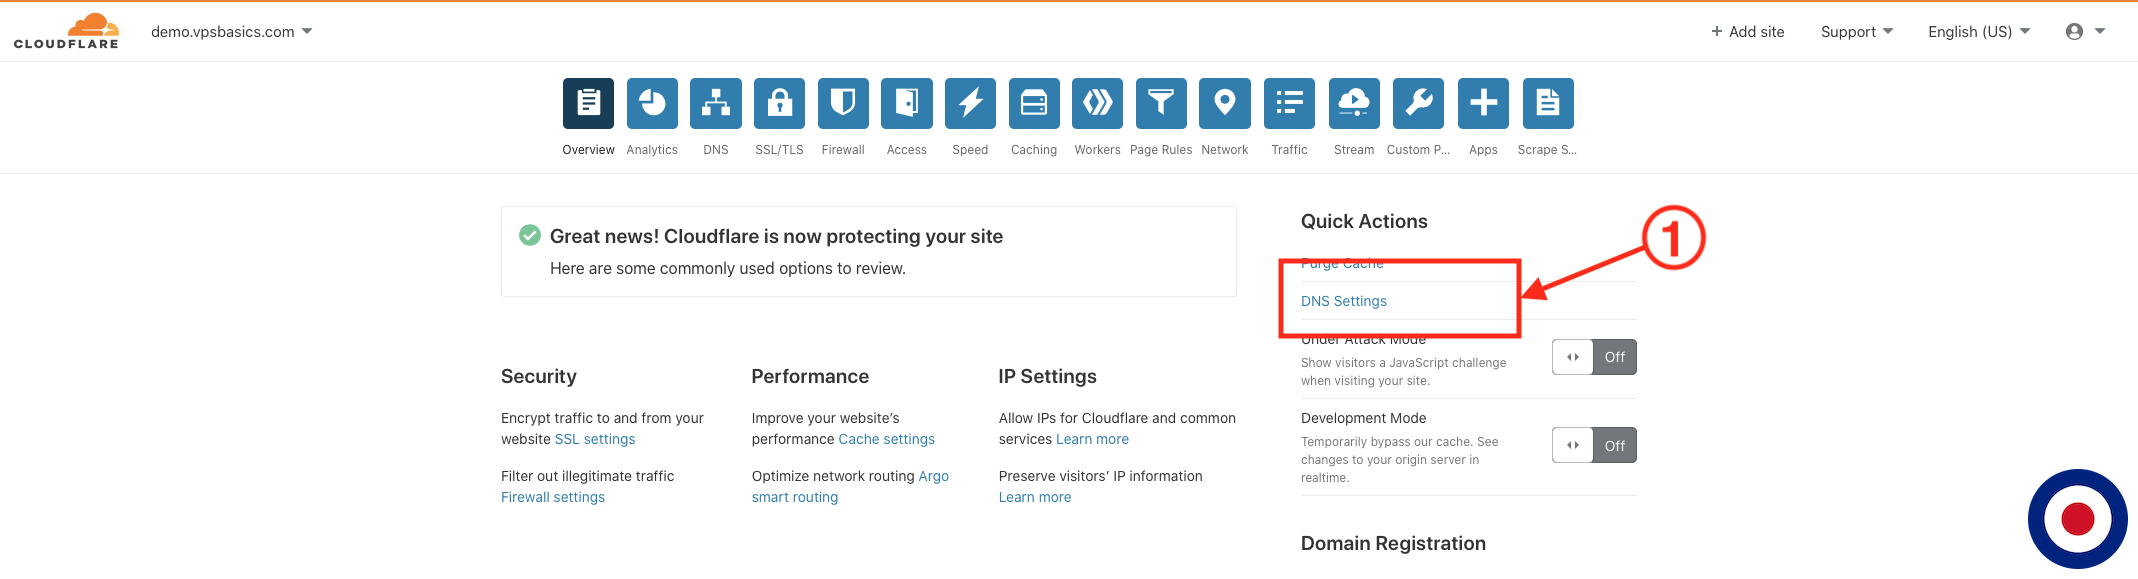
To find your Cloudflare nameservers you will need to log into your Cloudflare account and then select an existing website from the dashboard.
In the websites Cloudflare dashboard select DNS Settings under the Quick Actions menu on the right hand side of the page.
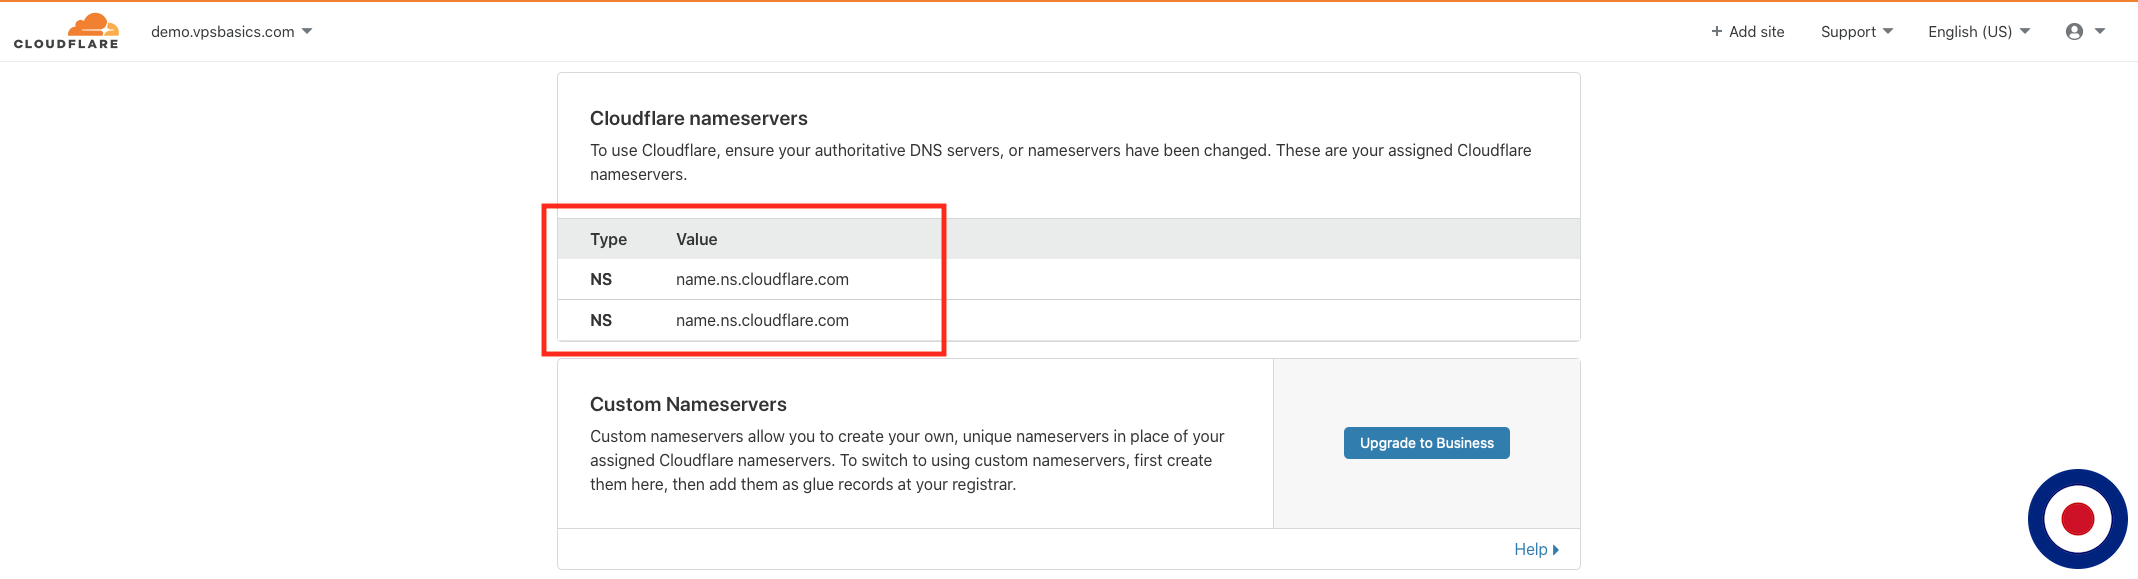
Now scroll down the page to the DNS Management section, where you will find your assigned Cloudflare nameservers which will look similar to name.ns.cloudflare.com. At this point it is important to make a note of the nameservers as we will require them later in the guide to update your nameservers at your domain registrar and to assign your them when adding a new domain or editing an existing domain with DirectAdmin.
Note
Now you know your Cloudflare nameservers you will need to update your domain nameservers to point towards Cloudflare by logging into your account at your domain registrar and changing the nameservers to the ones assigned by Cloudflare. Depending on your registrar full DNS propagation around the world can take anything up to 72 hours. You can check DNS propagation using the tool provided by DNS Checker.
Backup Cloudflare DNS Records
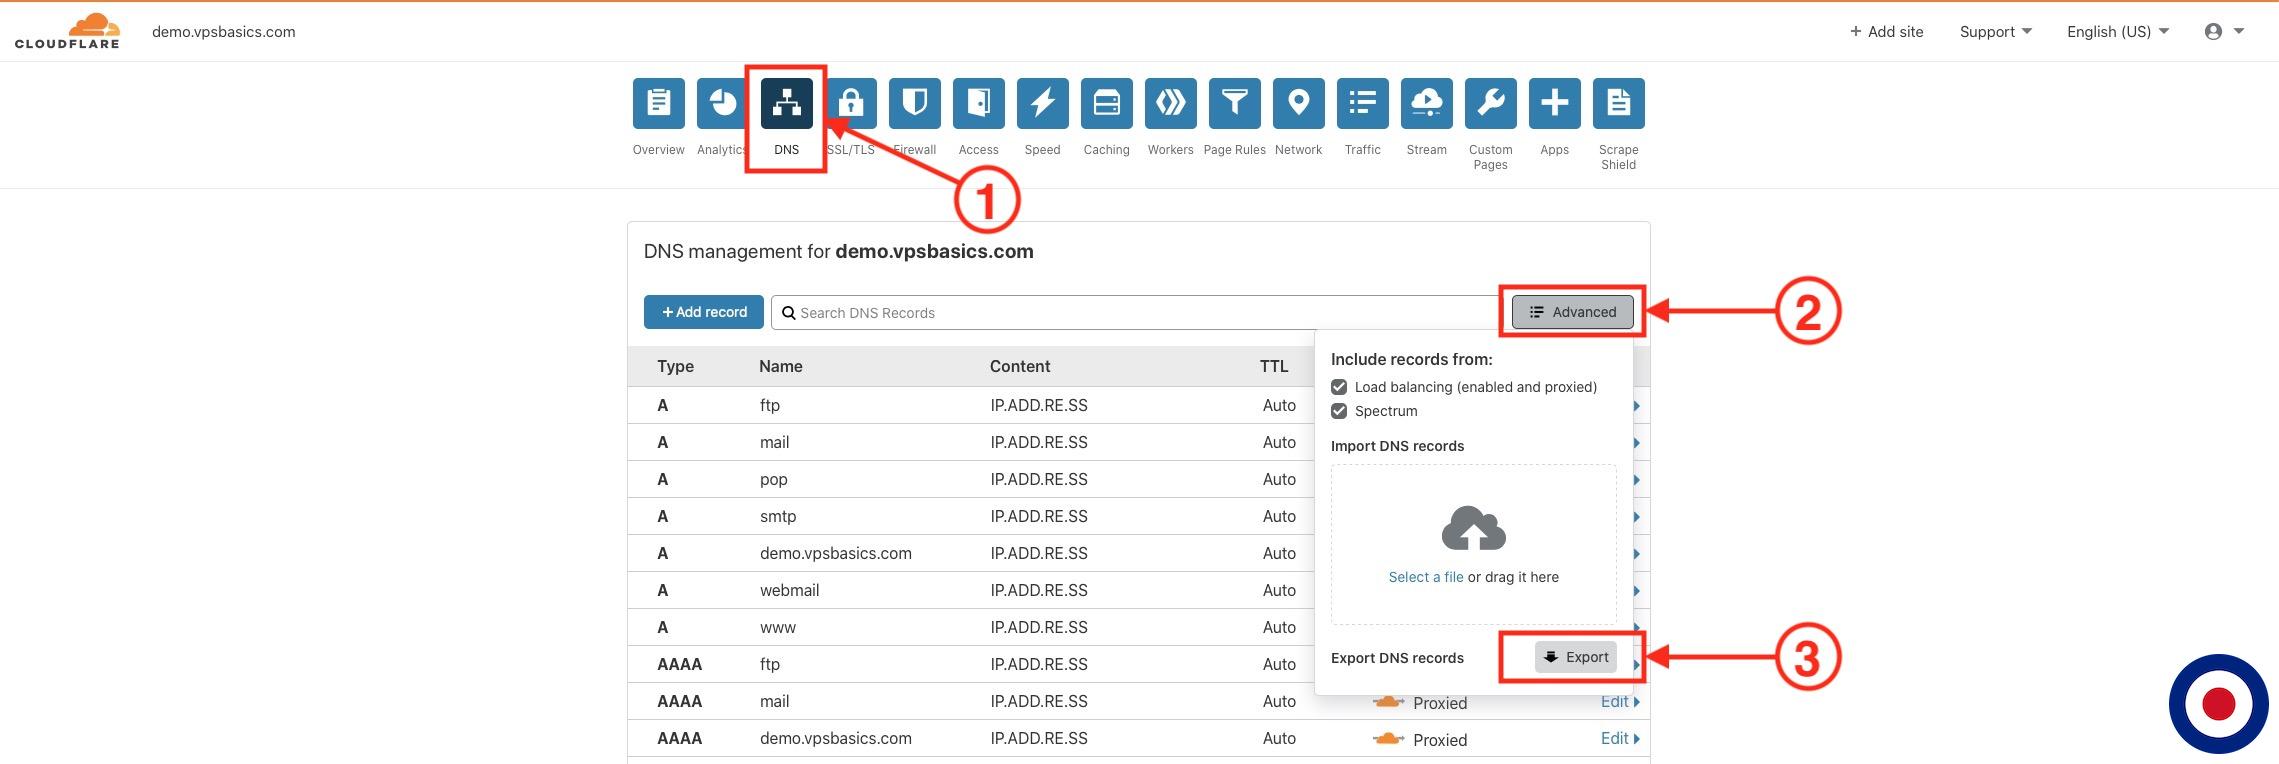
Before continuing we would recommend that you download a backup copy of your existing DNS records from Cloudflare. To download a copy of your DNS records select the DNS icon. In the DNS Management dashboard, select the grey Advanced button and then select Export. The download should be automatically and will be saved to your download folder on your computer.
That’s it. You have successfully logged into your Cloudflare account, noted your assigned Cloudflare nameservers and updated your domain nameservers at your domain registrar. Now we will need to create a Cloudflare API Token to enable communication between your DirectAdmin server and your Cloudflare account.
Cloudflare API Token
Now we will need to create an API Token that will enable your DirectAdmin server to communicate with Cloudflare without logging into your Cloudflare dashboard each time. The API Token will allow DNS records to be added, modified, edited and deleted automatically and synchronised across both platforms.
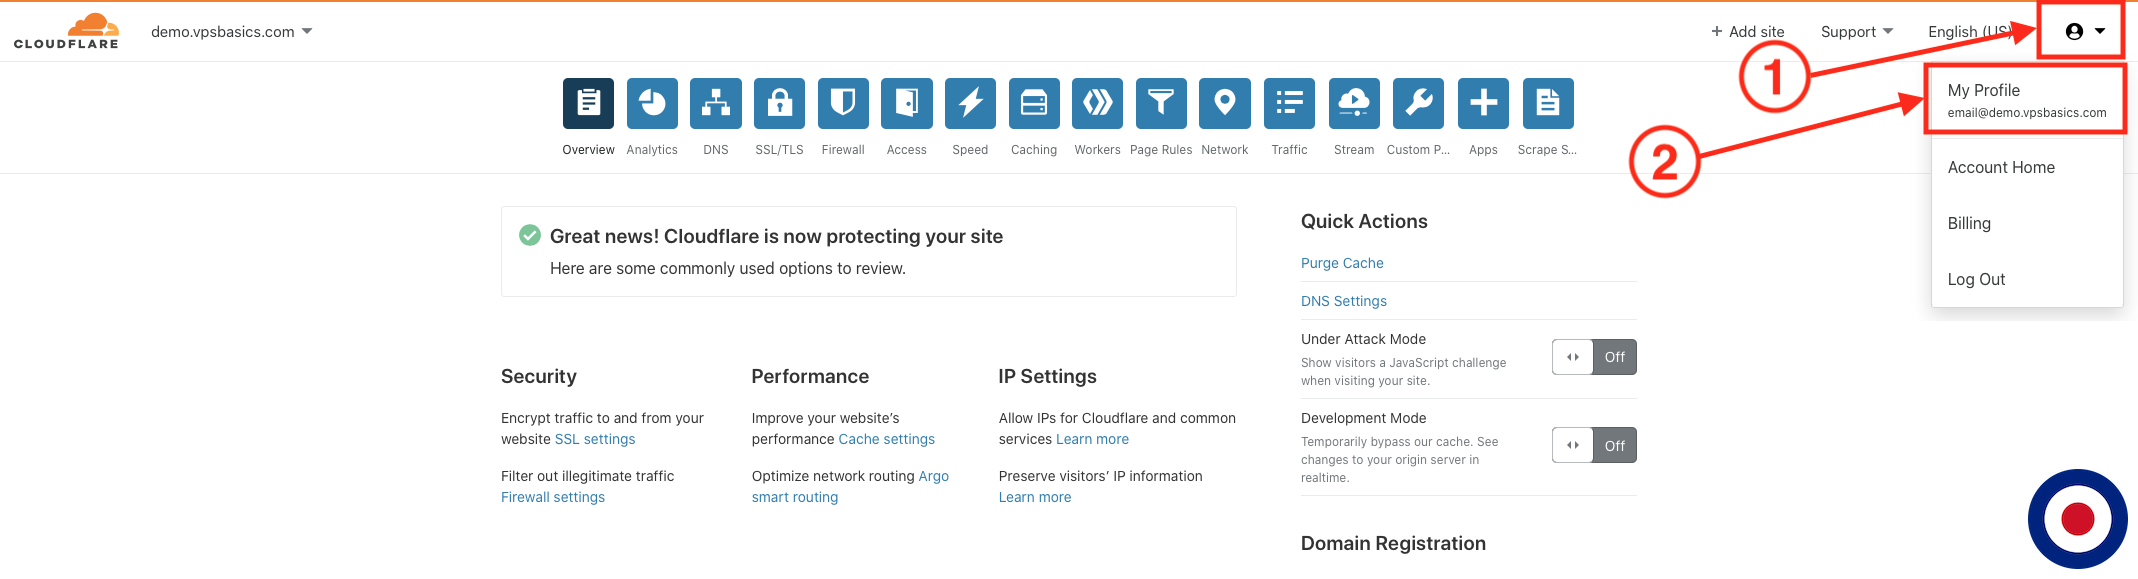
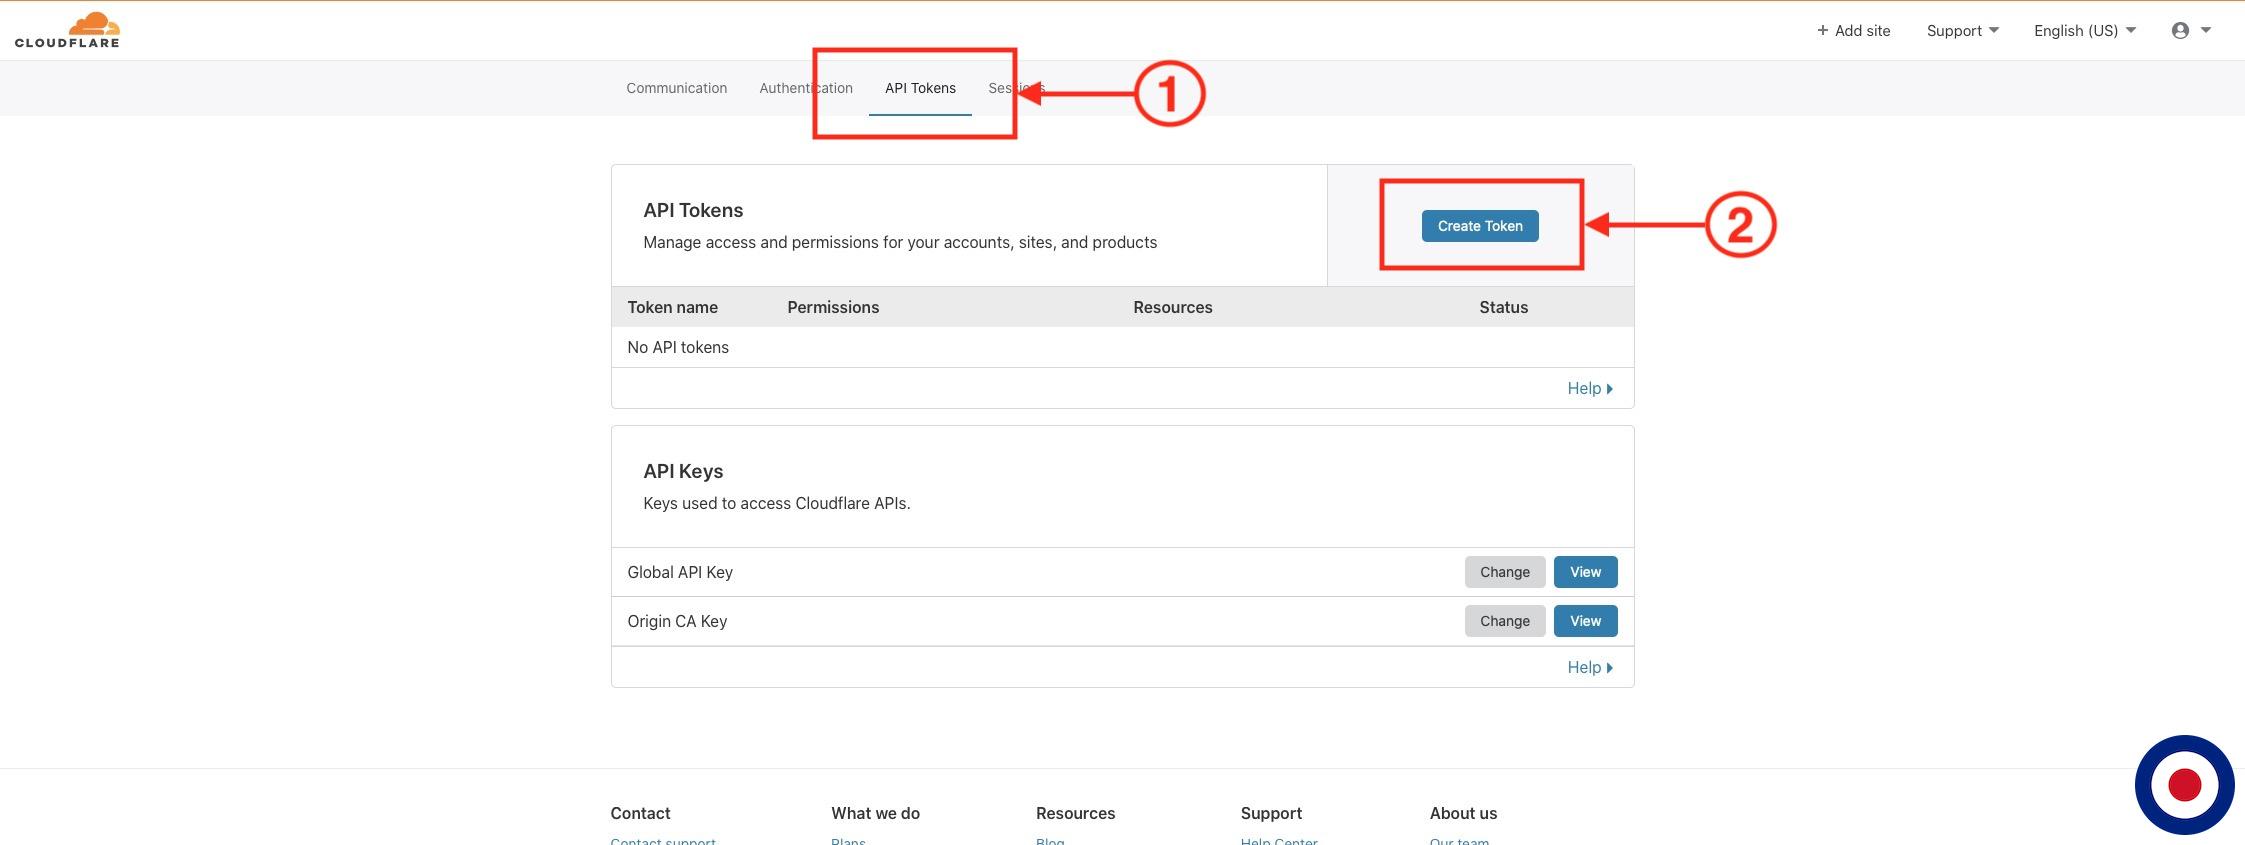
To access the API Token system, you will need click the Your Profile icon at the top right of the page in your Cloudflare dashboard. This will reveal the profile dropdown menu where you will need to select the My Profile option.
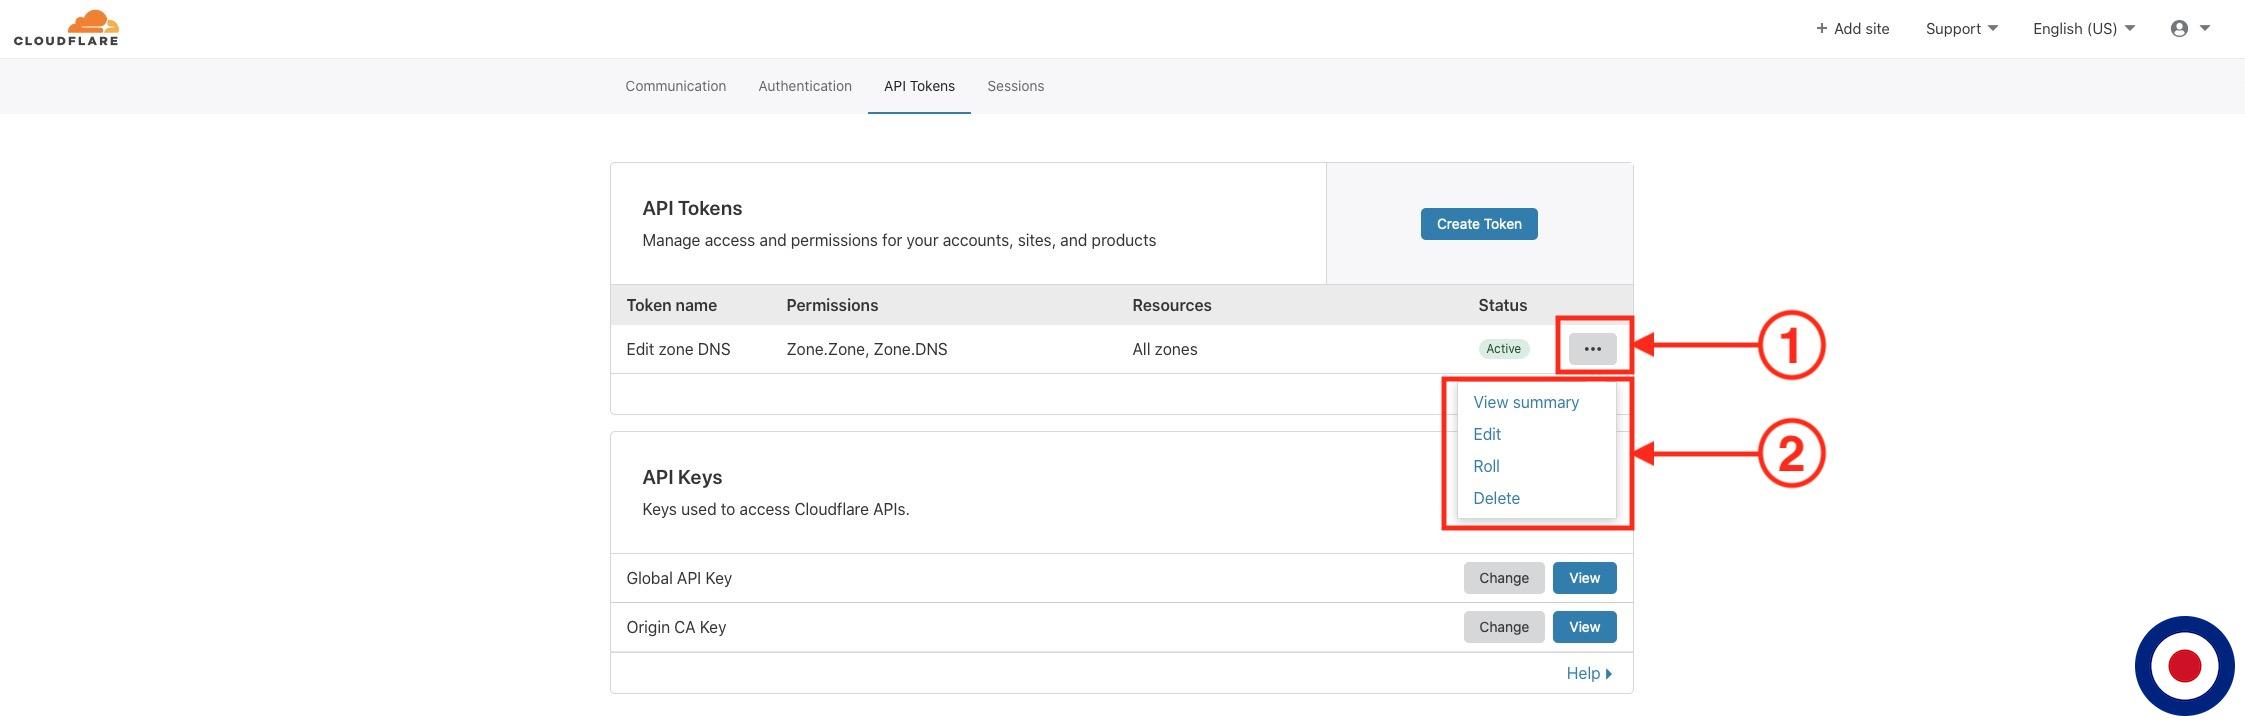
Once the My Profile dashboard has loaded you will need to select API Tokens from the menu. In the API Tokens dashboard we will create an API Token that will enable us to manage access and permissions to add, remove and edit DNS records in your Cloudflare account. To create a new API token simply click the Create Token button.
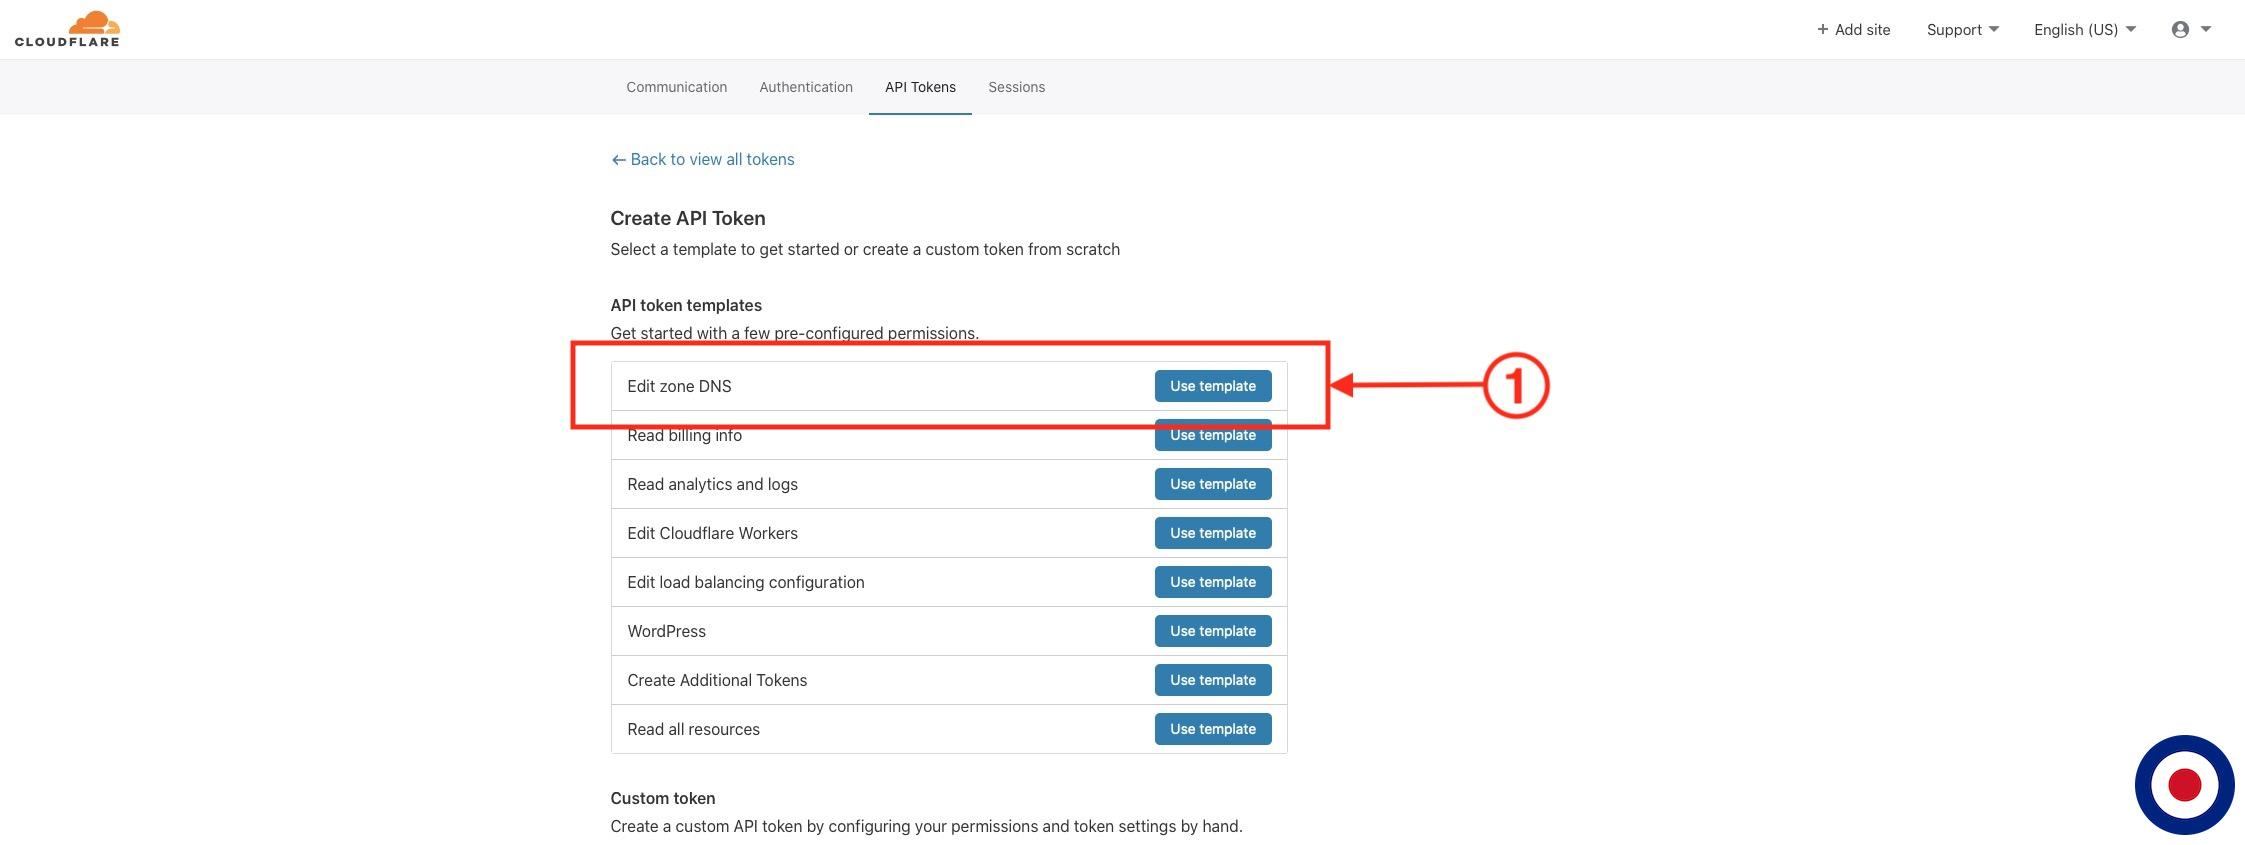
In the Create API Token dashboard you can either select from the pre-configured templates or create your own custom template and manually configure the permissions and settings. For this guide we will not need to configure our own custom template and can use the pre-configured Edit Zone DNS template supplied by Cloudflare. This template will set the permissions to edit an existing DNS zone. Next to the Edit Zone DNS template, click the blue Use template button.
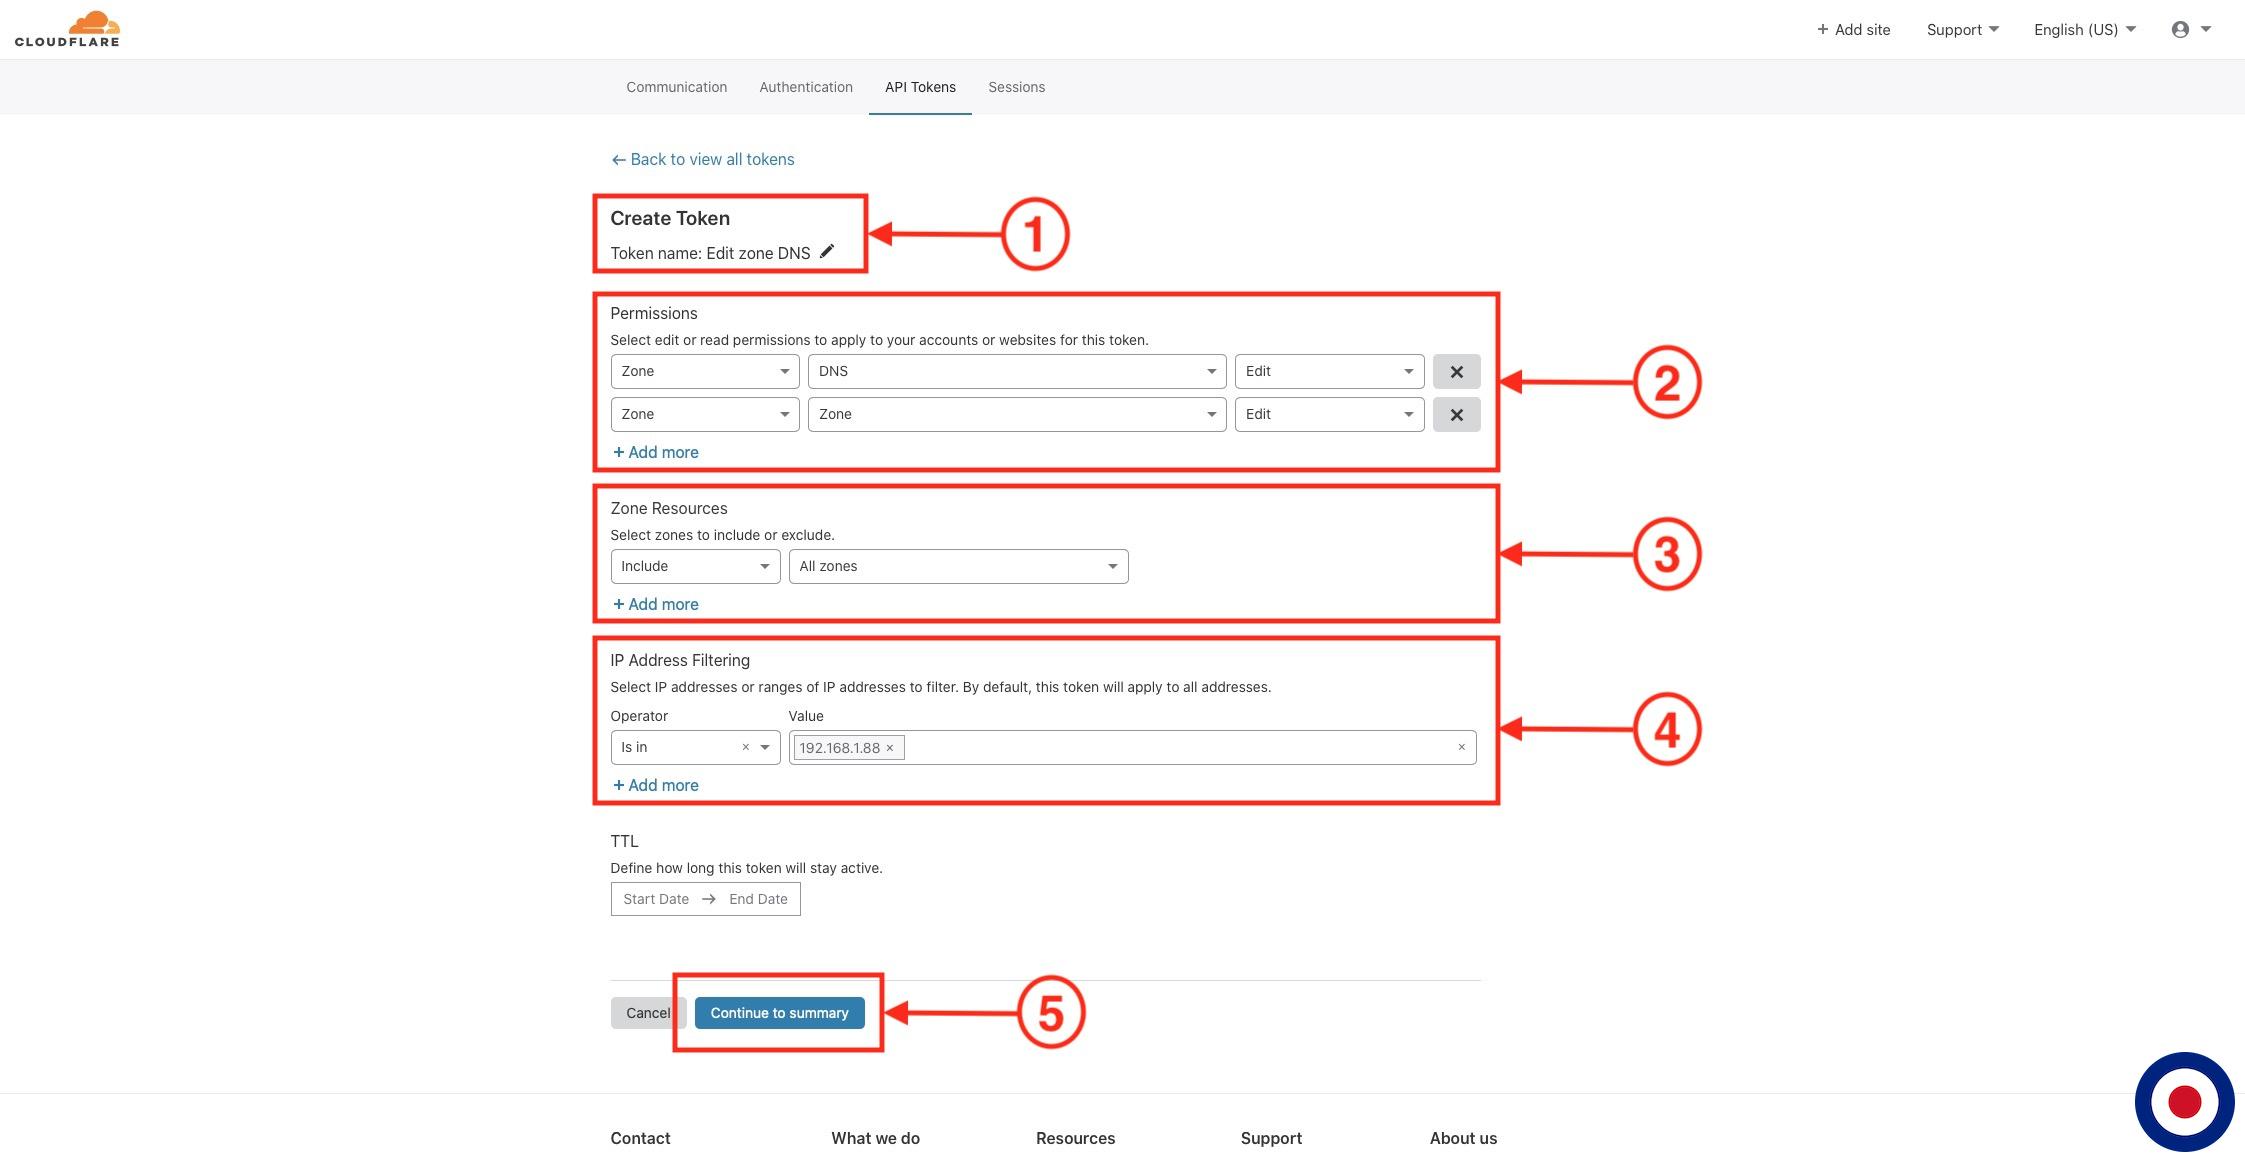
This will open the Create Token dashboard. Now we can adjust the name of the token, assign different permissions and resources to it. Although the pre-configured template contain the permissions to edit a DNS Zone we will need to adjust some of the options to enable full synchronisation.
- Under the Create Token section you can give your token a new name to make it easily identifiable in your API Token dashboard, for example, you could name the token as DAFlare DNS Sync.
- Under the Permissions section, you will see that Zone, DNS, Edit has been automatically selected. You will need to click on + Add more button and add the Zone, Zone and Edit option as well. Your permissions should look like the example in the image below. These options allow the necessary permissions for your DirectAdmin server to mange your Zones (domains) and their DNS records.
- Under the Zone Resources section you will need to select Include and All Zones options. This allows your DirectAdmin server to manage all the zones (domains) in your Cloudflare account.
- Under the IP Address Filtering section you can secure access to this API Token to only allow access from your server IP address or multiple server IP addresses. By default this option is greyed out and not enabled. To enable this you will need to select Is In followed by your IP.AD.DRE.SS. You can enter both IPv4 and IPv6 addresses. If your server has an IPv6 address assigned Cloudflare will default to using that rather than the IPv4 address. We highly recommend that you utilise this option for added security.
Once you have finished you will need to click the blue Continue to Summary button.
On the summary page, you will see that DNS API Token has been configured to enable all DNS zones (Zone:Edit) to be edited and be able to edit the DNS records (DNS:Edit) of those zones. If you have chosen to only allow access from your server IP address or addresses you will see the details under the IP address Filtering section. Once you confirmed the details are correct click the blue Create Token button.

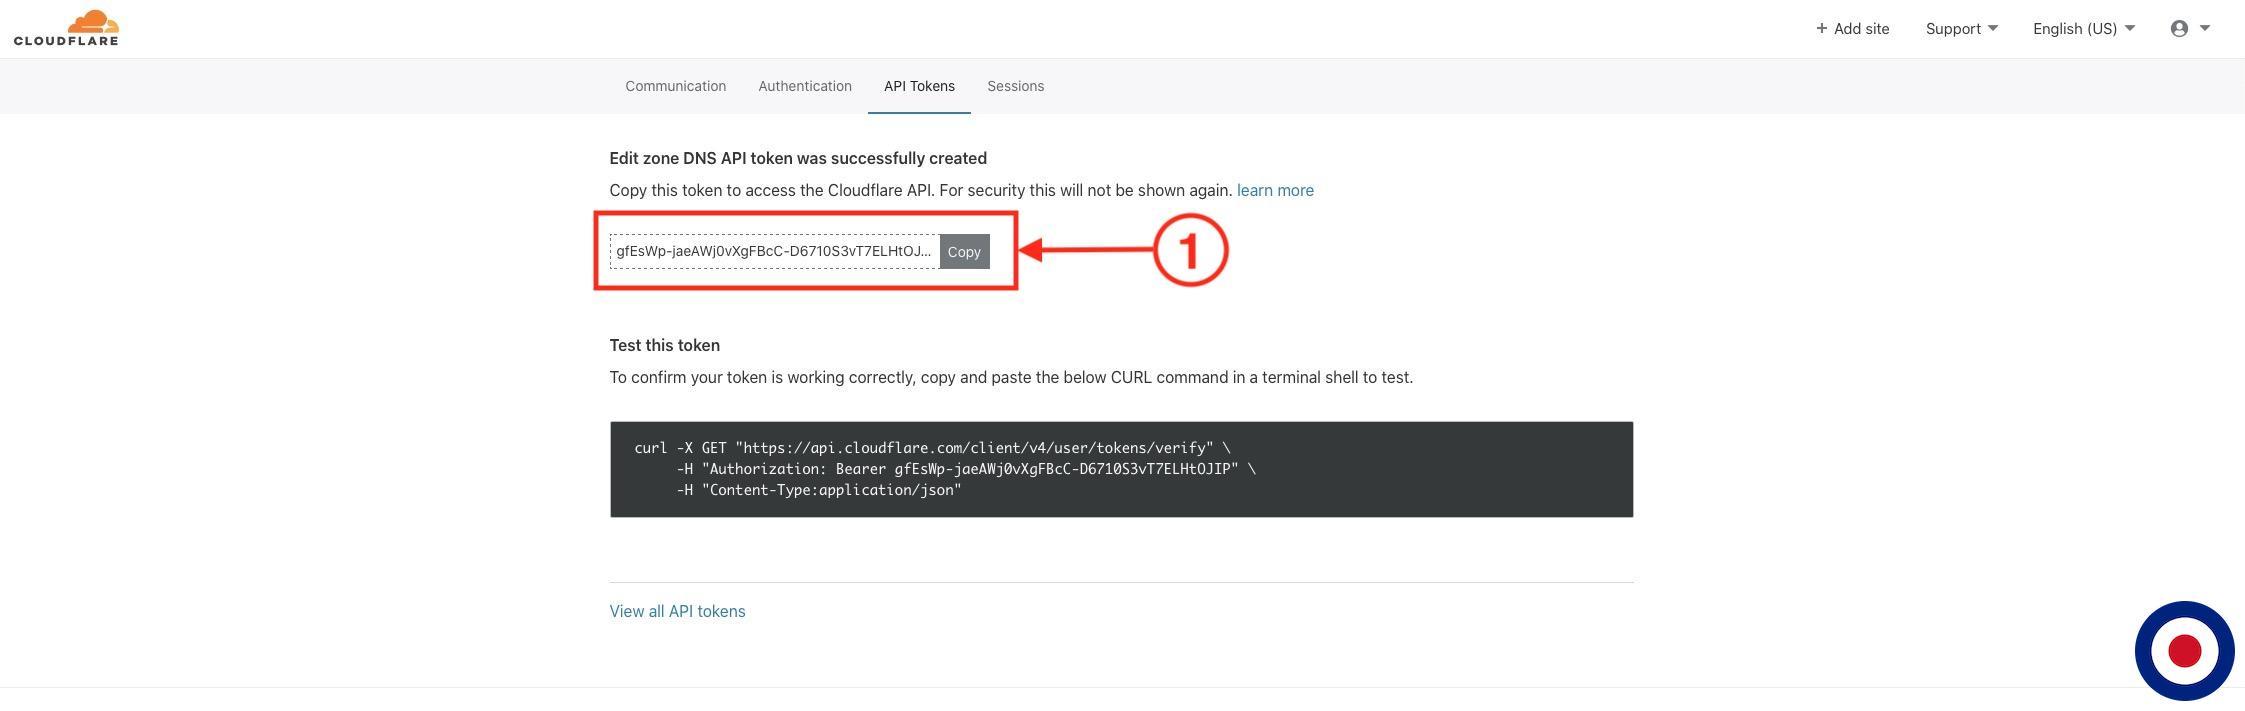
Now you will be presented with the confirmation page confirming the API Token has been successfully created and showing you the Cloudflare API Key that allows access to your Cloudflare account to manage your DNS records. This API Token will only be displayed once, therefore it is important that you make a note of the token and retain it in a safe place. We will require the API Token later to setup the DAFlare plugin.
Important
Your API Token is VERY IMPORTANT as it would allow someone the ability to add, edit or even remove DNS records from your Cloudflare account. It is VERY IMPORTANT that you keep the API Token protected and in a safe place, in the same way you would an account password. If you believe that this token has been compromised or lost, you will need to regenerate a new one which will also invalidate your current token.
If you have forgotten your current API Token you will need to regenerate (or roll as it termed by Cloudflare) a new one. You can do this from the API Tokens dashboard. Next to your existing API Token you will see a grey box with three little dots. Click the grey box and a menu will appear which will enable you to regenerate (roll) a new API Token by clicking the Roll option. You can also Edit your existing API Token if you needed to amend your server IP address or addresses that you had previously entered.
That’s it. You have successfully setup a new DNS API Token in your Cloudflare account that will enable DirectAdmin to create, manage, edit or delete DNS records automatically using your Cloudflare account via API. Next we will need to install and setup the DAFlare plugin.
Install & Setup DAFlare Plugin
Now that we have created the DNS API Token and noted the Cloudflare nameservers that will be used for your domain DNS records, we can now install and setup the DAFlare plugin in DirectAdmin. The DAFlare Plugin is available to download from the DAFlare website. The plugin was written by Paul Jones (pjjonesnz) who originally released it as a script on GitHub. This has now been deprecated as he has moved all the existing features and added new ones into this plugin.
At this time the plugin comes in one version – Standard. The standard version is ideal if you run your own server with your own accounts or manage accounts for others. Paul, is currently developing a Pro version of DAFlare which will enable multiple individual users to add their own Cloudflare accounts and manage their own settings from their individual user accounts. The Pro version is ideal if you run your server for others such as a web hosting business. Once the Pro version is released we will update this guide to include the Pro version features.
Note
This guide is compatible with all of the current retail licences offered by DirectAdmin; Personal, Lite or Standard. However, at this time we do not recommend you use this guide to install within a paid hosting environment as the plugin is currently only configurable by the server administrator and extra Cloudflare accounts can only be assigned by the administrator on a domain by domain basis.
After you have added the plugin to your basket and completed the checkout process (which is only your name and email address) you will receive a link to download the plugin which will come in a .tar.gz file and is ready to upload to DirectAdmin.
Install DAFlare Plugin
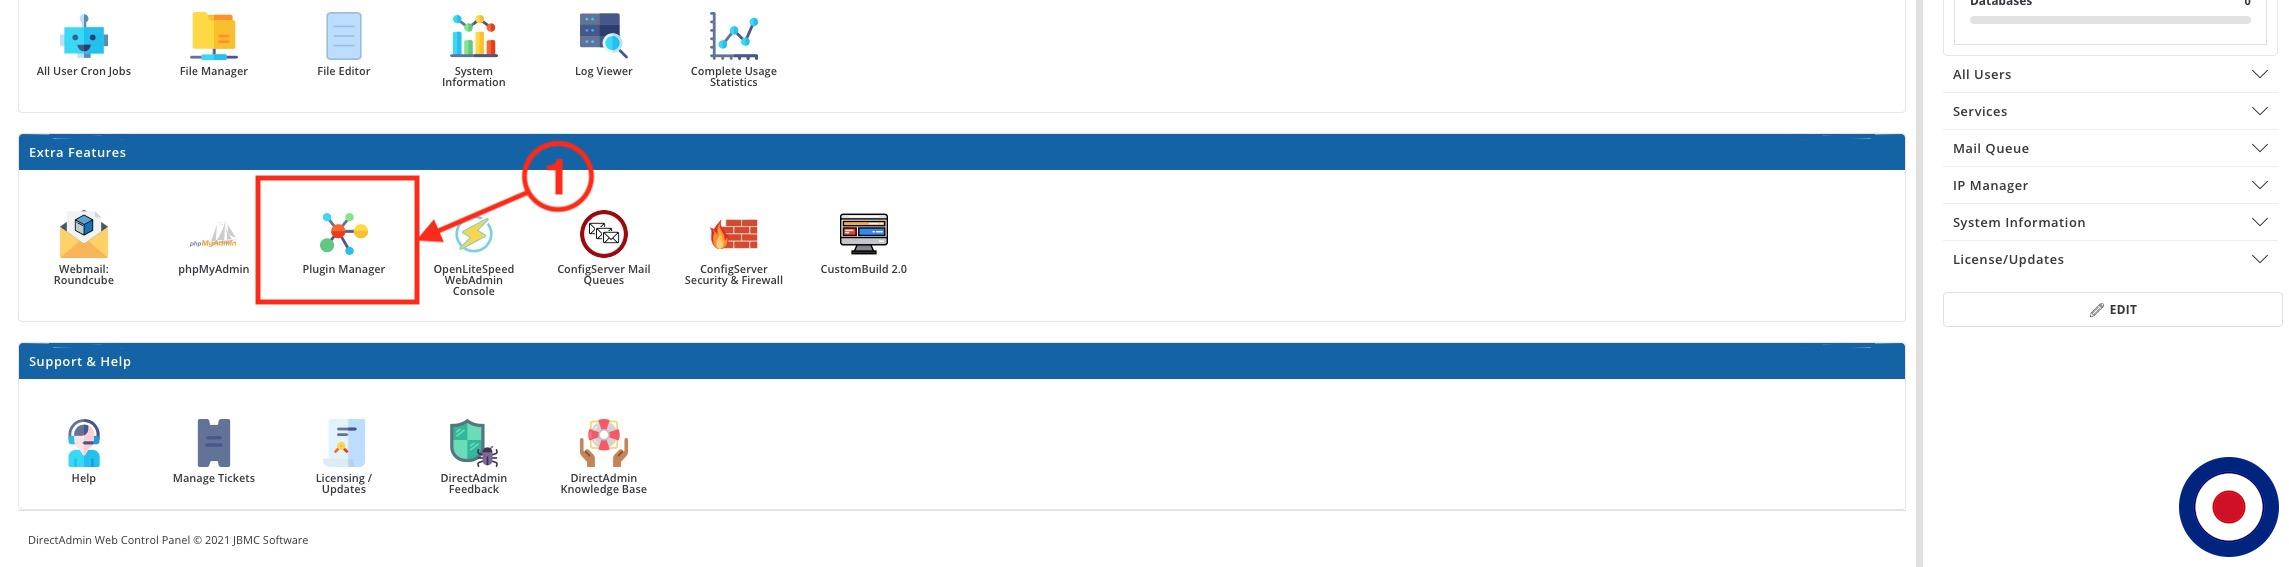
To add a plugin to DirectAdmin we will use Plugin Manager. These steps will need to be completed using the Admin user level. Select the Plugin Manager icon from the Extra Features section.
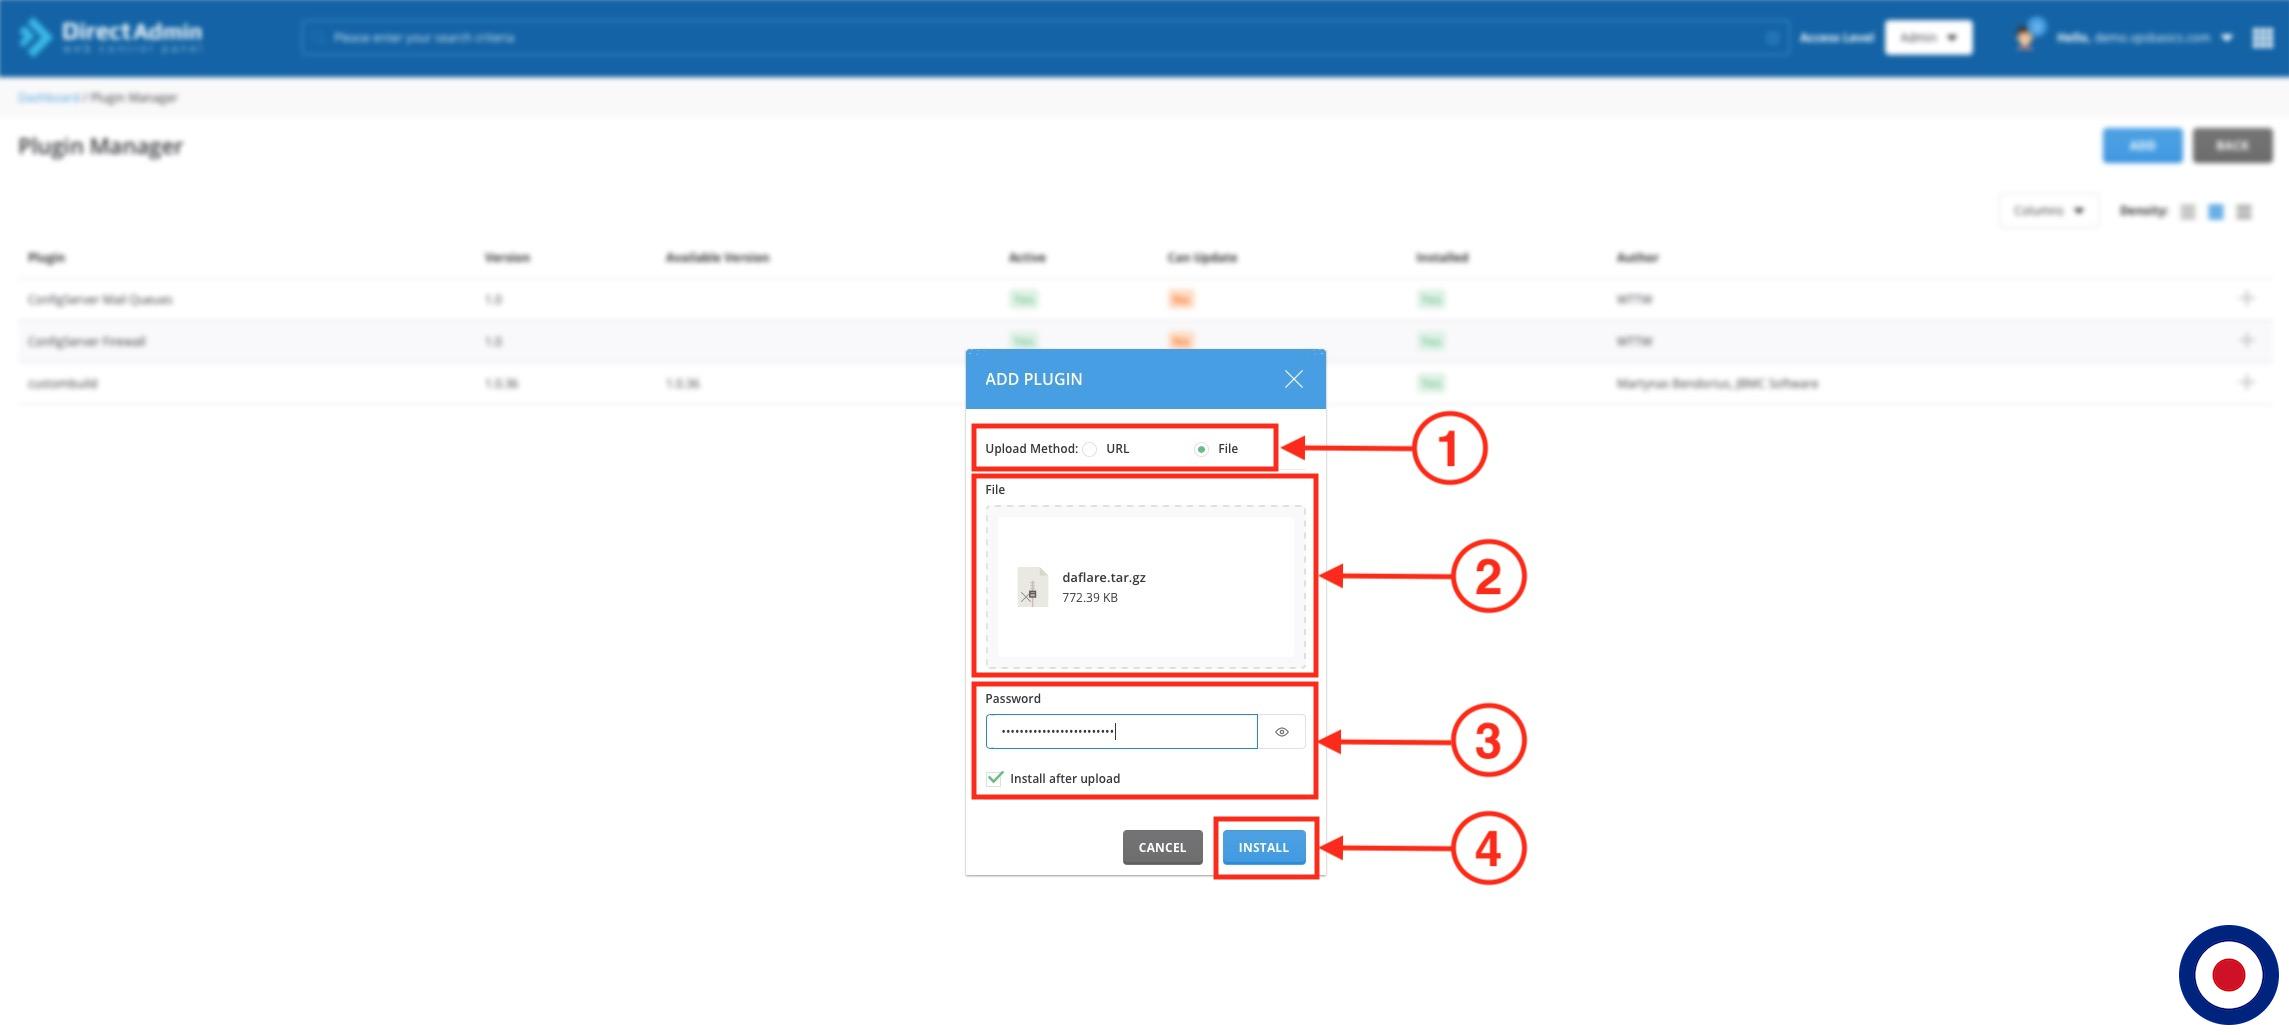
In the Plugin Manager dashboard you can install a new plugin by selecting the Add button in the top right of the screen.

This will open the Add Plugin modal which will enable you to upload and install a plugin by entering in the URL to the file or by uploading a previously downloaded .tar.gz file. As we have already downloaded the plugin .tar.gz file locally we will add the plugin using the upload option. Select the radio button next to File which will allow you to either drag and drop or locate the file into the modal window. Now enter your DirectAdmin admin user password and make sure that the Install after upload box is ticked. Once you have completed this select the Install button.
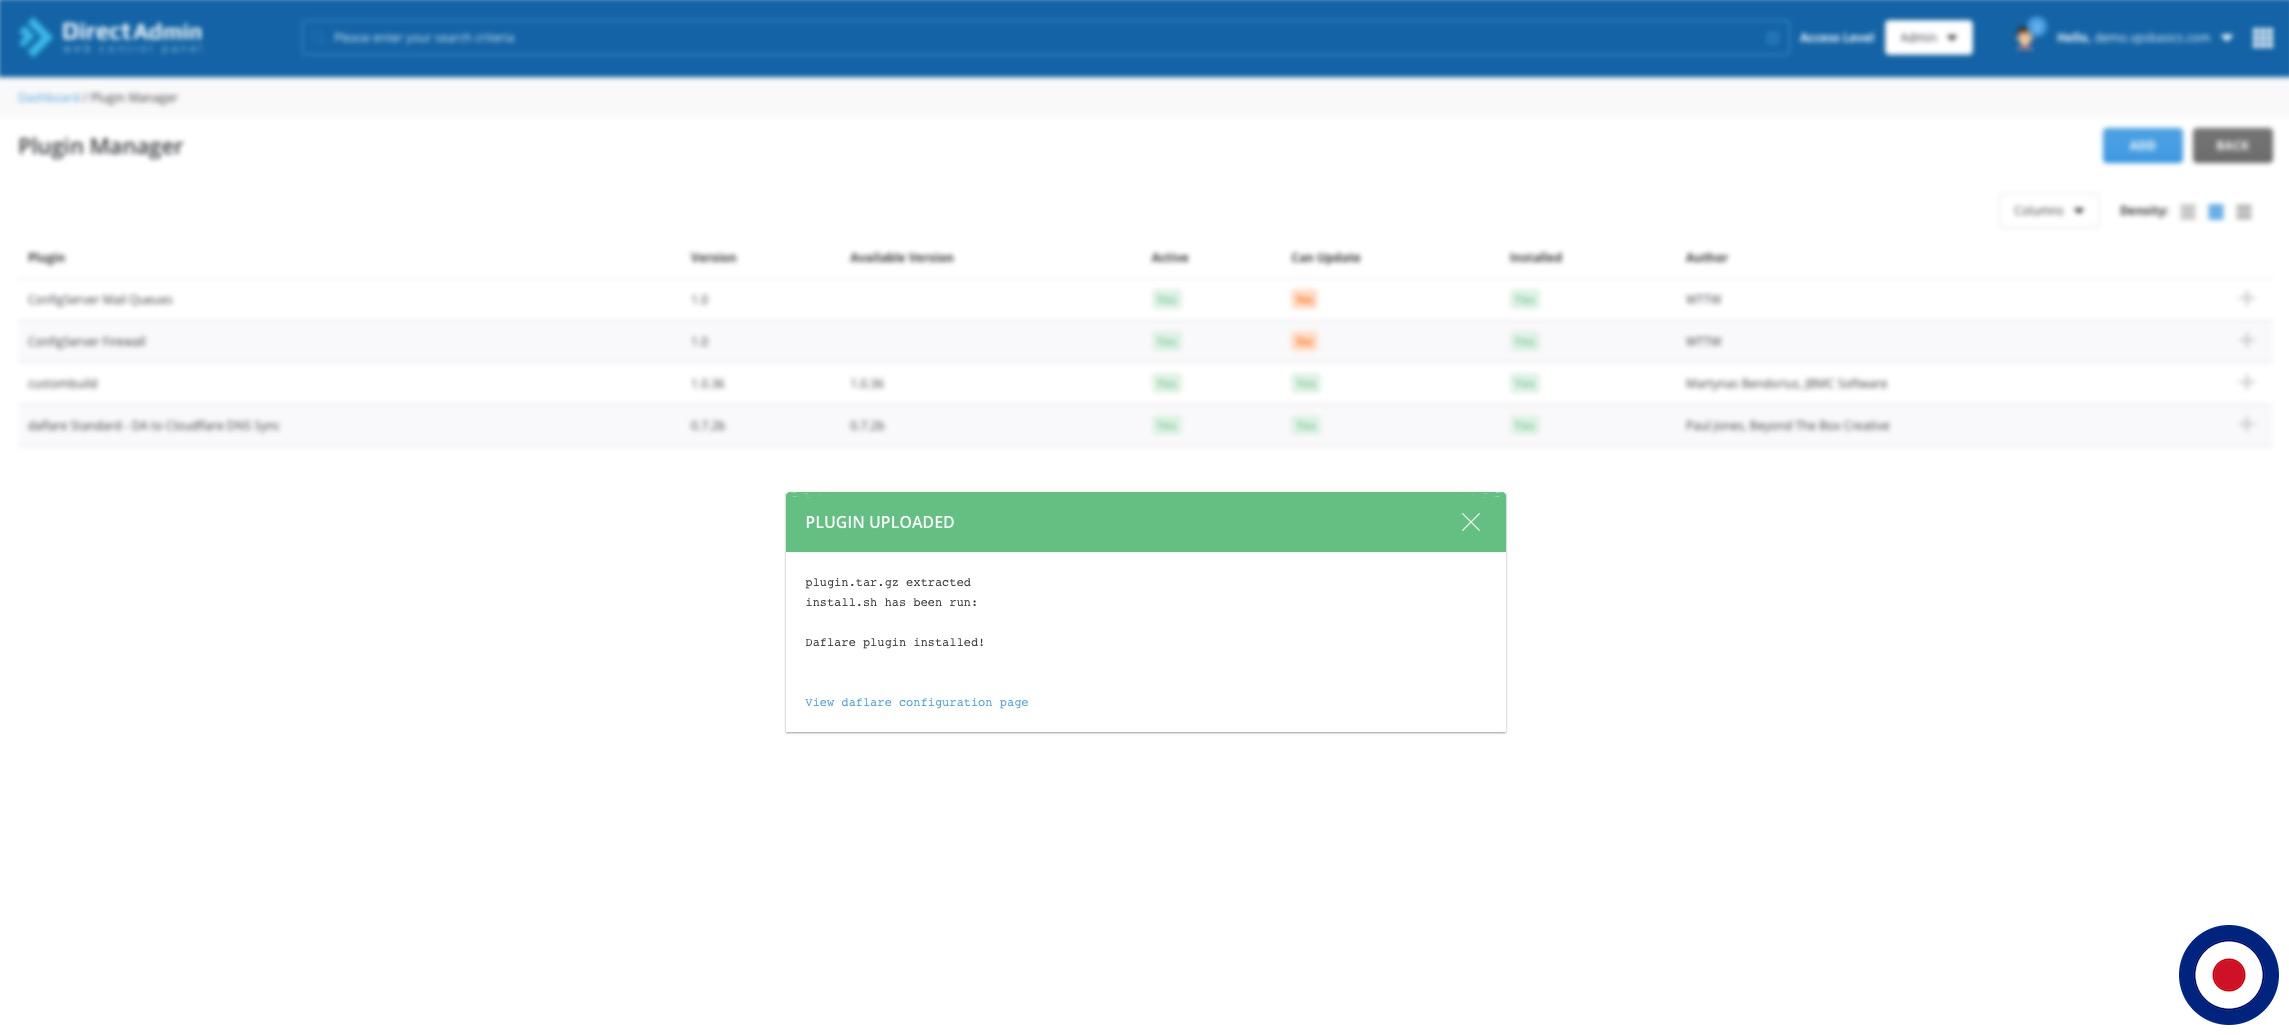
Once the DAFlare plugin has been install you will be notified that the plugin.tar.gz file has been extracted, install.sh has been run and the Daflare plugin has been installed.
If you used our previous guide to install the script from GitHub you will receive an error message when trying to install the DAFlare plugin. This is because you still have the da_Cloudflare_dns_sync files installed on your server along with the custom dns_write_post.sh file.
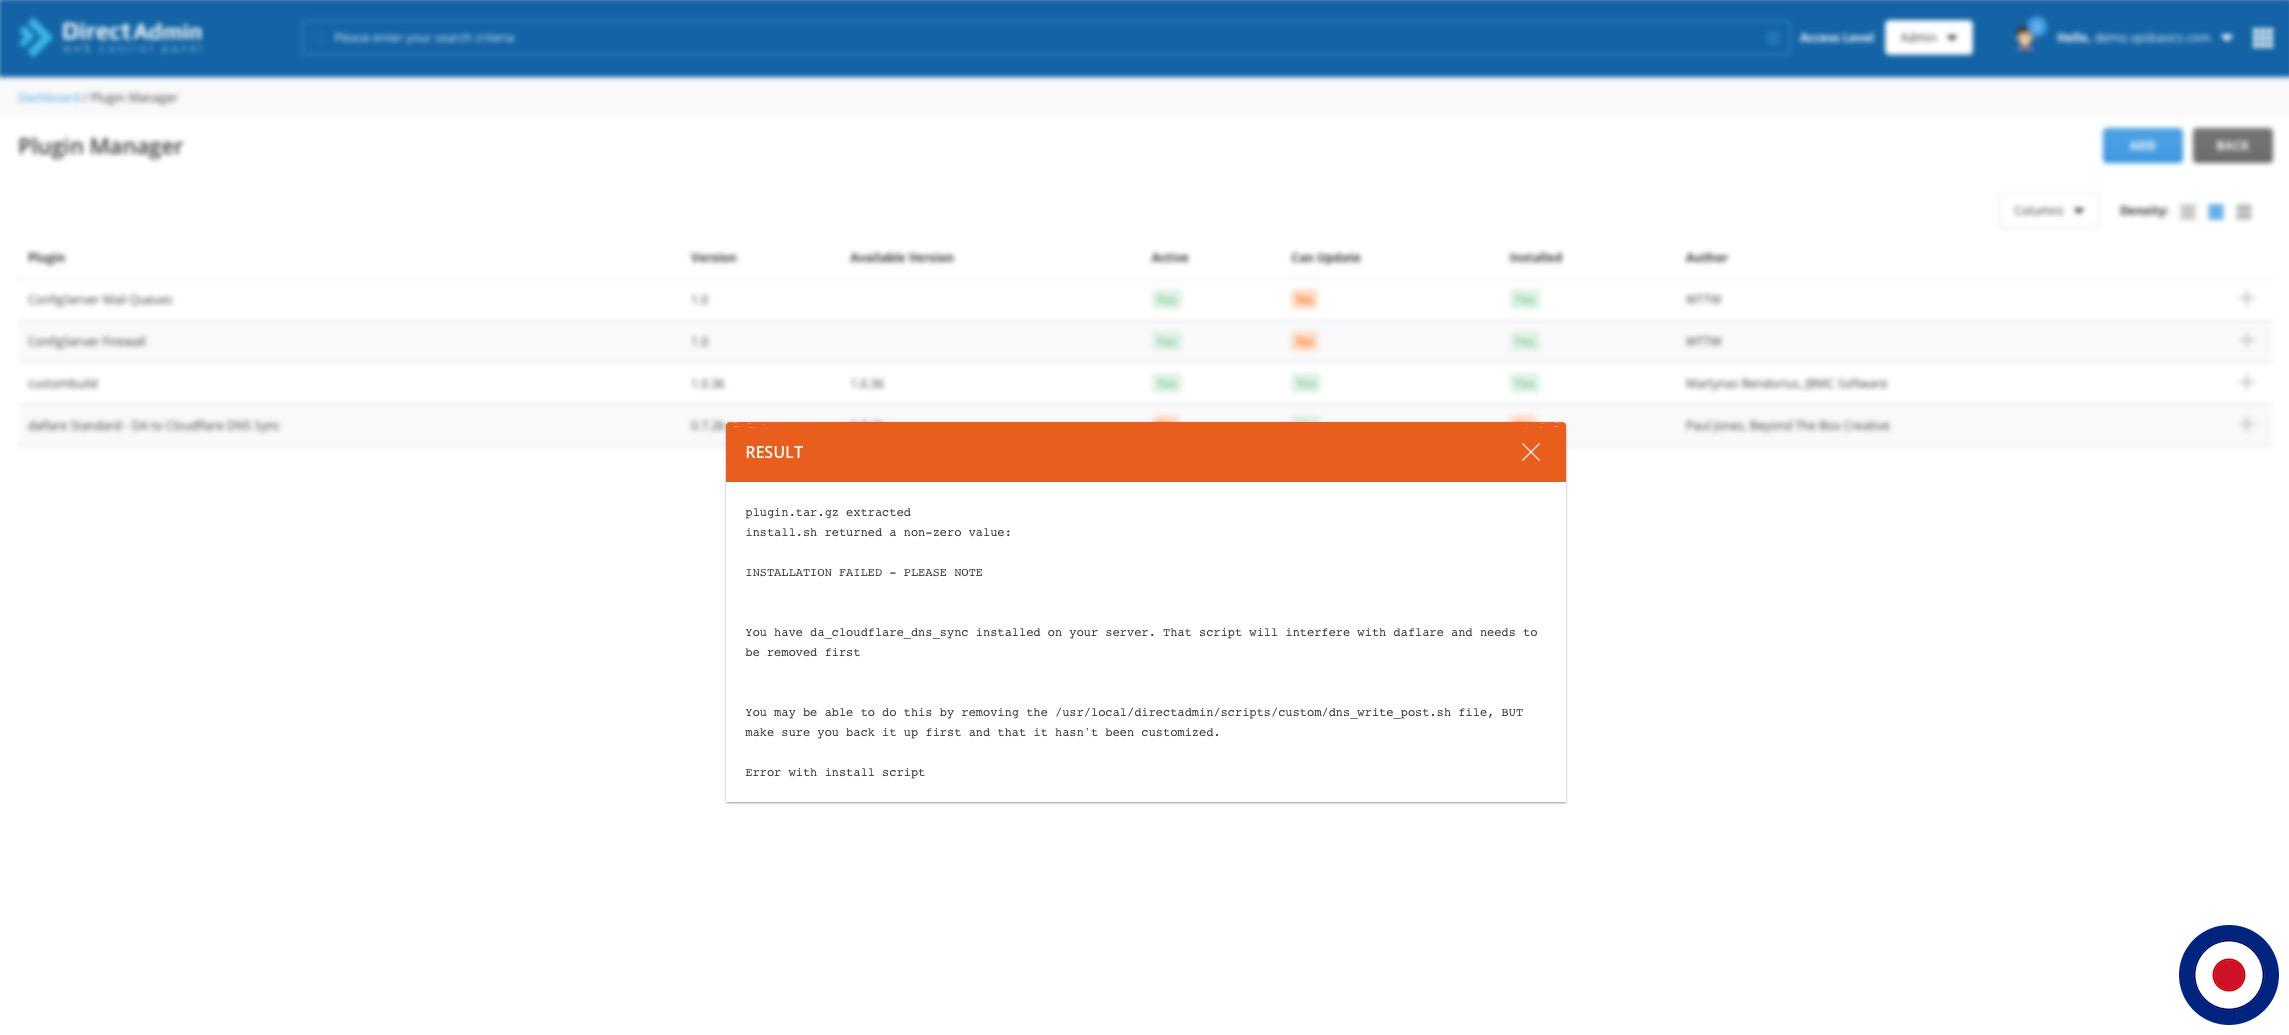
To fix the issue simply log into your server using the command line (SSH) and enter the following commands.
mv /usr/local/directadmin/scripts/custom/dns_write_post.sh /usr/local/directadmin/scripts/custom/dns_write_post.sh.bak
rm -rf /usr/local/directadmin/scripts/custom/da_cloudflare_dns_sync && rm -rf /usr/local/directadmin/scripts/custom/directadmin_cloudflare_dns
You will notice that we have renamed the original custom dns_write_post.sh file to a backup file called dns_write_post.sh.bak. This is just a preventative measure in case you had made further modifications to this file and will enable you to copy them back once we have finished the installation of DAFlare. If you are sure no modifications have been made to your custom dns_write_post.sh file you can safely delete it using the following command and confirming you wanted to delete the file.
rm /usr/local/directadmin/scripts/custom/dns_write_post.sh.bak
Now install the plugin again using the Plugin Manager dashboard.
That’s it. The DAFlare plugin has been successfully installed to your DirectAdmin server. Now we will need to setup and configure the DAFlare plugin and enable communication between your DirectAdmin server and your Cloudflare account using the DNS API Token.
Setup DAFlare Plugin
Now the DAFlare plugin has been successfully installed, we need to setup the plugin default settings to enable communication between your DirectAdmin server and your Cloudflare account using the DNS API Token we setup earlier. We will start by selecting the DAFlare icon under the Extra Features section.
![]()
In the daflare – Sync DNS to Cloudflare dashboard you will have two options, you can either Edit Admin Defaults or Add New Domain Configuration. The Edit Admin Defaults option allows you to edit the settings that will be applied across all domains hosted by the DirectAdmin server. The Add New Domain Configuration option will enable you to override the default admin configuration for an individual domain hosted on the DirectAdmin server.
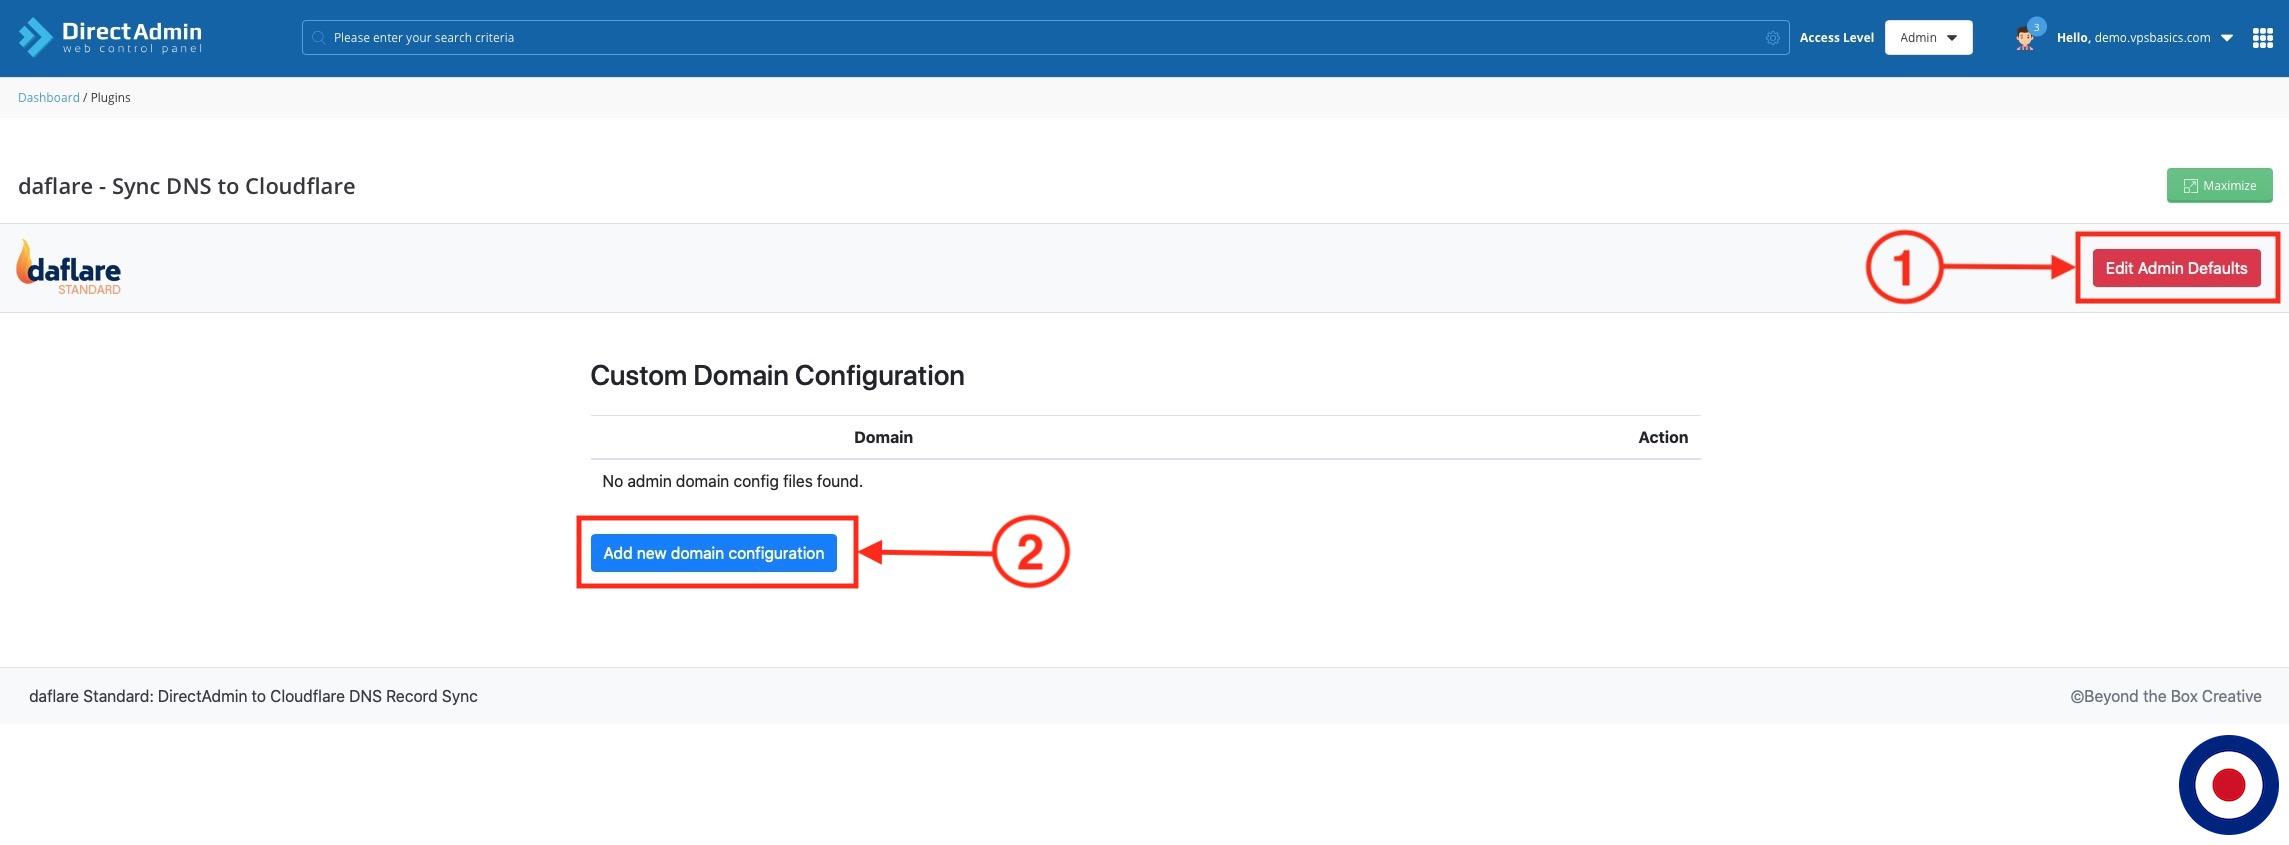
Edit Admin Defaults
To adjust the admin default settings, select the Edit Admin Defaults button in the top right of the dashboard. From the Admin Defaults dashboard you can adjust the different domain synchronisation settings, setup Cloudflare proxy defaults and proxy override options for A, AAAA and CNAME records.
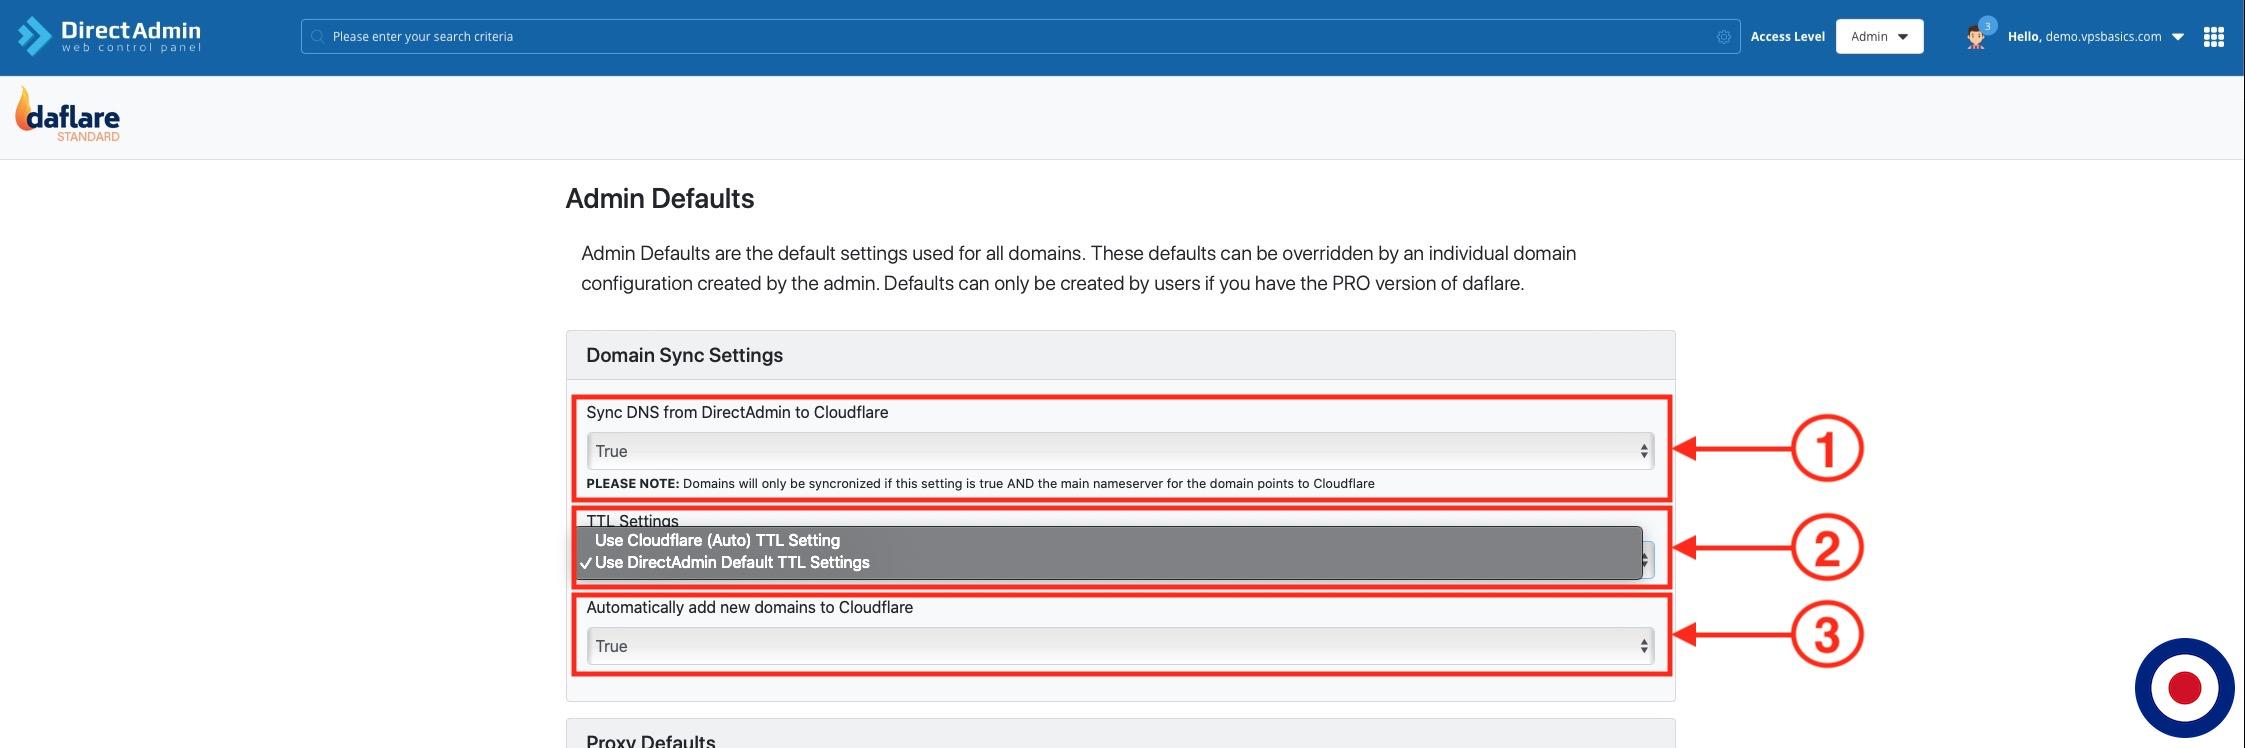
The different options in the Domain Sync Settings section are:
- In the Sync DNS from DirectAdmin to Cloudflaresection, you can automatically choose whether to sync DNS records from your DirectAdmin server to your Cloudflare account by setting either True or False. If this is set to True the Cloudflare nameservers must be set in the domains DNS record in DirectAdmin.
- In the TTL Settings section, you can choose the DNS Time To Live (TTL) setting by selecting either the DirectAdmin Default TTL which is 3600 seconds (1 hour) or use Cloudflare Default TTL which is 300 seconds (5 minutes). If you wanted to change the Default TTL for every domain on your DirectAdmin server you can use the
/usr/local/directadmin/directadmin set default_ttl 300command and thenservice directadmin restart. This will set the Default TTL to 300 seconds, you can adjust this to your preferred time in seconds by changing the number afterdefault_ttl. For an individual domain you can adjust this from the DNS Administration dashboard in DirectAdmin. - In the Automatically add new domains to Cloudflare section, you can choose whether or not to automatically add new domains to your Cloudflare account by choosing either True or False.
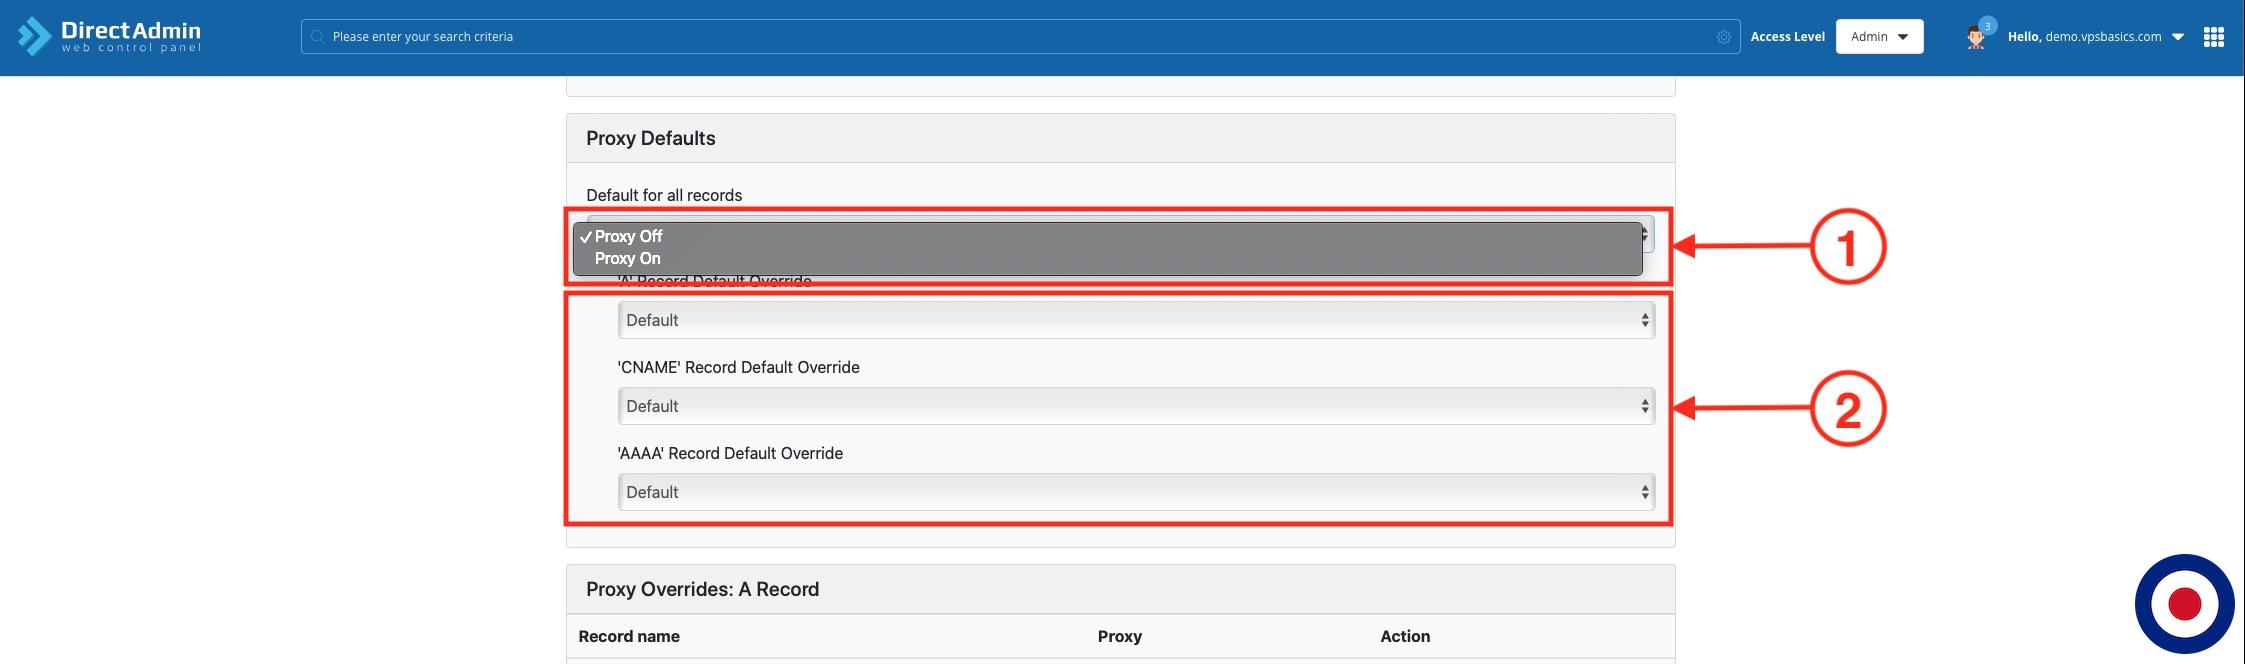
The different options in the Proxy Defaults section are:
- In the Default for all records section, you choose whether to automatically set DAFlare to proxy all A, AAAA and CNAME DNS records when adding them to Cloudflare by setting Proxy On. When you enable the proxy option with Cloudflare, it will redirect all traffic through Cloudflare servers and will show an orange cloud icon next to your DNS record. If you have choose the Proxy Off option, it will be disabled in your Cloudflare account and a grey cloud icon will show next to your DNS record.
- The Record Default Override section, if you didn’t want to proxy all A, AAAA and CNAME DNS records automatically through Cloudflare but only wanted to proxy all A and AAAA DNS records you can change the option from Default to Proxy On next to the corresponding override.
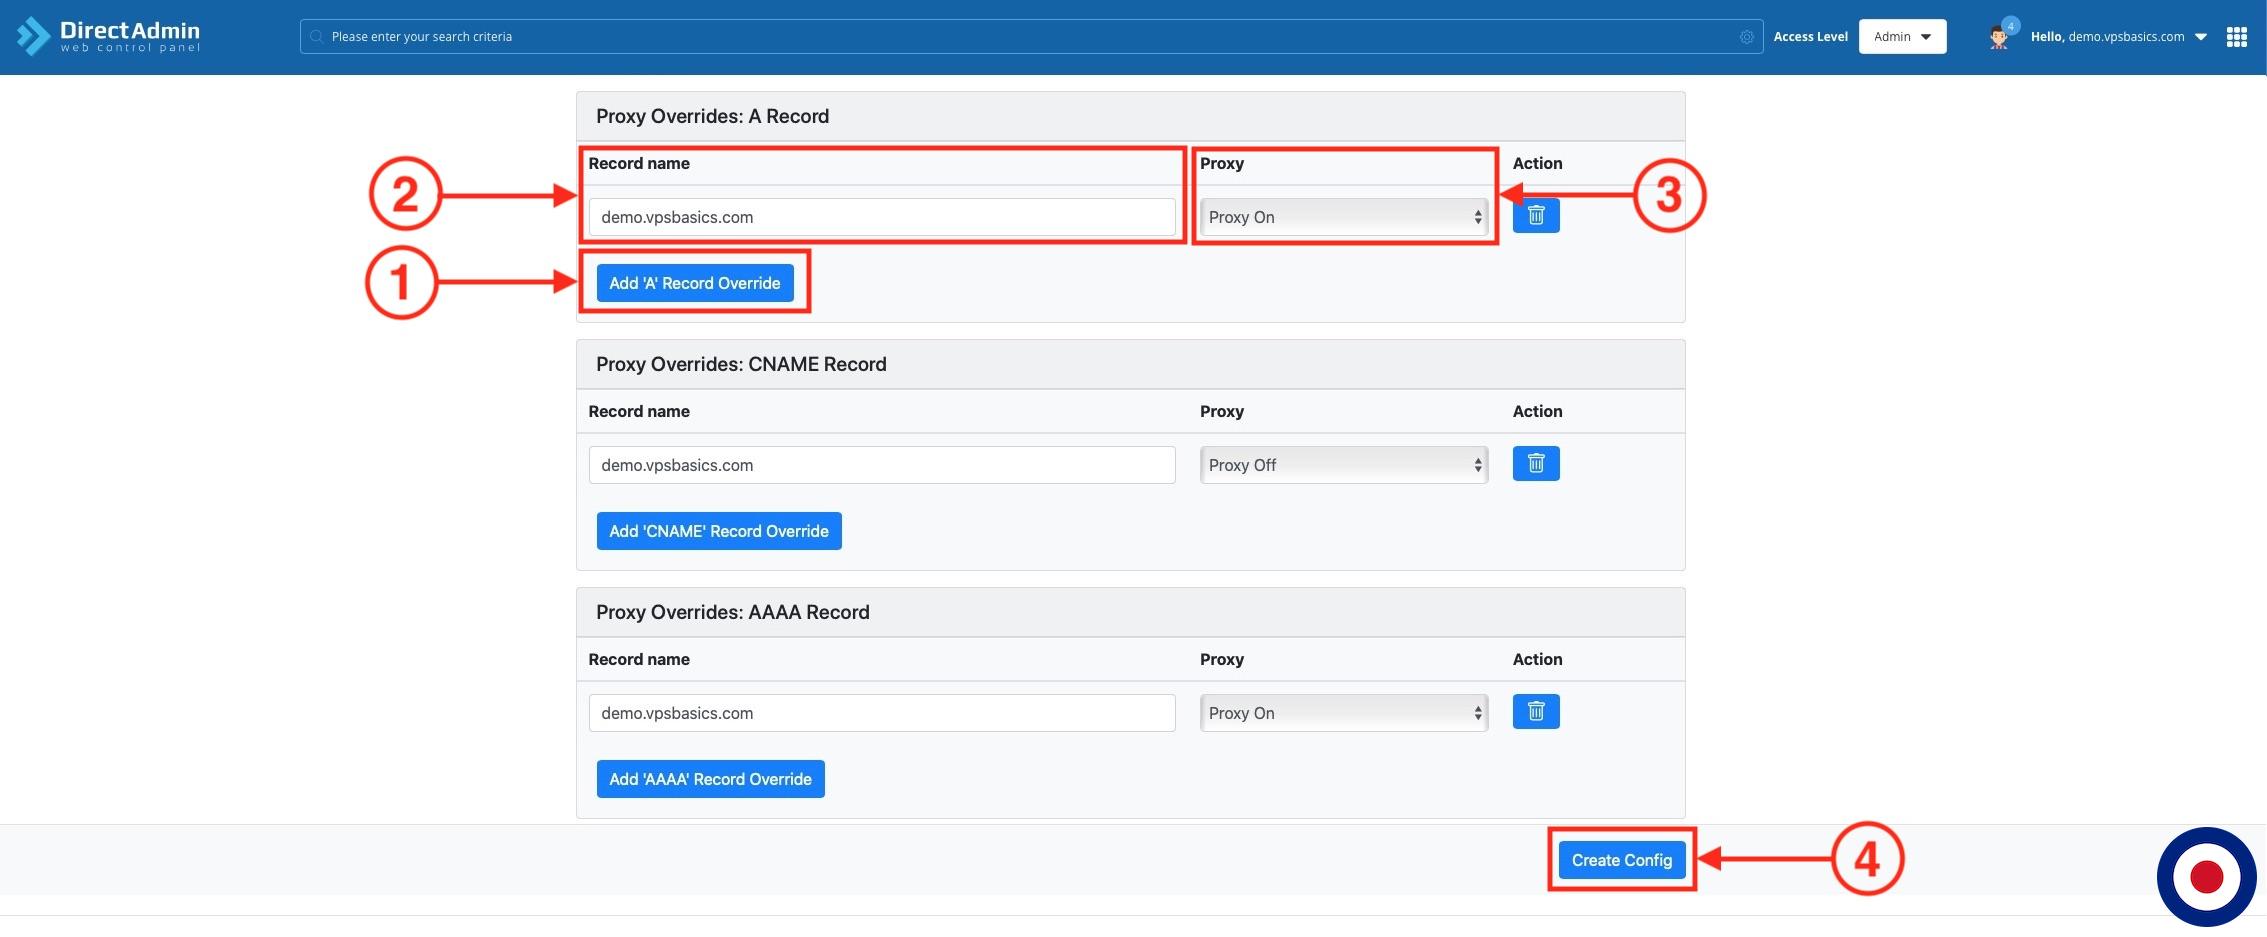
The Proxy Overrides sections enables you to add individual DNS zones to enable proxied A, AAAA and CNAME DNS records through Cloudflare. For example, if you wanted to add demo.vpsbasics.com to enable proxied A records only, you just need to add demo.vpsbasics.com to the Record name and change the Proxy setting to Proxy On and then click the Update Config button.
Now we will need to set the Admin ONLY Settings. These settings can only be added or adjust by the admin user only irrespective if you have the Standard or Pro version of the plugin.
The first section called Mode, enables you choose either Preview Mode or Live Mode. The Preview Mode will not automatically synchronise your DNS records from DirectAdmin to your Cloudflare but will log any changes to the daflare.log file. The Live Mode will synchronise any DNS records from DirectAdmin to your Cloudflare automatically when a domain has Cloudflare nameservers set and log any changes to the daflare.log file.

The next section called Shared Cloudflare Account, is where we can enable or disable sharing of the Cloudflare account, add the Cloudflare account API Token and allow or block individual users from using the Cloudflare account to manage DNS records.
- In the Shared Account Default section you can choose whether to enable sharing of your Cloudflare account with all users on the DirectAdmin server by choosing the Share the following Cloudflare account with ALL other users option or disable sharing of your Cloudflare account with all users by choosing the Do NOT share the following Cloudflare account with ALL other users option.
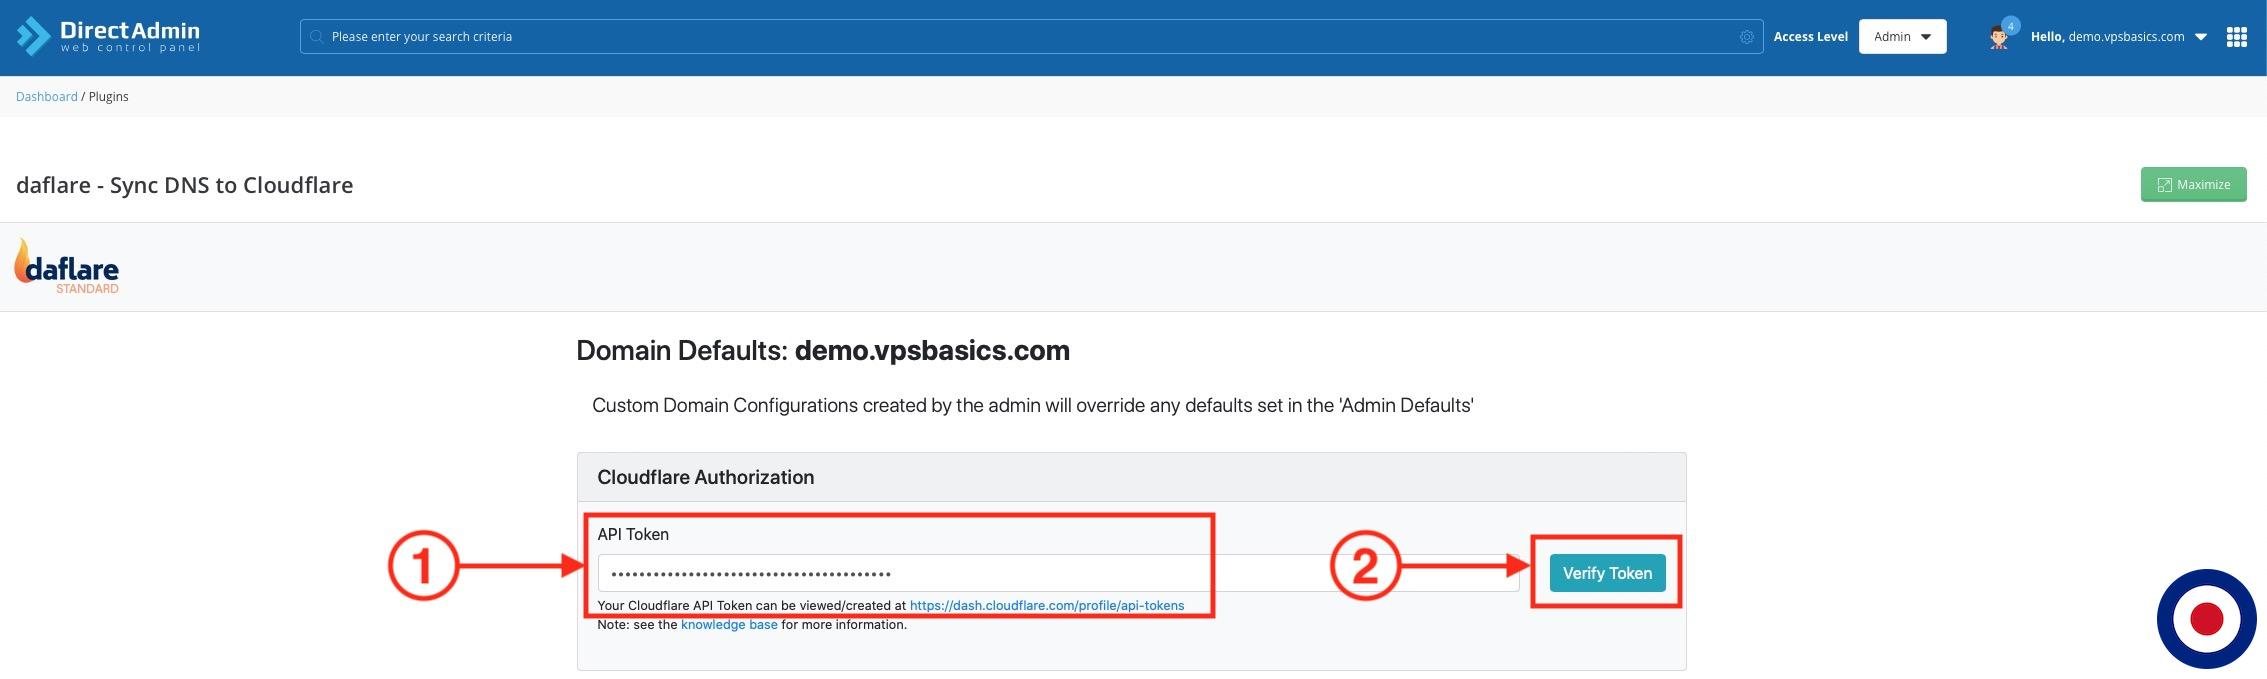
- In the Shared Cloudflare Account API Token section you will need to add your Cloudflare DNS API Token that we created earlier. If you made a note of your API Token you can copy and paste it.
- After entering your Cloudflare DNS API Token token, click the Verify Token button. If DAFlare is unable to verify the API Token with Cloudflare you will see the error message ERROR: The token is invalid. If this happens please double check that you have entered your DNS API Token correctly.
- If you have selected not to share your account with all users using the. Do NOT share the following Cloudflare account with ALL other users option, you can allow individual users by enabling this functionality in the Allow Shared CF Account for the following users section by adding the DirectAdmin account username.
- If you selected Share the following Cloudflare account with ALL other users, you can block individual users by disabling this functionality in the Block Shared CF Account for the following users section using the DirectAdmin account username.

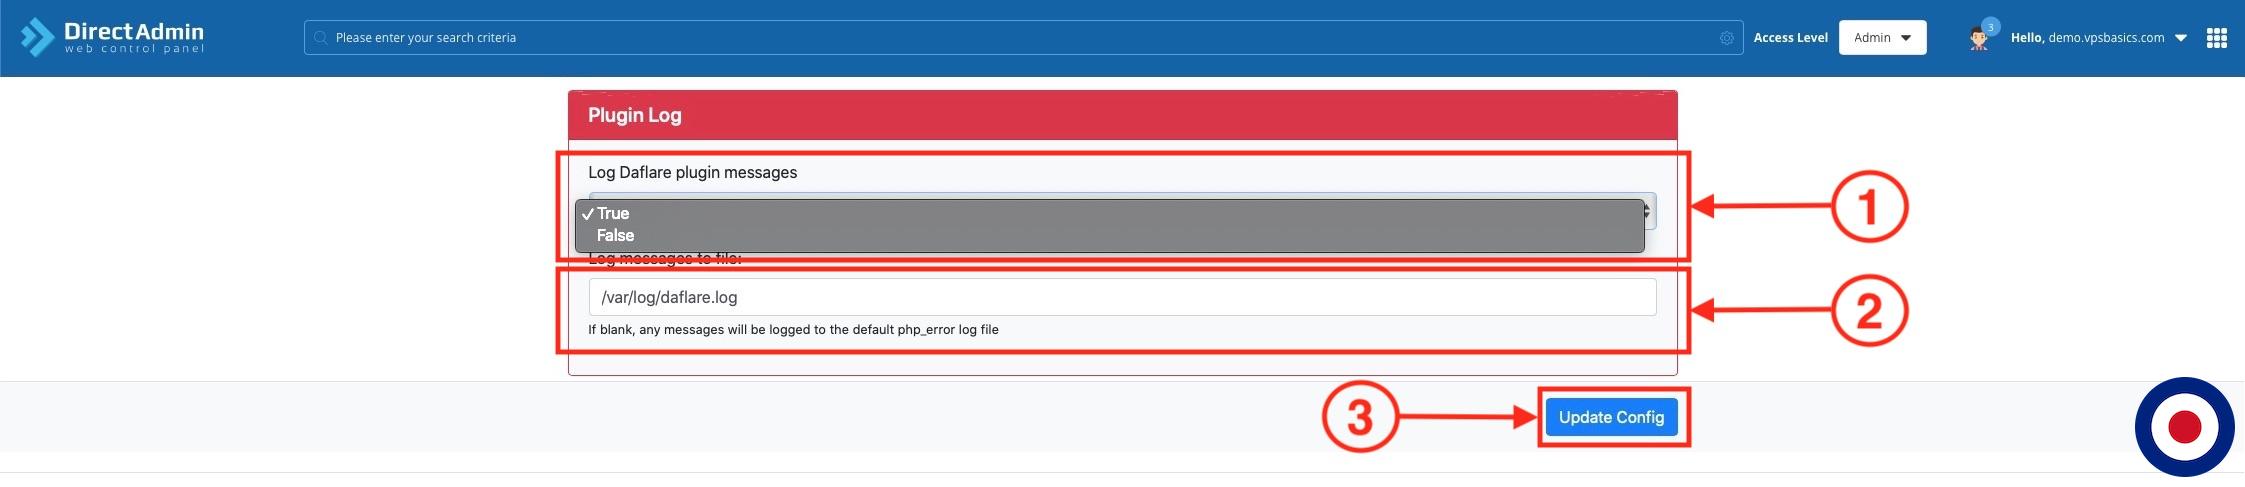
In the last section called Plugin Log, you can choose whether to enable the DAFlare log file by selecting either True or False. We would recommend that you enable the DAFlare log, so you can easily check for errors. If you wanted to change the location of the log you will need to edit the Log messages to file option. Once you finished editing the Admin Defaults click the Update Config button to confirm your options.
Currently the only way you can view the DAFlare log is via the command line (SSH) using either the less /var/log/daflare.log or tail -f /var/log/daflare.log depending on whether you wish to view or watch the log file. With the release of DirectAdmin v1.23.0 came the ability to edit the admin logs that are displayed in the Log Viewer in the DirectAdmin dashboard and add our own.
If you you like to view the daflare.log file directly from DirectAdmin dashboard we will need to add it to the list of logs viewable in the Log Viewer dashboard. We can add a custom log to the Log Viewer by creating a custom template of the logs.list file using the following commands.
mkdir -p /usr/local/directadmin/data/templates/custom
cd /usr/local/directadmin/data/templates/custom
cp -p ../logs.list .
Now we can access the custom logs.list file using the following command.
nano /usr/local/directadmin/data/templates/custom/logs.list
In the logs.list file you will need to add the daflare.log location and give the log a name which is displayed in the Log Viewer dashboard. Simply add the following command to the bottom of the custom logs.list file and then save it.
/var/log/daflare.log=DAFlare Log
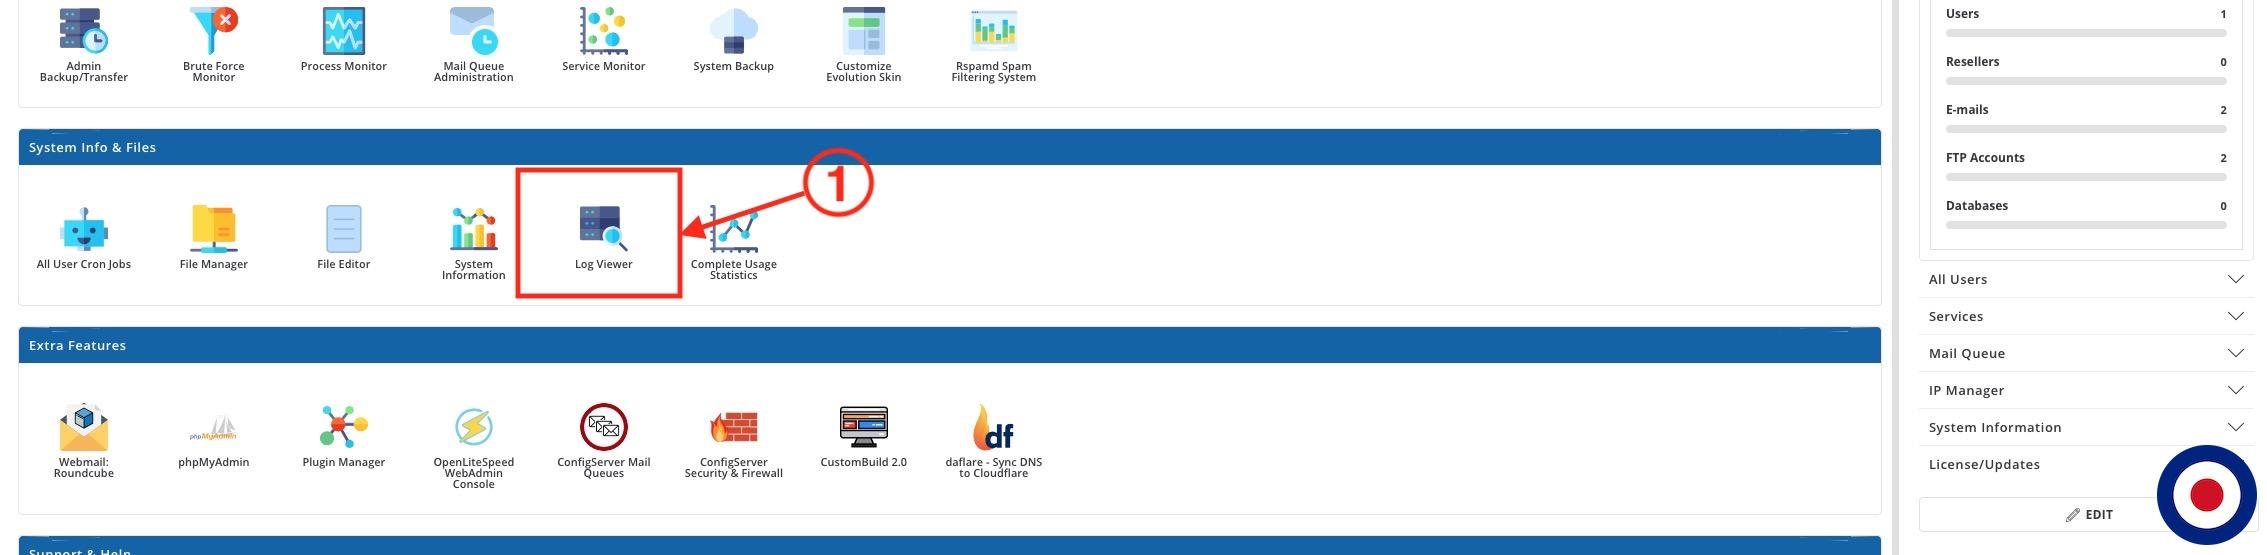
In order to view a log in the DirectAdmin dashboard we will use the Log Viewer. This option is only available on the Admin user level dashboard. Select the Log Viewer icon from the System Info & Files section.
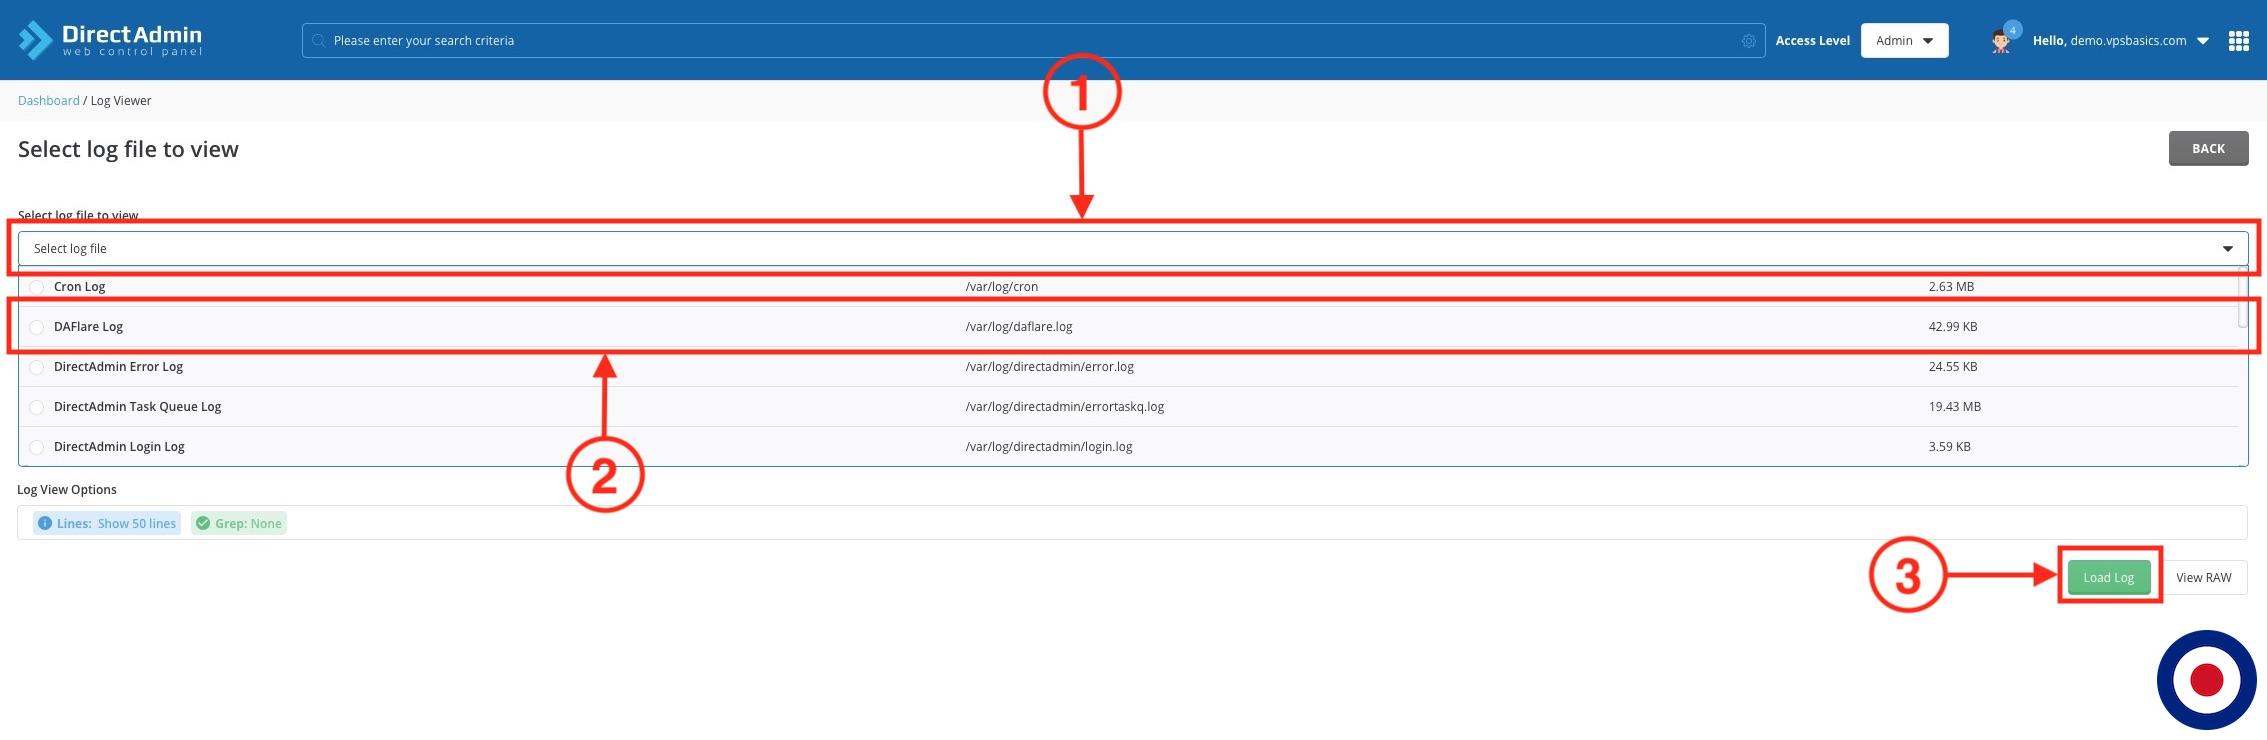
In the Log Viewer dashboard you will need to select the daflare.log file from the dropdown menu under Select log file and then click the Load Log button in the bottom right corner.
That’s it. You have successfully adjusted the default Admin Configuration used to automatically synchronise DNS records between your DirectAdmin server and Cloudflare using the DAFlare plugin. Now we show you how you can adjust the default options for an individual domain by creating a Custom Domain DNS Configuration file.
Add New Domain Configuration
The Custom Domain Configuration option allows you create different domain synchronisation settings for an individual domain by setting a custom Cloudflare API Token, override the admin synchronisation settings, proxy defaults and proxy override options for A, AAAA and CNAME records for the domain.
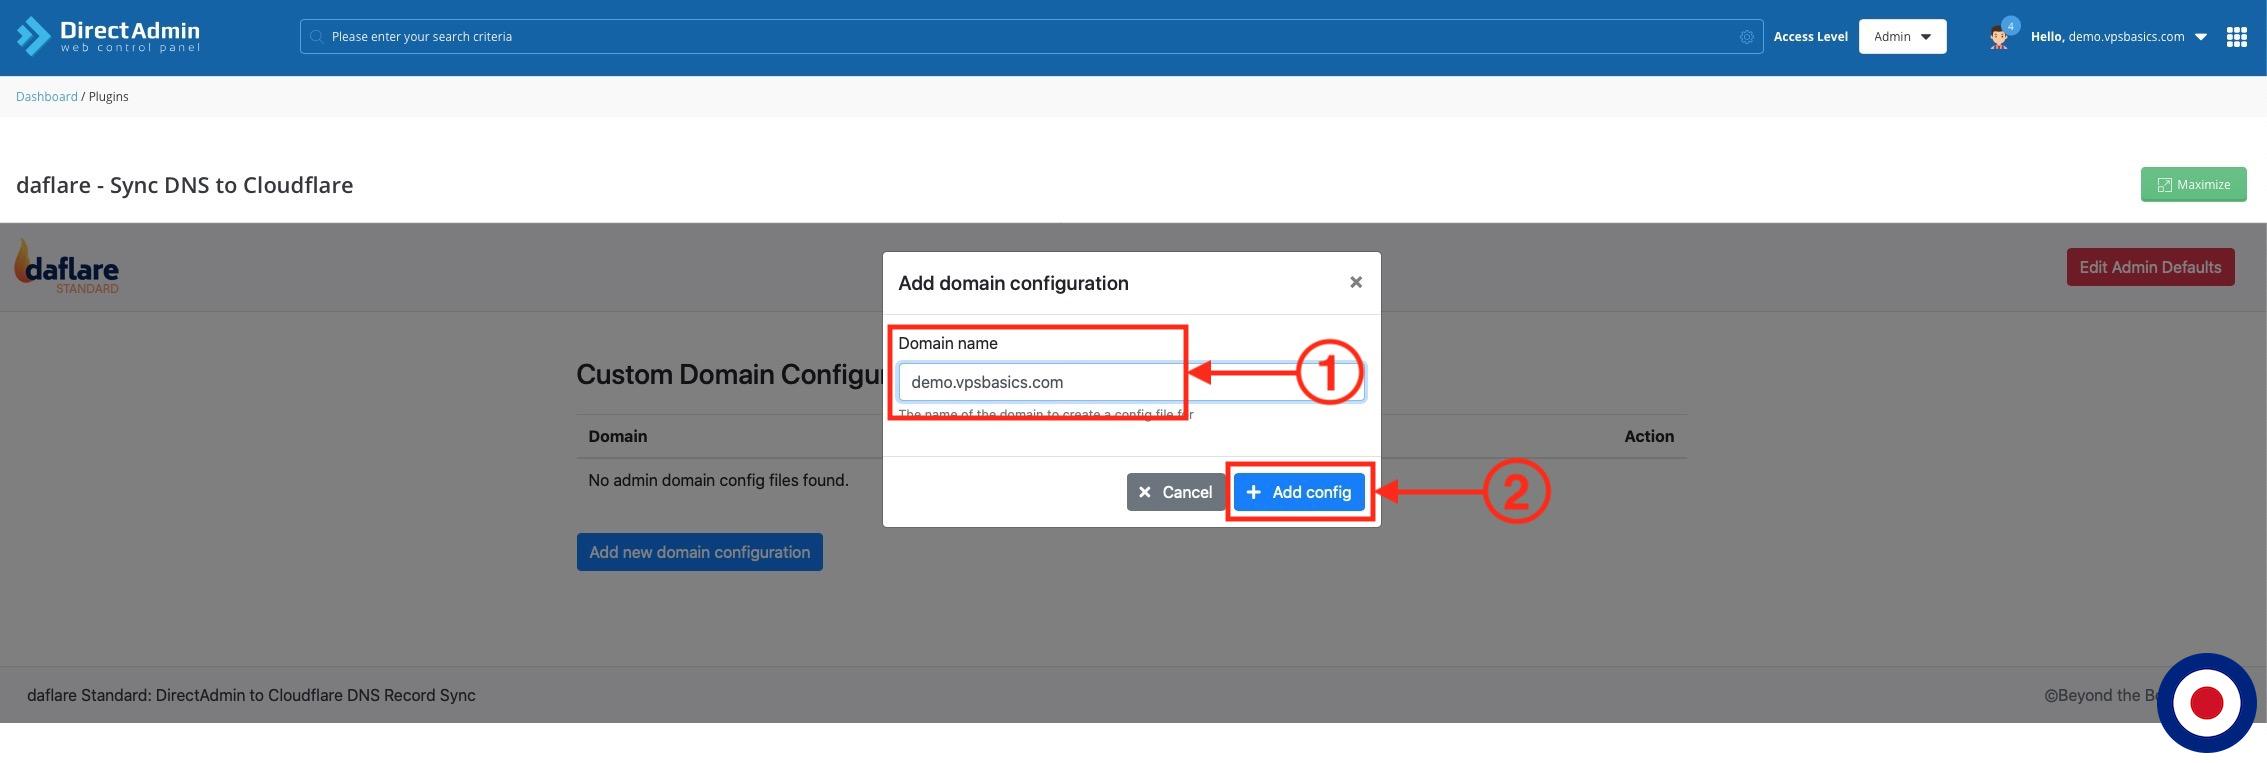
To create a custom domain configuration in DAFlare, select the blue Add New Domain Configuration button from the daflare – Sync DNS to Cloudflare dashboard which will open the Add Domain Configuration. Here you will need to enter the domain name that you want to create a custom configuration file for and then select Add Config.
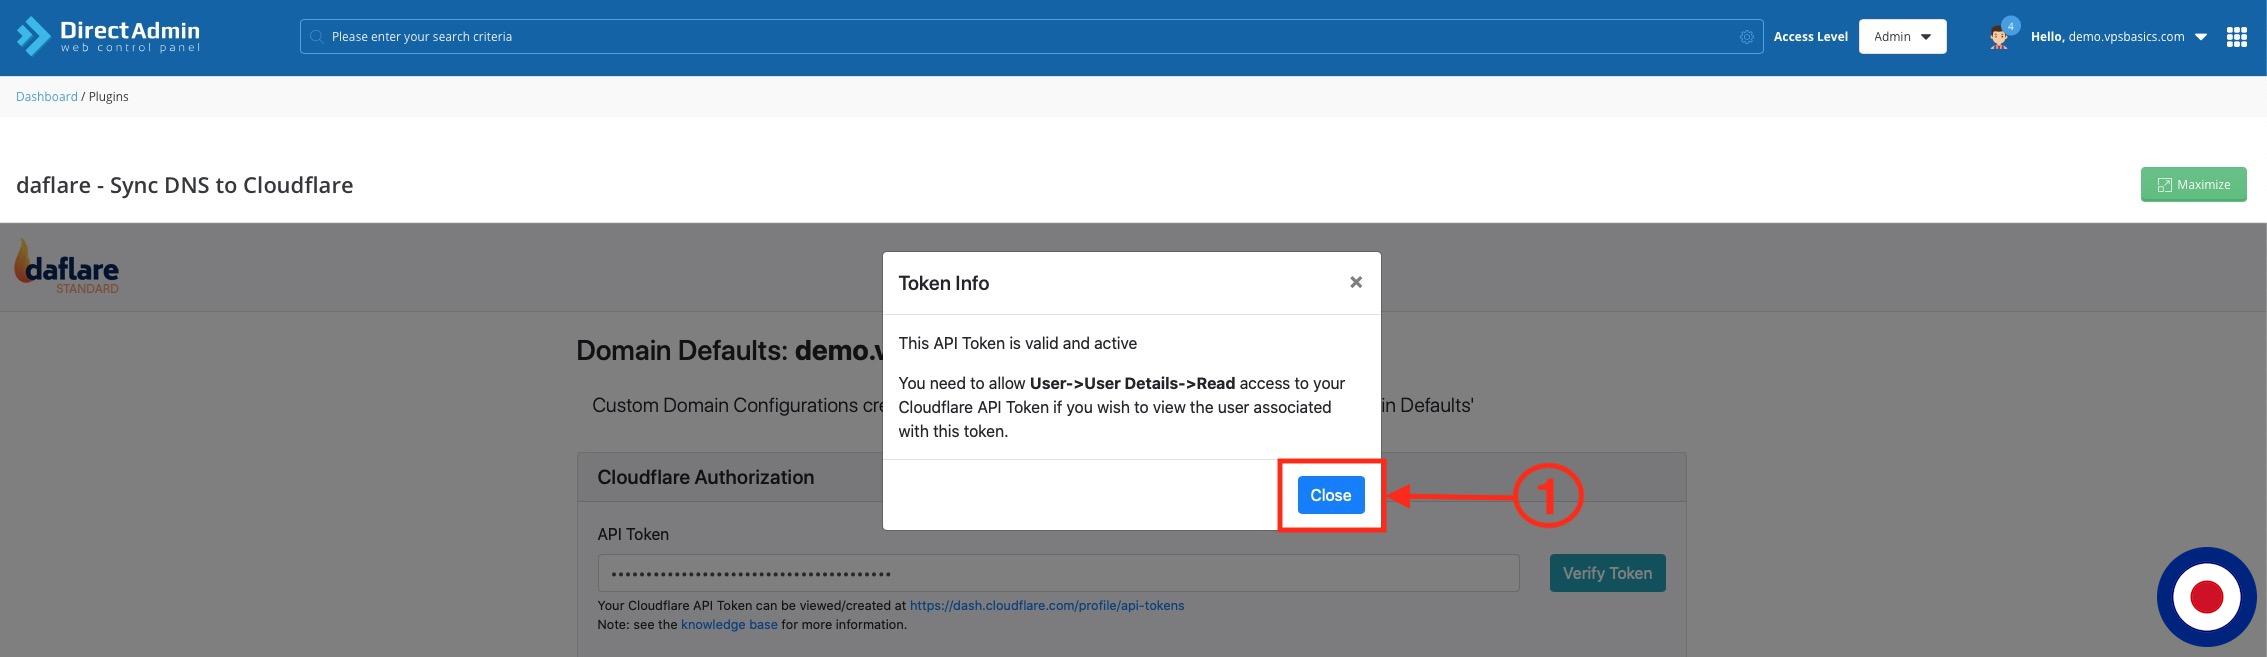
The first section allows you to configure a different Cloudflare API Token for the custom domain configuration file. If you leave the API section blank it will use the default API from the admin default options. If you want to add the DNS records to another Cloudflare account you can enter the API Token to be used on this domain only and then click the Verify Token.
If DAFlare is unable to verify the API Token you will see the error message ERROR: The token is invalid. If the API Token verification is successful you will be receive the message below. Then click the Close button to continue.
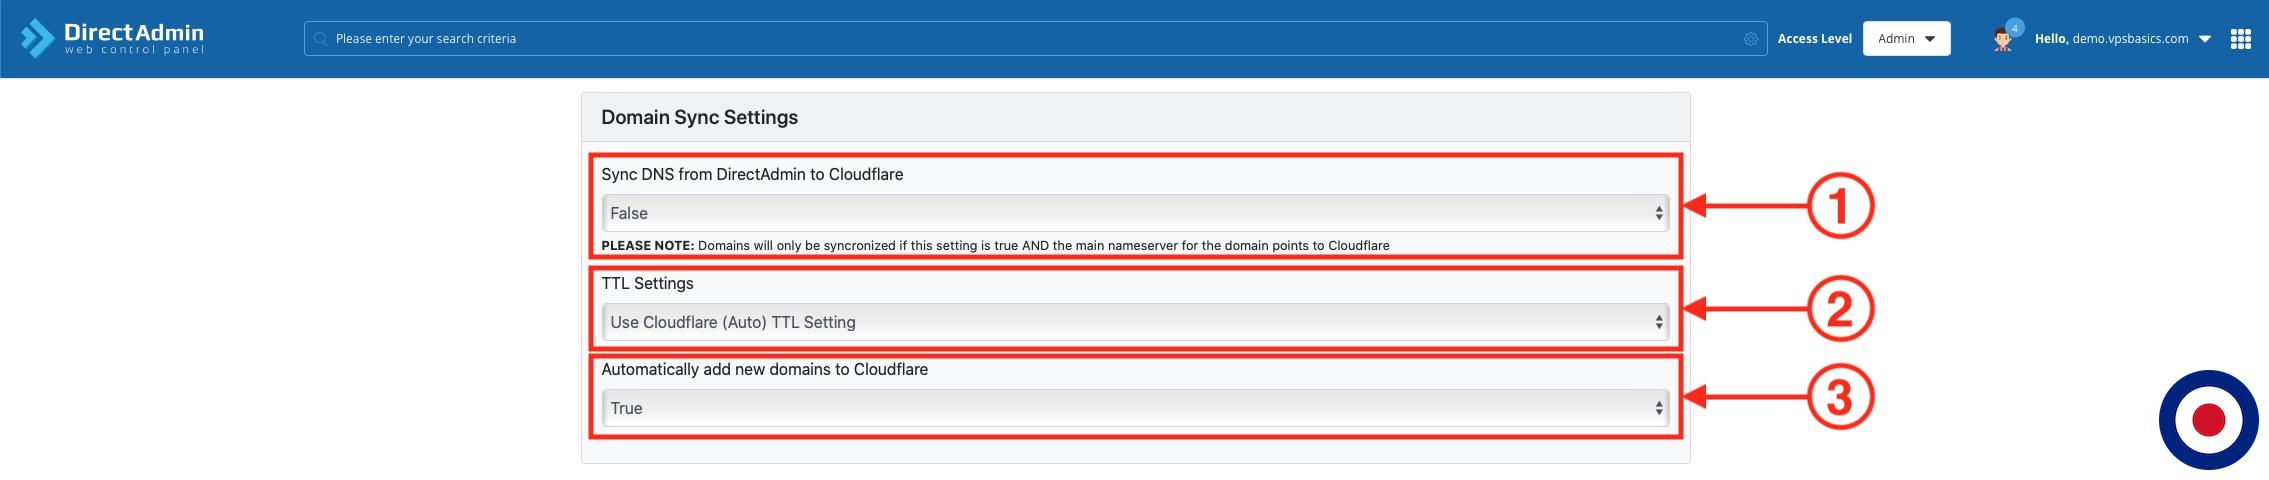
The different options in the Domain Sync Settings section are:
- You can automatically Sync DNS records from your DirectAdmin server to Cloudflare by setting either Default, True or False. The Default option will use the existing setting from the admin settings. The True option will sync your DNS records with the Cloudflare account associated with the API Token above. The False option will not sync your DNS records with the Cloudflare.
- You can choose the DNS Time To Live (TTL) setting by choosing either Default, Use Cloudflare (Auto) TTL Setting or Use DirectAdmin Default TTL Settings. The Default option will use the existing setting from the admin settings. The Use Cloudflare (Auto) TTL Setting will use the Cloudflare Default TTL which is 300 seconds (5 minutes). The Use DirectAdmin Default TTL Settings will use the DirectAdmin Default TTL which is 3600 seconds (1 hour). You can adjust the DirectAdmin Default TTL for this domain from the DNS Administration dashboard in DirectAdmin.
- You can choose whether to automatically add new domains to Cloudflare setting by choosing either Default, True or False. The Default option will use the existing setting from the admin settings. The True option will automatically sync the DNS records of any new domains with the Cloudflare account associated with the API Token above. The False option will not sync the domain DNS records with the Cloudflare.
The different options in the Proxy Defaults section are:
- You can automatically set DAFlare to proxy all A, AAAA and CNAME DNS records with Cloudflare for the custom domain configuration by setting either Default, Proxy Off or Proxy On in the Default for All Records section. The Default option will use the existing setting from the admin settings. The Proxy Off option not enable the proxy option with Cloudflare and set Cloudflare to serve only DNS records as well as showing an grey cloud icon next to your DNS record. The Proxy On option will enable the proxy option with Cloudflare and will redirect all traffic through Cloudflare servers as well as showing an orange cloud icon next to your DNS record.
- If you didn’t want to proxy all A, AAAA and CNAME DNS records through Cloudflare but only wanted to proxy either A, AAAA or CNAME DNS records only you can change the options in ‘A’ Record Default Override, ‘CNAME’ Record Default Override or ‘AAAA’ Record Default Override. The options for each section are Default, Proxy Off or Proxy On and work in the same say as the Default for All Records section.
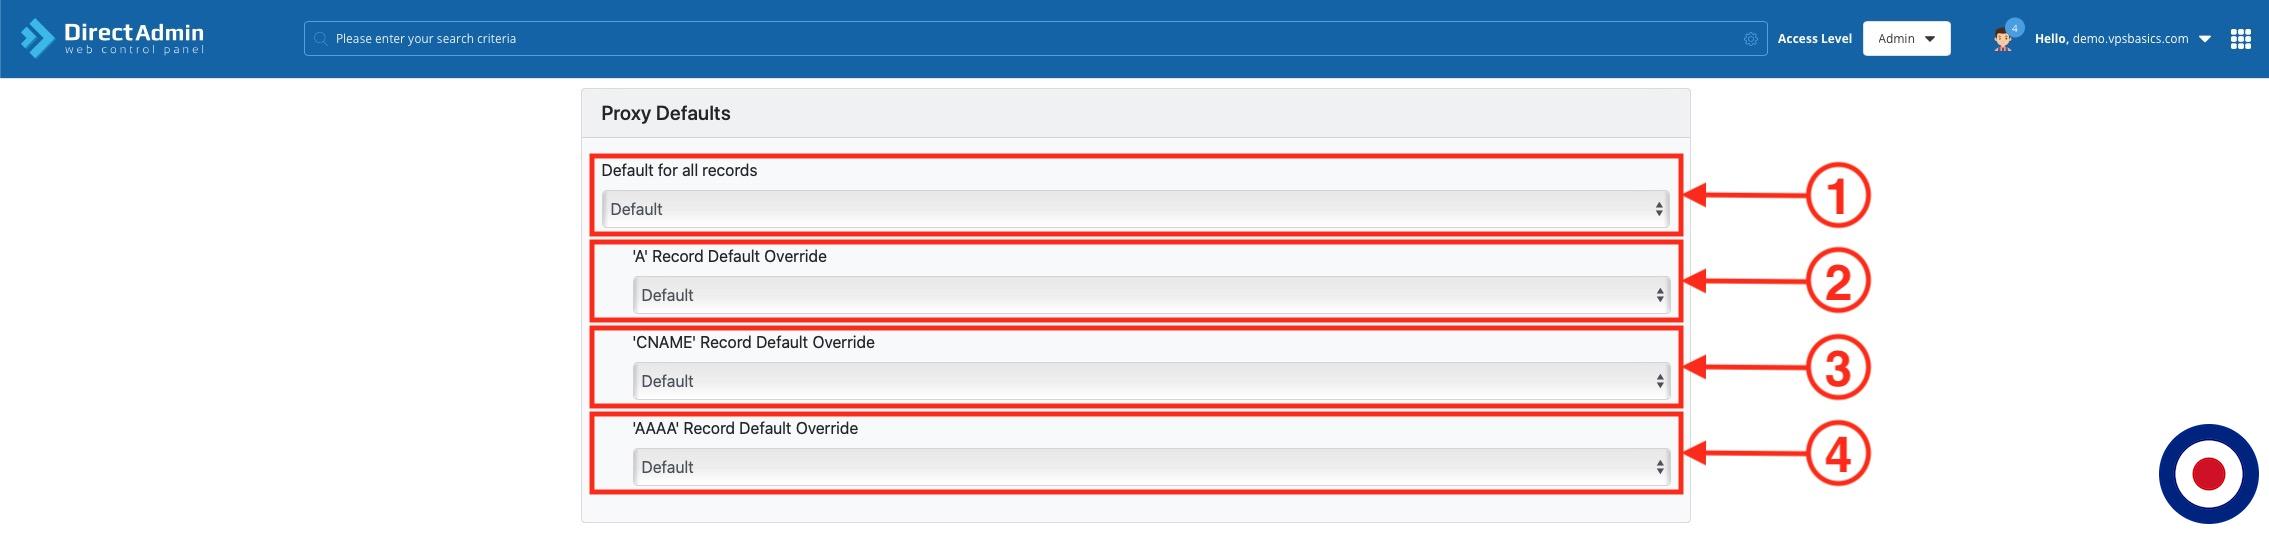
The Proxy Overrides sections enables you to add individual DNS zones to enable proxied A, AAAA and CNAME DNS records through Cloudflare. For example, if you only wanted to proxy the A DNS record for demo.vpsbasics.com you will need to select the Add ‘A’ Record Override button, add demo.vpsbasics.com to the Record name and change the Proxy setting to Proxy On. Once you have finished setting up the custom domain configuration file completed click the Update Config button.
Note
If you are adding a Custom Domain DNS Configuration file after creating the domain in DirectAdmin, you will need to make an adjustment to the domains DNS records using the DNS Management dashboard in DirectAdmin to force the Custom Domain DNS Configuration changes to be synchronised.
That’s it. You have successfully created a Custom Domain DNS Configuration file used to automatically synchronise DNS records between your DirectAdmin server and Cloudflare using the DAFlare plugin. Now we will show you how to setup DirectAdmin to use your Cloudflare nameservers by adjusting the default nameservers used by DirectAdmin when creating a new domain or change the the existing nameservers to Cloudflare for an existing domains nameservers.
Setup DirectAdmin
Now we will need to ensure that any domains already active in DirectAdmin and any new domains added going forward are using your assigned Cloudflare nameservers. The process for editing and adding the nameservers used with existing and new accounts is slightly different.
New Accounts
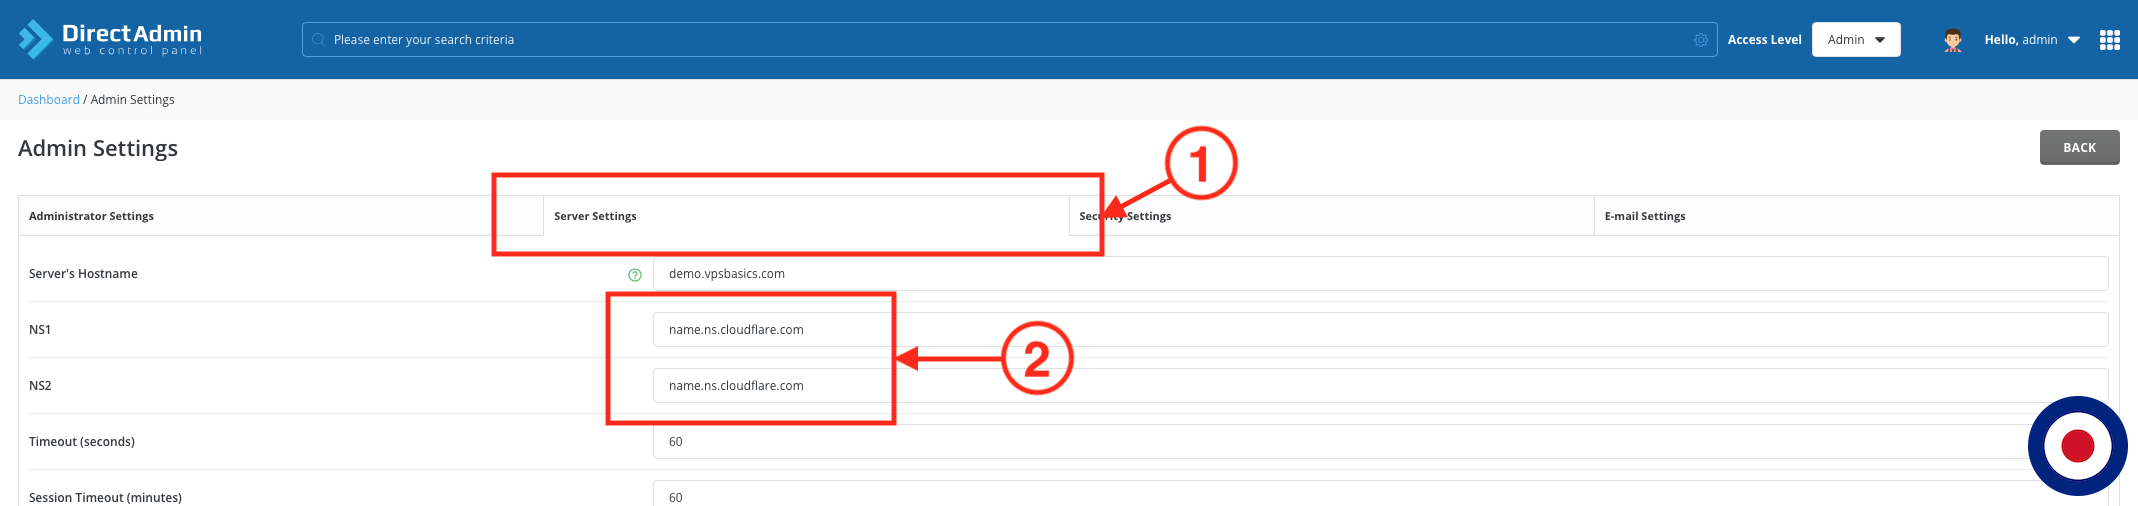
After logging into your DirectAdmin account, select Administrator Settings under Server Manager section from your dashboard.

In the Admin Settings dashboard select Server Settings from the tab menu. Here you will need to add/change your existing name servers under the NS1 and NS2 sections to those assigned by Cloudflare and then click the Save to apply the changes.
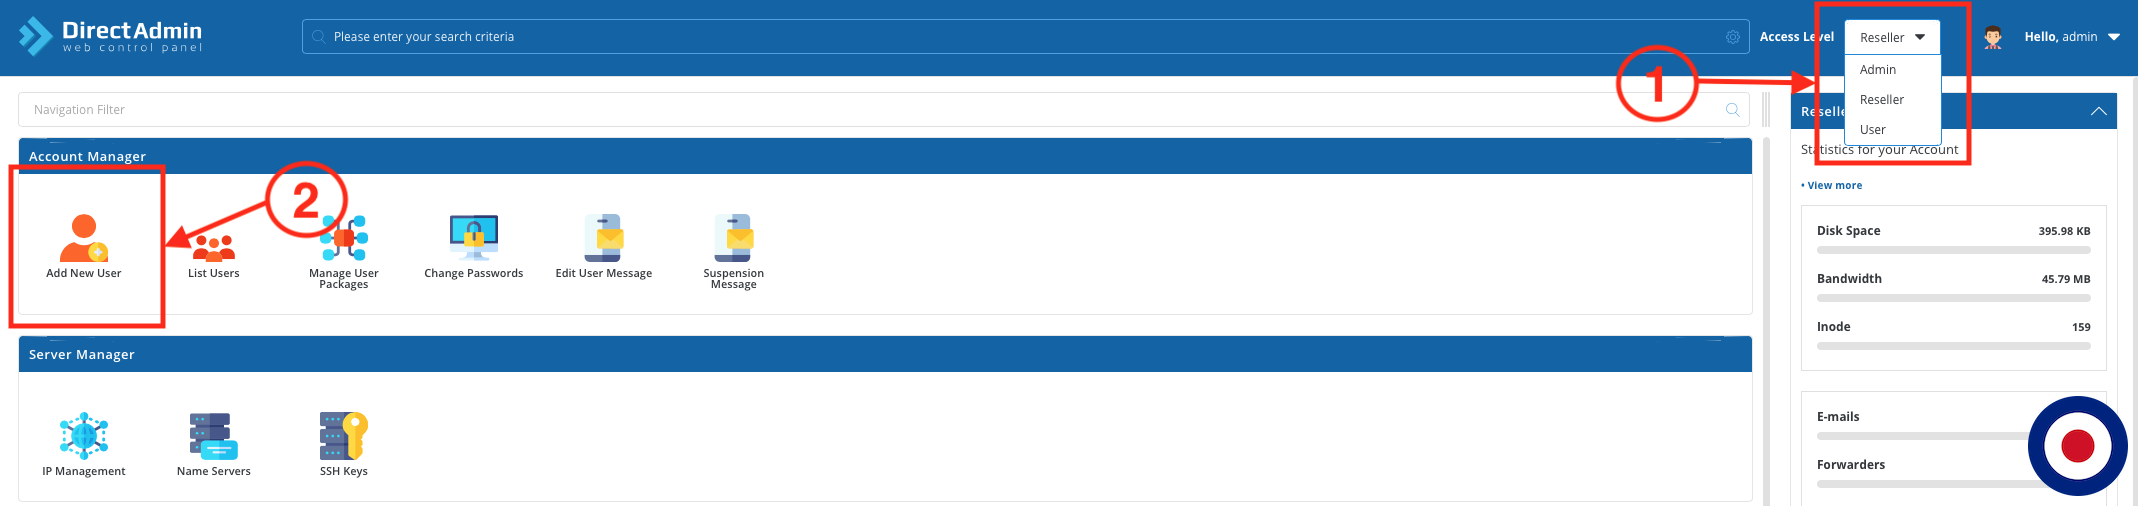
Now you can add a new account to DirectAdmin. From the Access Level dropdown menu in the top right of your DirectAdmin dashboard change to the Access Level to Reseller. From the Reseller Access Level, select Add New User under Account Manager section.
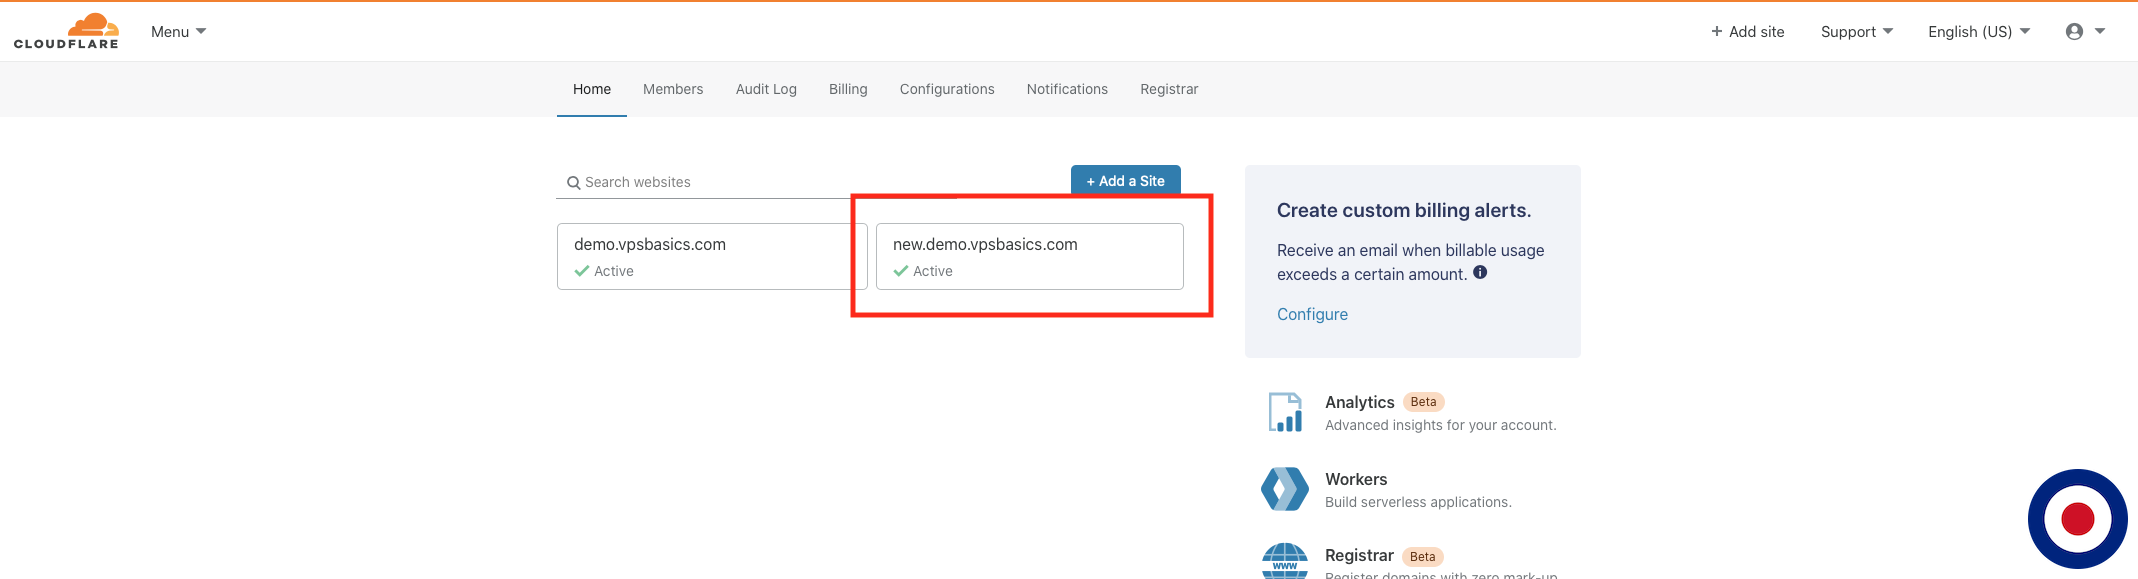
Once you have added the New User to your DirectAdmin server, log into your Cloudflare dashboard. In the dashboard you will see your New User’s domain has been automagically added to your Cloudflare account. Now any changes you make to the users DNS records in the DNS Management section of your DirectAdmin dashboard will be continually synchronised between your DirectAdmin server and Cloudflare account.
Note
All DNS changes made are only synchronised one-way, from your DirectAdmin server to your Cloudflare account. If you make changes directly in your Cloudflare account they will be overwritten by your DirectAdmin server.
All future DNS changes must be made using the DNS Management section within DirectAdmin.
Important
If you have a Free, Pro or Business account with Cloudflare you will not be able to add a subdomain using the Domain Setup dashboard within DirectAdmin and have Cloudflare manage the DNS records.
Unfortunately this is not a fault of DirectAdmin or the DAFlare plugin but Cloudflare as the functionality for adding subdomains as a root domain in Cloudflare is only available to Enterprise customers.
If you want Cloudflare to manage the DNS records for a subdomain you will need to set it up using the Subdomain Management dashboard of the root domain you want to use. For more information please refer to the Understanding Subdomain Support article.
Existing Accounts
Important
If your domain already exists within your Cloudflare account we would highly recommend that before proceeding you make a Backup Existing Cloudflare DNS Records and transfer any missing DNS records from your Cloudflare account to your DirectAdmin server.
This is due to all DNS changes made only being synchronised one-way, from your DirectAdmin server to your Cloudflare account. When your domains DNS records are synchronised your server will overwrite/modify any existing DNS records for your domain that exist in your Cloudflare account or delete any DNS records that do not exist on your DirectAdmin server.
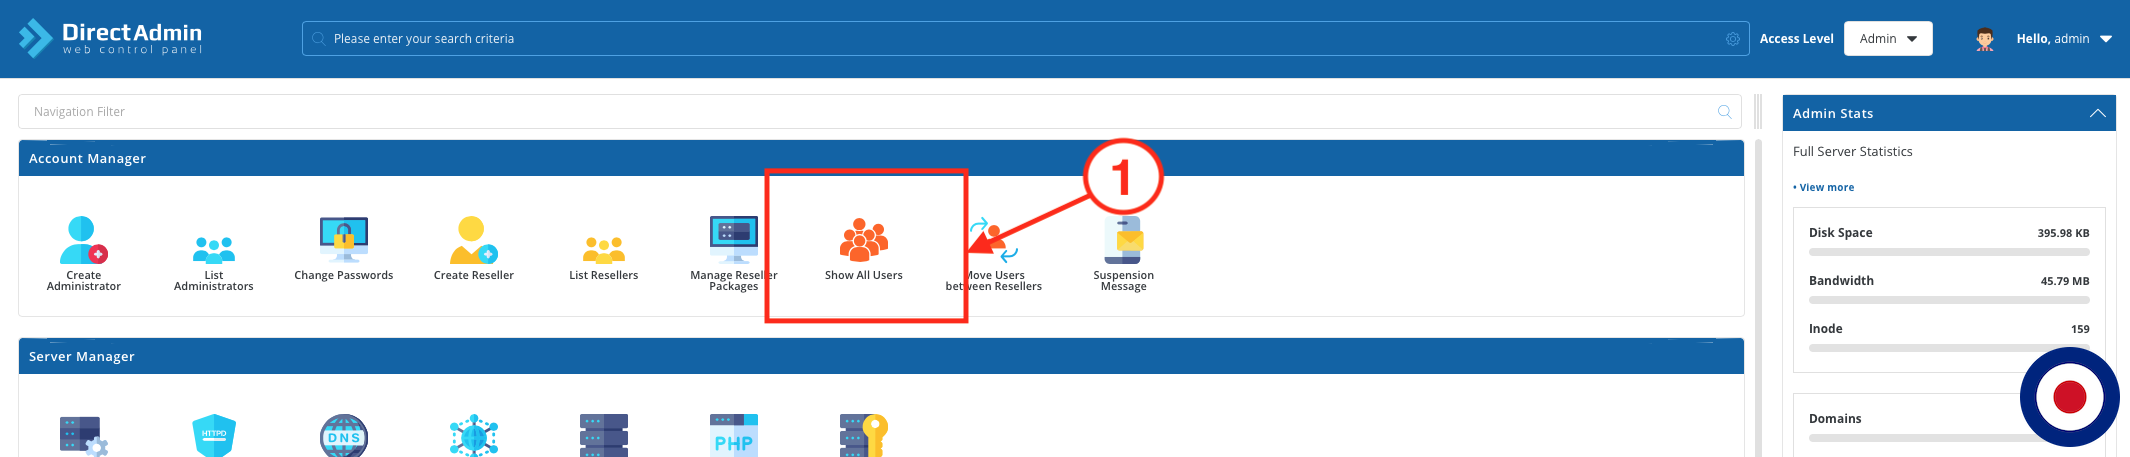
After logging into your DirectAdmin account, select Show All Users under Account Manager section from your dashboard.
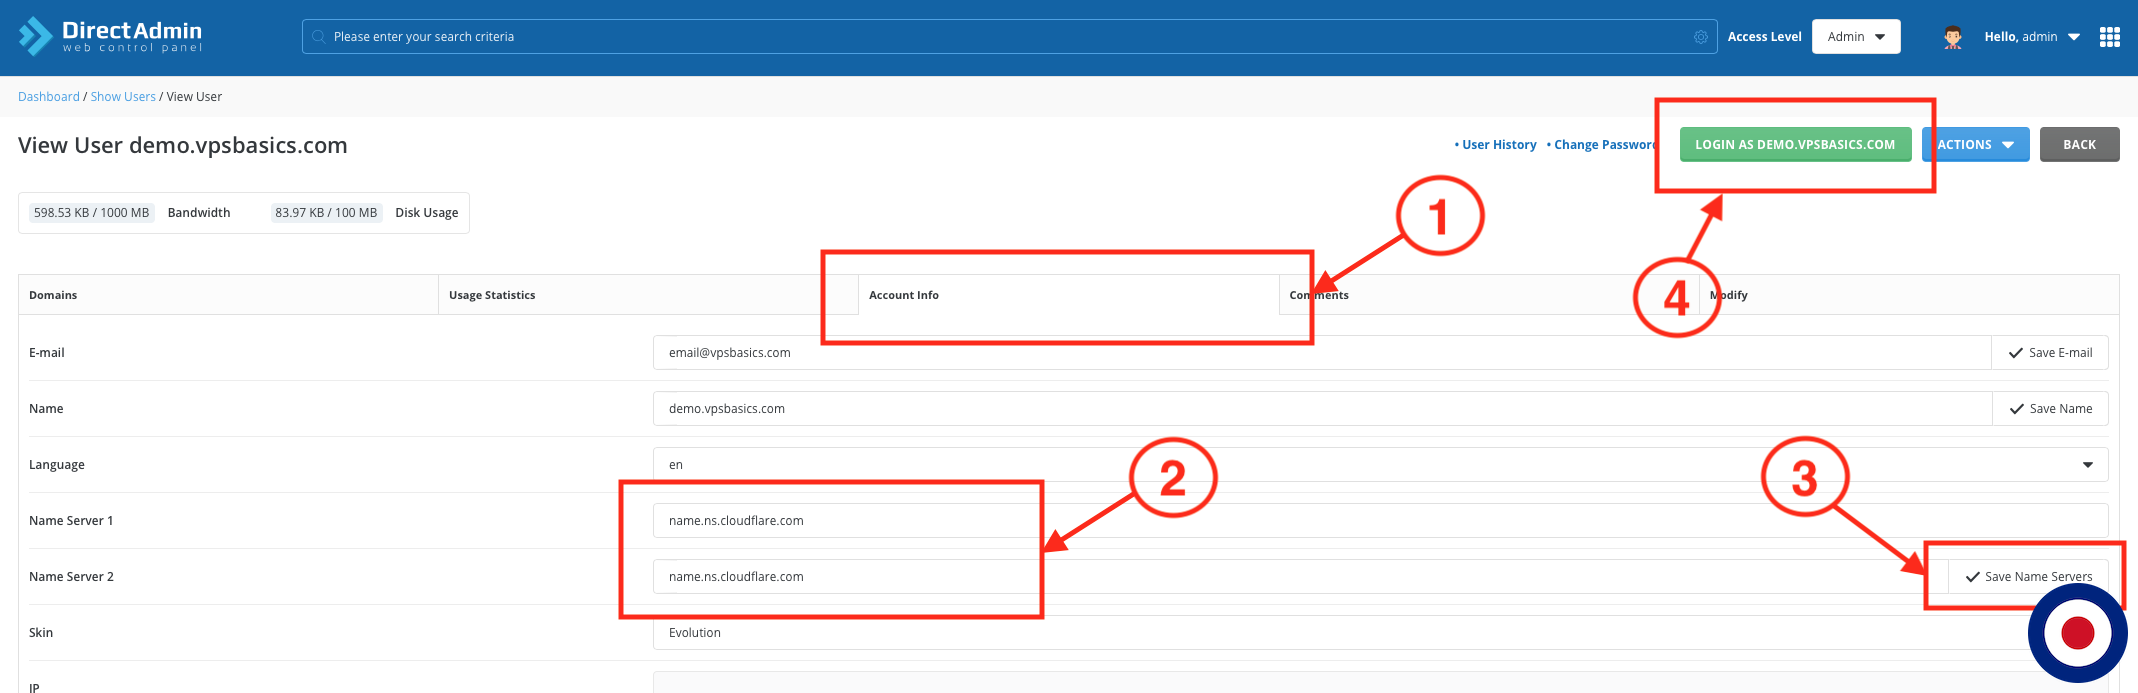
From the Show Users dashboard select the Username of the account you want to change. This will open the View User dashboard, where you will need to select Account Info from the tab menu. Here you will need to change your existing name servers under the Name Server 1 and Name Server 2 sections to those assigned by Cloudflare and then click Save Name Servers. Once the new nameservers are saved click Login as USER button.
After logging into the User Account, select DNS Management under the Account Manager section. Scroll down to the NS section and you will see that the nameservers have been changed to those assigned by Cloudflare.

Note
Any DNS changes made are only synchronised one-way, from your DirectAdmin server to your Cloudflare account. All changes must be made using the DNS Management section within DirectAdmin.
If you make changes directly in your Cloudflare account they will be overwritten when your server updates the DNS records.
Important
If you have a Free, Pro or Business account with Cloudflare you will not be able to add a subdomain using the Domain Setup dashboard within DirectAdmin and have Cloudflare manage the DNS records.
Unfortunately this is not a fault of DirectAdmin or the DAFlare plugin but Cloudflare as the functionality for adding subdomains as a root domain in Cloudflare is only available to Enterprise customers.
If you want Cloudflare to manage the DNS records for a subdomain you will need to set it up using the Subdomain Management dashboard of the root domain you want to use. For more information please refer to the Understanding Subdomain Support article.
That’s it. You have successfully setup continuous DNS record synchronisation between your DirectAdmin server and Cloudflare using the DAFlare plugin.