WordPress is the most popular Content Management Systems (CMS), and is estimated to have been installed on over 27 million websites worldwide. Part of the reason for WordPress’s success is down to it being open-source, meaning it’s free to download and use. The WordPress platform offers a vast range of options and flexibility to designers, bloggers and more, with thousands of free themes and plugins provided by developers through the WordPress repository. You can find virtually any design or feature needed and customise WordPress to your needs.
Whether you run a DirectAdmin server for your own websites or for others, having a facility that automatically installs WordPress when adding new accounts or domains can save you a lot of time. Rather than focusing on installing and setting up WordPress for individual accounts or domains, you can instead apply your time and focus your energy towards your website and its content.
One of the great aspects of DirectAdmin is its modular design and the way custombuild can incorporate custom files and scripts. By using custombuild, we can create custom files that are run at different points, such as before or after a new user account has been created or before or after a new domain has been added. By using these files we can tell DirectAdmin to carry out certain functions such as being able to automatically install WordPress to a new domain.
In this guide, we will explain how to automatically install WordPress when adding new or existing domains with DirectAdmin. We will install the WordPress Command Line Interface (WP-CLI) which will enable you to install and manage WordPress as well as adjusting the default disabled PHP Functions installed by DirectAdmin to enable the installation script to work correctly. We will create a Custom Package Option and Custom Domain Option which will enable you to select the option to install WordPress when creating adding a new domain, subdomain or modifying an existing domain in the DirectAdmin dashboard. We will create the WordPress Installation Script for new domains, new subdomains and existing domains before showing you how to create a new specific WordPress User Package. We will show you how to automatically install WordPress to a New User Account and Domain, a New Domain with an Existing User Account or Modify Existing Domain with Existing User Account.
Note
This guide is compatible with all of the current retail licences offered by DirectAdmin; Personal, Lite or Standard.
How to Automatically Install WordPress with DirectAdmin
- 1 Install WordPress Command Line Interface (WP-CLI)
- 2 Adjust PHP Functions
- 3 Create Custom Package Option
- 4 Create Custom Domain Option
- 5 Create WordPress Installation Scripts
- 6 Create New User Package
- 7 Create New User Account and Domain
- 8 Create New Domain with Existing User Account
- 9 Modify Existing Domain with Existing User Account
Install WordPress Command Line Interface (WP-CLI)
WordPress Command Line Interface (WP-CLI) is a tool designed to provide access to your WordPress installation from the command line. By enabling access to WordPress via the command line you can enable a host of powerful functions without ever needing to login to your WordPress dashboard. While the WordPress admin dashboard is intuitive and comprehensive, it can also be time-consuming to navigate even for the simplest of tasks. This is where WP-CLI comes in.
Using WP-CLI enables you to set a bash script that allows you to run a sequence of different commands using only a single command. For example, you can create the bash file to download and install WordPress, create a new database and add the details to the wp-config.php file, install and activate any plugin or theme, the list is endless.
By default the WP-CLI tool is not installed using custombuild or DirectAdmin and you will need to download and install it from Github using the following commands.
curl -O https://raw.githubusercontent.com/wp-cli/builds/gh-pages/phar/wp-cli.phar
chmod +x wp-cli.phar
sudo mv wp-cli.phar /usr/local/bin/wp
Check WP CLI Installation
With WP-CLI downloaded and installed to the /usr/local/bin/ folder we can test it to ensure it has been installed successfully using the following command.
wp --info
If everything has installed correctly you will see a similar output in the command line.
[root@vpsbasics] # wp --info
OS:	Linux 4.18.0-193.19.1.el8_2.x86_64 #1 SMP Mon Sep 14 14:37:00 UTC 2020 x86_64
Shell:	/bin/bash
PHP binary:	/usr/local/php74/bin/php74
PHP version:	7.4.12
php.ini used:	/usr/local/php74/lib/php.ini
WP-CLI root dir:	phar://wp-cli.phar/vendor/wp-cli/wp-cli
WP-CLI vendor dir:	phar://wp-cli.phar/vendor
WP_CLI phar path:	/vpsbasics
WP-CLI packages dir:
WP-CLI global config:
WP-CLI project config:
WP-CLI version:	2.4.0
WP-CLI Commands
WP-CLI commands always start with wp followed by a command and/or subcommand with any required and/or optional parameters. A WP-CLI command will be similar to wp command subcommand requiredparam --optionalparam.
If you wanted to install and activate the WordPress theme, Twenty Nineteen, you would use the following command.
wp theme install twentynineteen --activate
If you wanted to install and activate the WordPress plugin, Jetpack, you would use the following command.
wp plugin install jetpack --activate
WP-CLI also has a built-in help system. You can list all the available help commands using the following command.
wp help
If you wanted to get detailed help documentation on how to use the comment system you would use the following command wp help comment. The help system will detail the description, available subcommands and show you an example of how to use the command.
For more information on how to use WP-CLI commands you can explore the WordPress CLI Commands documentation.
Note
By default WP-CLI, is designed to run as the user where the WordPress installation exists. A user will not been able to use WP-CLI from the command line unless they have SSH Access enabled within their User Package.
Update WP-CLI
You can update WP-CLI by either using the wp cli update command or repeating the installation commands above.
If your installation doesn’t require any updates you will see a message similar to Success: WP-CLI is at the latest version.
If your installation does require updating you will see a message similar to You have version 2.3.0. Would you like to update to 2.4.0? [y/n]. To proceed you will need to confirm by typing Y.
WP-CLI and CageFS
If you have CloudLinux and CageFS installed with DirectAdmin, you will need to adjust CageFS to allow your users access WP-CLI tool. First, we will need to create a new configuration file inside the CageFS folder and then access it using the following commands.
touch /etc/cagefs/conf.d/wpcli.cfg
nano /etc/cagefs/conf.d/wpcli.cfg
Now we will need add the WP-CLI path into the wpcli.cfg file using the following command.
[wpcli]
comment=WP-CLI
paths=/usr/local/bin/wp
After saving the file, we will need to update CagsFS using the following command.
cagefsctl --force-update
Once CageFS has been updated you can test WP-CLI access to ensure it is working correctly by running the following command – replace $USERNAME with an existing user, for example, if the user was called bob you would use $bob.
su -c "wp --info" $USERNAME
That’s it. You have now successfully downloaded and installed WP-CLI on your DirectAdmin server. Now we will need to adjust the default disabled PHP functions in DirectAdmin.
Adjust PHP Functions
When using the WordPress installation, you might see some issues related to the PHP functions proc_open() and proc_close().
Error: Cannot do 'run_mysql_command': The PHP functions `proc_open()` and/or `proc_close()` are disabled. Please check your PHP ini directive `disable_functions` or suhosin settings.
Error: 'wp-config.php' not found.
Either create one manually or use `wp config create`.
This is because when the ./build secure_php script is run with DirectAdmin, it will automatically prevent the proc_open() and proc_close() functions from executing by adding them to the disable_functions = section of your php.ini file.
Although disabling these PHP functions is built into the ./build secure_php script ,we can utilise a feature of custombuild to tell DirectAdmin to use a set of custom disable_functions = when securing PHP.
Important
This will enable proc_open() and proc_close() functions server wide. Therefore your users will able use the PHP functions proc_open() and proc_close().
First we will need to navigate to the custombuild folder and create a php_disable_functions file using the following commands.
cd /usr/local/directadmin/custombuild
touch custom/php_disable_functions
Now we will use the default disabled PHP function list from DirectAdmin but exclude the proc_open() and proc_close() functions from our custom PHP function list using the following command.
echo "exec,system,passthru,shell_exec,dl,popen,show_source,posix_kill,posix_mkfifo,posix_getpwuid,posix_setpgid,posix_setsid,posix_setuid,posix_setgid,posix_seteuid,posix_setegid,posix_uname" > custom/php_disable_functions
After populating the php_disable_functions file we will need to rebuild the disable_functions = list. When using the following commands, DirectAdmin will automatically update the php.ini files of all installed versions of PHP with the new disable_functions = list.
./build set secure_php yes
./build secure_php
Once the ./build secure_php command has finished you can check the new disable_functions = list using the following command.
grep disable_functions /usr/local/php*/lib/php.ini
That’s it. You have now successfully created a custom disabled PHP functions list and applied it to all versions of PHP installed on your DirectAdmin server. Now we will need to create a custom package option which can be selected when creating a new user package to automatically install WordPress.
Create Custom Package Option
When DirectAdmin released v1.23.5, it enabled the creation of custom packages options. This feature allows you to add new items to a user package that will appear automagically in the DirectAdmin interface.
In order to create a custom package option we will need to create a custom_package_items.conf file using the following commands.
touch /usr/local/directadmin/data/admin/custom_package_items.conf
nano /usr/local/directadmin/data/admin/custom_package_items.conf
In the custom_package_items.conf file simply add the following command.
installWP=type=checkbox&string=Install WordPress&desc=Automatically install WordPress with this User Package&checked=yes
Now we will need to correct the file ownership and permissions to ensure that it can be run by the user diradmin using the following command.
chown diradmin. /usr/local/directadmin/data/admin/custom_package_items.conf
chmod 700 /usr/local/directadmin/data/admin/custom_package_items.conf
That’s it. You have now successfully created a custom package option which will display the Install WordPress option and can be selected within a user package to enable automatic WordPress installation. Now we need to create a custom domain option which can be selected when creating a new domain to automatically install WordPress.
Create Custom Domain Option
With the release of DirectAdmin v1.49.0, came a new feature which enable us to create custom domain options. This new facility works in a similar way to custom package option and is formatted in the same way. This feature allows you to add new custom items that will appear automagically when creating a new domain from the user dashboard in DirectAdmin.
Important
This option will not work when adding a subdomain using the Subdomain Management section in the DirectAdmin dashboard. You will need to add the subdomain in Domain Setup section to be able to automatically install WordPress when creating a new subdomain.
In order to create a custom domain option we will need to create a custom_domain_items.conf file using the following commands.
touch /usr/local/directadmin/data/admin/custom_domain_items.conf
nano /usr/local/directadmin/data/admin/custom_domain_items.conf
In the custom_domain_items.conf file simply add the following command.
installWP=type=checkbox&string=Install WordPress&desc=Automatically install WordPress for this domain&checked=no
Note
We have set the Custom Domain Option to be unselected (not checked) as default. If you wanted to enable the checkbox option as default you can change the option checked=no to checked=yes.
Now we will need to correct the file ownership and permissions to ensure that it can be run by the user diradmin using the following command.
chown diradmin. /usr/local/directadmin/data/admin/custom_domain_items.conf
chmod 700 /usr/local/directadmin/data/admin/custom_domain_items.conf
That’s it. You have now successfully created a custom domain option which will display the Install WordPress option and can be selected when adding a new domain to automatically install WordPress. Now we need to create and configure the WordPress installation scripts that will automatically install WordPress when creating a domain or subdomain.
Create WordPress Installation Scripts
So far, we have installed the WordPress Command Line Interface (WP-CLI), adjusted the default disabled PHP functions and created new custom package and custom domain options to enable WordPress to be automatically installed and created a new User Package or adding a New Domain. Now we need create the actual WordPress installation scripts that will be called when creating a new Domain, Subdomain or modifying an Existing Domain.
The installation script will automatically check if the Install WordPress option we created earlier has been selected in the user package when adding a new domain, subdomain or modifying an existing domain in DirectAdmin. The installation script will be run automatically after a domain or subdomain has been created by DirectAdmin using the custom domain_create_post.sh, subdomain_create_post.sh and domain_modify_post.sh files. These scripts will automatically install and setup WordPress including any additional options selected using WP-CLI.
Note
In order to automatically install WordPress, we will be using an external script which has been written by the team at KnownHost. We have tested the script and found that it should not interfere with your current services or server, however, as always we highly recommend that you test it on a different system and make sure to take backups before implementing in a production environment.
New Domain
Now we can create a script that will run after a new domain has been created in DirectAdmin and automatically install WordPress. Using the custom script option in custombuild we will create a domain_create_post.sh file using the following command.
touch /usr/local/directadmin/scripts/custom/domain_create_post.sh
After creating the domain_create_post.sh file we will need to change file owner to diradmin and the file permissions to 700 using the following commands.
chown diradmin.diradmin /usr/local/directadmin/scripts/custom/domain_create_post.sh
chmod 700 /usr/local/directadmin/scripts/custom/domain_create_post.sh
Now open the domain_create_post.sh file using the following command.
nano /usr/local/directadmin/scripts/custom/domain_create_post.sh
In the domain_create_post.sh file we will a script that contains the WP-CLI installation commands which will create a new database in DirectAdmin, download and install the latest WordPress version and setup and populate the wp-config.php file. Simply copy and paste the following code into the file.
#!/bin/bash
# CHECK CUSTOM PKG ITEM INSTALLWP
if [[ $installWP != 'ON' ]]; then
  exit 0;
else

# ENABLE ERROR LOGGING
# exec 2>/usr/local/directadmin/customscripts.error.log

# SET UP DATABASE VARIABLES
dbpass=$(openssl rand -base64 12) > /dev/null
ext=$(openssl rand -hex 2) > /dev/null
dbuser="wp${ext}"    # do not include the username_ for dataskq here as DA adds this
wpconfigdbuser="${username}_wp${ext}"
wpadminpass=$(openssl rand -base64 14) > /dev/null

# CHECK IF WORDPRESS EXISTS
if [ -f /home/$username/domains/$domain/public_html/index.php ]; then
echo "WARNING: There appears to be an index file already located in this directory, which indicates that an installation is already present! Empty the directory before running the script again."
exit
else

# DISABLE DIRECTADMIN INDEX.HTML FILE
if [ -f /home/$username/domains/$domain/public_html/index.html ]; then
mv /home/$username/domains/$domain/public_html/index.html{,.bak}
fi

# CREATE DATABASE
/usr/bin/mysqladmin -uda_admin -p$(cat /usr/local/directadmin/conf/mysql.conf | grep pass | cut -d\= -f2 ) create ${wpconfigdbuser};
echo "CREATE USER ${wpconfigdbuser} IDENTIFIED BY '${dbpass}';" | mysql -uda_admin -p$(cat /usr/local/directadmin/conf/mysql.conf | grep pass | cut -d\= -f2 );
echo "GRANT ALL PRIVILEGES ON ${wpconfigdbuser}.* TO ${wpconfigdbuser} IDENTIFIED BY '${dbpass}';" | mysql -uda_admin -p$(cat /usr/local/directadmin/conf/mysql.conf | grep pass | cut -d\= -f2);

# DOWNLOAD WORDPRESS
cd /home/$username/domains/$domain/public_html/
su -s /bin/bash -c "/usr/local/bin/wp core download" $username

# SET DATABASE DETAILS IN THE CONFIG FILE
su -s /bin/bash -c "/usr/local/bin/wp config create --dbname=$wpconfigdbuser --dbuser=$wpconfigdbuser --dbpass=$dbpass --dbhost=localhost" $username

# INSTALL WORDPRESS
if [[ $ssl == 'ON' ]]; then
su -s /bin/bash -c "/usr/local/bin/wp core install --url=https://$domain/ --admin_user=$username --admin_password=$wpadminpass --title="$domain" --admin_email=$username@$domain " $username
su -s /bin/bash -c "/usr/local/bin/wp rewrite structure '/%postname%/'" $username
printf "\n\nWORDPRESS LOGIN CREDENTIALS:\nURL: https://$domain/wp-admin/\nUSERNAME: $username\nPASSWORD: $wpadminpass\n\n"
if [[ ! -h /home/$username/domains/$domain/private_html ]]; then
echo "Making a symlink for https..."
cd /home/$username/domains/$domain/
rm -rf private_html
su -s /bin/bash -c "ln -s public_html private_html" $username
fi
else
su -s /bin/bash -c "/usr/local/bin/wp core install --url=http://$domain/ --admin_user=$username --admin_password=$wpadminpass --title="$domain" --admin_email=$username@$domain " $username
su -s /bin/bash -c "/usr/local/bin/wp rewrite structure '/%postname%/'" $username
printf "\n\nWORDPRESS LOGIN CREDENTIALS:\nURL: http://$domain/wp-admin/\nUSERNAME: $username\nPASSWORD: $wpadminpass\n\n"
fi

# ADD LOGIN DETAILS TO TEXT FILE
printf "\n\nWORDPRESS LOGIN CREDENTIALS:\nURL: http://$domain/wp-admin/\nUSERNAME: $username\nPASSWORD: $wpadminpass\n\n" >> /home/$username/domains/$domain/public_html/.wp-details.txt
chown $username. /home/$username/domains/$domain/public_html/.wp-details.txt
fi

# DELETE DOLLY PLUGIN AND INSTALL LITESPEED CACHE
su -s /bin/bash -c "/usr/local/bin/wp plugin delete hello" $username
su -s /bin/bash -c "/usr/local/bin/wp plugin install litespeed-cache --activate" $username
#su -s /bin/bash -c "/usr/local/bin/wp plugin install litespeed-cache jetpack --activate" $username

# CREATE .HTACCESS
cat << EOF > /home/$username/domains/$domain/public_html/.htaccess
# BEGIN WordPress
RewriteEngine On
RewriteRule .* - [E=HTTP_AUTHORIZATION:%{HTTP:Authorization}]
RewriteBase /
RewriteRule ^index\.php$ - [L]
RewriteCond %{REQUEST_FILENAME} !-f
RewriteCond %{REQUEST_FILENAME} !-d
RewriteRule . /index.php [L]
# END WordPress
EOF
chown $username. /home/$username/domains/$domain/public_html/.htaccess

# CHANGE FILE PERMISSIONS
cd /home/$username/domains/$domain/public_html/
find . -type d -exec chmod 0755 {} \;
find . -type f -exec chmod 0644 {} \;

# WORDPRESS SECURITY AND HARDENING
chmod 400 /home/$username/domains/$domain/public_html/.wp-details.txt
chmod 400 /home/$username/domains/$domain/public_html/wp-config.php

fi
exit 0;
Now you can save the domain_create_post.sh file and exit.
Important
In the installation script, the default admin username created for WordPress is set as the user’s DirectAdmin username. The WordPress database and admin password are randomly generated. The WordPress database password is set at 12 characters long and the admin password is set at 14 characters. They both consists of number, letters and special characters. If you want to make the randomly generated password shorter or longer you will need to edit the dbpass=$(openssl rand -base64 12) > /dev/null and wpadminpass=$(openssl rand -base64 14) > /dev/null lines under the # SET UP DATABASE VARIABLES section. Although both the passwords are randomly generated we highly recommend that you change these to passwords of your own choosing.
At the top of the script you will notice the # ENABLE ERROR LOGGING section which by default is commented out. If you find you are having trouble installing WordPress when creating a new account then simply uncomment the line exec 2>/usr/local/directadmin/customscripts.error.log to enable the log which will highlight any fatal errors.
We have added the # ADD LOGIN DETAILS TO TEXT FILE section which will print the WordPress URL, username and password to the .wp-details.txt file which will be added to the users public_html. This is simply a precautionary measure in case you accidentally close down the user created message from DirectAdmin. Once you have noted the login detail we highly recommend you delete this file.
In the section # DELETE DOLLY PLUGIN AND INSTALL LITESPEED CACHE we have set WP-CLI to automatically delete the plugin called Dolly, which is automatically installed to all WordPress installations then install and activate the Litespeed Cache plugin. If you did not want to uninstall the Dolly plugin and install Litespeed Cache you can simply either comment out (add # to the beginning of the line) the command or delete it altogether.
If you want you can use this section to tell WP-CLI to install a new WordPress theme or plugin automatically. You can even set WP-CLI to install multiple plugins at once by simply adding the plugin name to download and enable automatic activation. You just need to keep in mind, that the more you ask WP-CLI to install when the domain is created the longer the domain creation will take. For example, if you wanted to install the plugins WP Super Cache, Jetpack – WP Security, Backup, Speed, & Growth and Contact Form 7 you would simply change the plugin name in the script from litespeed-cache to wp-super-cache jetpack contact-form-7.
su -s /bin/bash -c "/usr/local/bin/wp plugin install wp-super-cache jetpack contact-form-7 --activate" $username
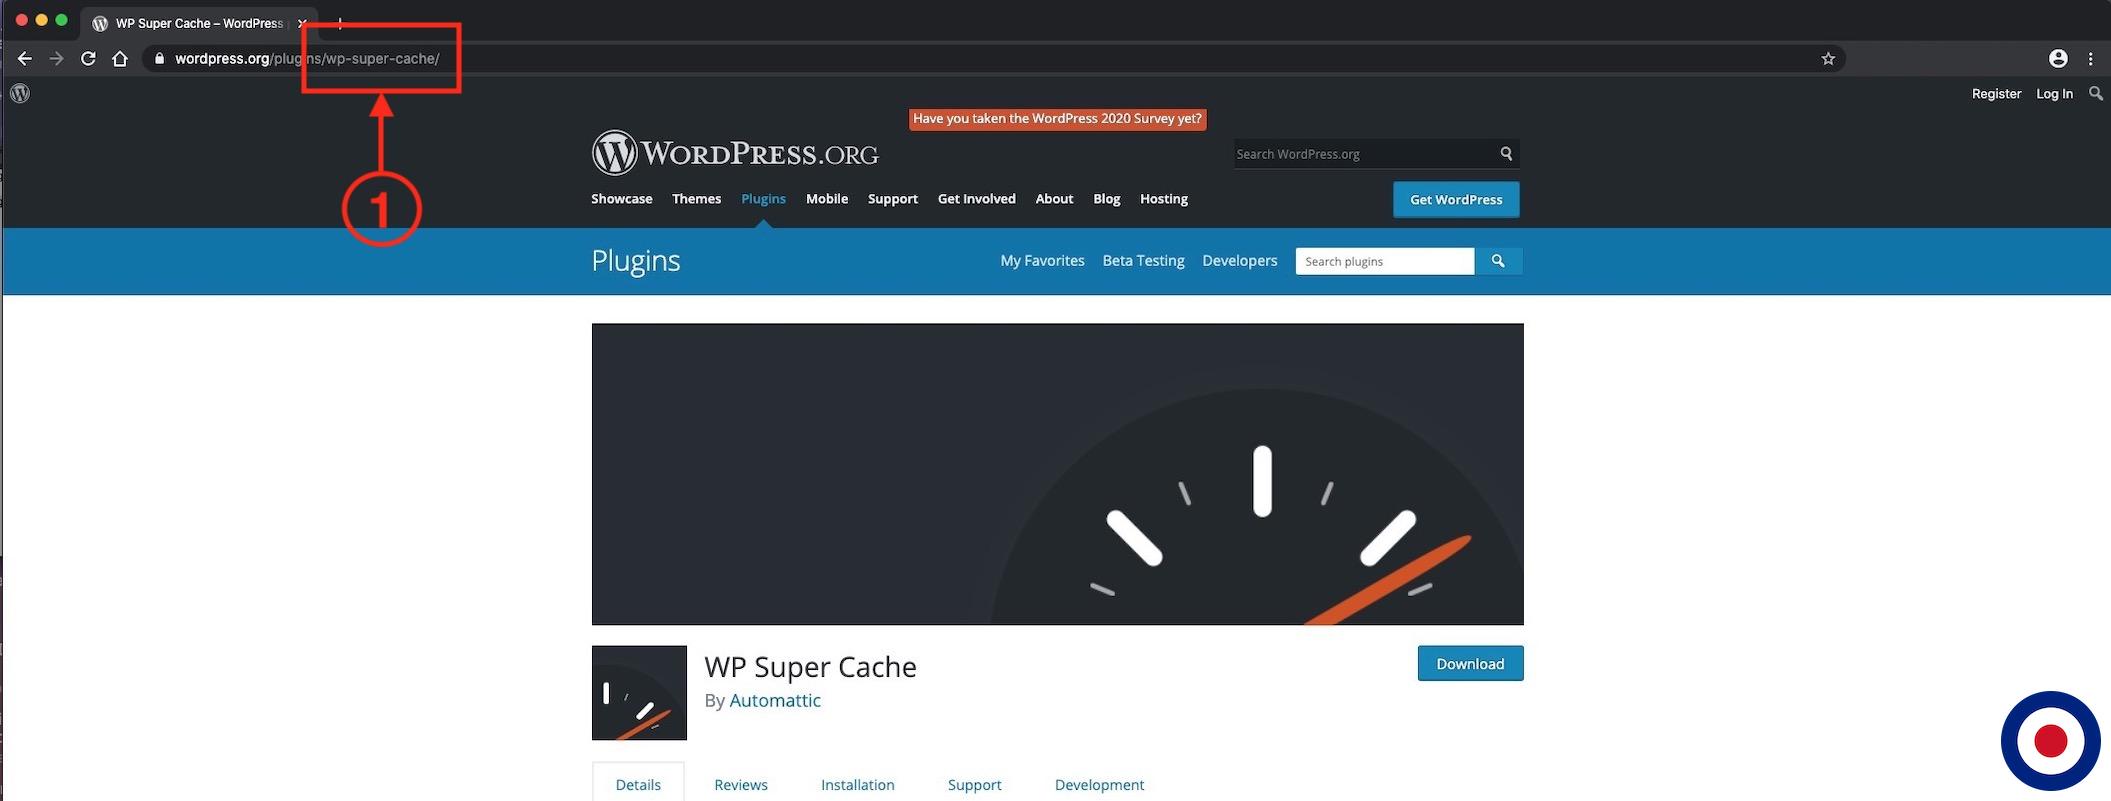
The plugin names used for WP-CLI come from their respective names in the WordPress repository. The easiest way to find the plugin name is to visit the plugins web page and look at the URL. In the example below you will see for WP Super Cache, its WordPress repository name is wp-super-cache.
Towards the end of the script you will notice the # CHANGE FILE PERMISSIONS section. This has been added because the WordPress files could be downloaded and installed with file permissions set at 600. This means the domain owner has full read and write access to the files but no one else can access them, causing permission errors for WordPress CSS and JS files.
After everything has been installed we switch to the domain owners public_html folder and find all folders using the -type d command and change the folder permissions to 755. Then we look for all files using the -type f command and change the files permissions to 644 which enables the domain owner to have full read and write access with the group and other users having read access enabling access to the WordPress CSS and JS files.
At the end of the script you will see the # WORDPRESS SECURITY AND HARDENING section where we have changed the file permissions of the .wp-details.txt and wp-config.php files to 400 meaning it can only be read by the domain owner.
The default language when downloading WordPress is U.S. English, although you can easily adjust the script to download WordPress in any of its supported languages. To adjust the WordPress language version, you will need to change the line under the # DOWNLOAD WORDPRESS section and add the --locale= followed by your choice of language.
For example, if you wanted to use British English you would append the --locale= command with en_GB. If you wanted to use Dutch you would append the --locale= command with nl_NL. The replacement code used in the script above would look like this.
su -s /bin/bash -c "/usr/local/bin/wp core download --locale=en_GB" $username
su -s /bin/bash -c "/usr/local/bin/wp core download --locale=nl_NL" $username
That’s it. You have now successfully created a custom domain_create_post.sh script that will automatically run after a new domain has been created in DirectAdmin and automatically install the latest version of WordPress and any required themes or plugins using WP-CLI. Next we will create post domain script to enable WordPress to be automatically installed for subdomains.
New Subdomain
In the same way we created the post domain script domain_create_post.sh above, we will now create a post subdomain script called subdomain_create_post.sh. This script will run after a new subdomain has been created in DirectAdmin and then automatically install WordPress. Using the custom script option in custombuild we will create a subdomain_create_post.sh file using the following command.
touch /usr/local/directadmin/scripts/custom/subdomain_create_post.sh
After creating the subdomain_create_post.sh file we will need to change owner and file permissions using the following command.
chown diradmin.diradmin /usr/local/directadmin/scripts/custom/subdomain_create_post.sh
chmod 700 /usr/local/directadmin/scripts/custom/subdomain_create_post.sh
Now open the subdomain_create_post.sh file using the following command.
nano /usr/local/directadmin/scripts/custom/subdomain_create_post.sh
Note
At this time DirectAdmin does not provide a facility to check a custom domain option within the main domain when adding a subdomain. As such this script will automatically install WordPress to any subdomain added through the DirectAdmin dashboard. If you want to add a subdomain and automatically install WordPress we would recommend you add it as a domain through the Domain Setup dashboard.
In the subdomain_create_post.sh file we will add the WordPress installation commands which will create a new database, download and install WordPress and setup and populate the wp-config.php file. Simply copy and paste the following code into the file.
#!/bin/bash
# CHECK CUSTOM PKG ITEM INSTALLWP
# THIS DOES NOT CURRENTLY WORK WITH SUBDOMAINS
#if [[ $installWP != 'ON' ]]; then
#  exit 0;
#else

# ENABLE ERROR LOGGING
# exec 2>/usr/local/directadmin/customscripts.error.log

# SET UP DATABASE VARIABLES
dbpass=$(openssl rand -base64 12) > /dev/null
ext=$(openssl rand -hex 2) > /dev/null
dbuser="wp${ext}"    # do not include the username_ for dataskq here as DA adds this
wpconfigdbuser="${username}_wp${ext}"
wpadminpass=$(openssl rand -base64 14) > /dev/null

# CHECK IF WORDPRESS EXISTS
if [ -f /home/$username/domains/$domain/public_html/$subdomain/index.php ]; then
echo "WARNING: There appears to be an index file already located in this directory, which indicates that an installation is already present! Empty the directory before running the script again."
exit
else

# DISABLE DIRECTADMIN INDEX.HTML FILE
if [ -f /home/$username/domains/$domain/public_html/$subdomain/index.html ]; then
mv /home/$username/domains/$domain/public_html/$subdomain/index.html{,.bak}
fi

# CREATE DATABASE
/usr/bin/mysqladmin -uda_admin -p$(cat /usr/local/directadmin/conf/mysql.conf | grep pass | cut -d\= -f2 ) create ${wpconfigdbuser};
echo "CREATE USER ${wpconfigdbuser} IDENTIFIED BY '${dbpass}';" | mysql -uda_admin -p$(cat /usr/local/directadmin/conf/mysql.conf | grep pass | cut -d\= -f2 );
echo "GRANT ALL PRIVILEGES ON ${wpconfigdbuser}.* TO ${wpconfigdbuser} IDENTIFIED BY '${dbpass}';" | mysql -uda_admin -p$(cat /usr/local/directadmin/conf/mysql.conf | grep pass | cut -d\= -f2);

# DOWNLOAD WORDPRESS
cd /home/$username/domains/$domain/public_html/$subdomain/
su -s /bin/bash -c "/usr/local/bin/wp core download" $username

# SET DATABASE DETAILS IN THE CONFIG FILE
su -s /bin/bash -c "/usr/local/bin/wp config create --dbname=$wpconfigdbuser --dbuser=$wpconfigdbuser --dbpass=$dbpass --dbhost=localhost" $username

# INSTALL WORDPRESS
if [[ $ssl == 'ON' ]]; then
su -s /bin/bash -c "/usr/local/bin/wp core install --url=https://$subdomain.$domain/ --admin_user=$username --admin_password=$wpadminpass --title="$subdomain.$domain" --admin_email=$username@$domain " $username
su -s /bin/bash -c "/usr/local/bin/wp rewrite structure '/%postname%/'" $username
printf "\n\nWORDPRESS LOGIN CREDENTIALS:\nURL: https://$subdomain.$domain/wp-admin/\nUSERNAME: $username\nPASSWORD: $wpadminpass\n\n"
if [[ ! -h /home/$username/domains/$domain/$subdomain.$domain/private_html ]]; then
echo "Making a symlink for https..."
cd /home/$username/domains/$subdomain.$domain/
rm -rf private_html
su -s /bin/bash -c "ln -s public_html private_html" $username
fi
else
su -s /bin/bash -c "/usr/local/bin/wp core install --url=http://$subdomain.$domain/ --admin_user=$username --admin_password=$wpadminpass --title="$subdomain.$domain" --admin_email=$username@$domain " $username
su -s /bin/bash -c "/usr/local/bin/wp rewrite structure '/%postname%/'" $username
printf "\n\nWORDPRESS LOGIN CREDENTIALS:\nURL: http://$subdomain.$domain/wp-admin/\nUSERNAME: $username\nPASSWORD: $wpadminpass\n\n"
fi

# ADD LOGIN DETAILS TO TEXT FILE
printf "\n\nWORDPRESS LOGIN CREDENTIALS:\nURL: http://$subdomain.$domain/wp-admin/\nUSERNAME: $username\nPASSWORD: $wpadminpass\n\n" >> /home/$username/domains/$domain/public_html/$subdomain/.wp-details.txt
chown $username. /home/$username/domains/$domain/public_html/$subdomain/.wp-details.txt
fi

# DELETE DOLLY PLUGIN AND INSTALL LITESPEED CACHE
su -s /bin/bash -c "/usr/local/bin/wp plugin delete hello" $username
su -s /bin/bash -c "/usr/local/bin/wp plugin install litespeed-cache --activate" $username
#su -s /bin/bash -c "/usr/local/bin/wp plugin install litespeed-cache jetpack --activate" $username

# CREATE .HTACCESS
cat << EOF > /home/$username/domains/$domain/public_html/$subdomain/.htaccess
# BEGIN WordPress
RewriteEngine On
RewriteRule .* - [E=HTTP_AUTHORIZATION:%{HTTP:Authorization}]
RewriteBase /
RewriteRule ^index\.php$ - [L]
RewriteCond %{REQUEST_FILENAME} !-f
RewriteCond %{REQUEST_FILENAME} !-d
RewriteRule . /index.php [L]
# END WordPress
EOF
chown $username. /home/$username/domains/$domain/public_html/$subdomain/.htaccess

# CHANGE FILE PERMISSIONS
cd /home/$username/domains/$domain/public_html/$subdomain/
find . -type d -exec chmod 0755 {} \;
find . -type f -exec chmod 0644 {} \;

# WORDPRESS SECURITY AND HARDENING
chmod 400 /home/$username/domains/$domain/public_html/$subdomain/.wp-details.txt
chmod 400 /home/$username/domains/$domain/public_html/$subdomain/wp-config.php

fi
exit 0;
Now you can save the subdomain_create_post.sh file and exit. The script contains the sections we added into the domain_create_post.sh file above, such as deleting the plugin Dolly and installing Litespeed Cache, etc.
Important
In the installation script, the default admin username created for WordPress is set as the user’s DirectAdmin username. The WordPress database and admin password are randomly generated. The WordPress database password is set at 12 characters long and the admin password is set at 14 characters. They both consists of number, letters and special characters. If you want to make the randomly generated password shorter or longer you will need to edit the dbpass=$(openssl rand -base64 12) > /dev/null and wpadminpass=$(openssl rand -base64 14) > /dev/null lines under the # SET UP DATABASE VARIABLES section. Although both the passwords are randomly generated we highly recommend that you change these to passwords of your own choosing.
That’s it. You have now successfully created a custom subdomain_create_post.sh script that will automatically run after a new subdomain has been created in DirectAdmin and automatically install the latest version of WordPress and any required themes or plugins using WP-CLI. Next we will create post domain modify script to enable WordPress to be automatically installed for modified domains.
Existing Domain
With the release of DirectAdmin v1.61.5, came a new feature which enabled us to create a custom script in the domain_modify_post.sh file which is automatically triggered when modifying a domain.
With the domain_modify_post.sh file we can enable the functionality to have the option to automatically install WordPress to an existing domain that doesn’t currently have WordPress installed. The script will make use of the custom domain option we created earlier and similarly to how we created a new domain with an existing user account all that you would need to do is select the Install WordPress checkbox in the Modify Domain dashboard.
The actual script to automatically install WordPress is very similar to the one we create above for domains and subdomains but will backup the existing contents of the public_html folder to a backup folder called wp-backup first and then install WordPress.
In the same way we created the post domain and subdomains script above, we will now create a post modify domain file called domain_modify_post.sh. This file will run after a domain has been modified in DirectAdmin and then automatically install WordPress. Using the custom file option in custombuild we will create a domain_modify_post.sh file using the following command.
touch /usr/local/directadmin/scripts/custom/domain_modify_post.sh
After creating the domain_modify_post.sh file we will need to change owner and file permissions using the following command.
chown diradmin.diradmin /usr/local/directadmin/scripts/custom/domain_modify_post.sh
chmod 700 /usr/local/directadmin/scripts/custom/domain_modify_post.sh
Now open the domain_modify_post.sh file using the following command.
nano /usr/local/directadmin/scripts/custom/domain_modify_post.sh
In the domain_modify_post.sh file we will add the WordPress installation commands which will create a new database, download and install WordPress and setup and populate the wp-config.php file. Simply copy and paste the following code into the file.
#!/bin/bash
# CHECK CUSTOM PKG ITEM INSTALLWP
if [[ $installWP != 'ON' ]]; then
  exit 0;
else

# ENABLE ERROR LOGGING
# exec 2>/usr/local/directadmin/customscripts.error.log

# MOVE CONTENTS TO BACKUP FOLDER
mkdir -p /home/$username/wp-backup/$domain-backup
mv /home/$username/domains/$domain/public_html/* /home/$username/wp-backup/$domain-backup
chown -R $username. /home/$username/wp-backup

# SET UP DATABASE VARIABLES
dbpass=$(openssl rand -base64 12) > /dev/null
ext=$(openssl rand -hex 2) > /dev/null
dbuser="wp${ext}"    # do not include the username_ for dataskq here as DA adds this
wpconfigdbuser="${username}_wp${ext}"
wpadminpass=$(openssl rand -base64 14) > /dev/null

# CREATE DATABASE
/usr/bin/mysqladmin -uda_admin -p$(cat /usr/local/directadmin/conf/mysql.conf | grep pass | cut -d\= -f2 ) create ${wpconfigdbuser};
echo "CREATE USER ${wpconfigdbuser} IDENTIFIED BY '${dbpass}';" | mysql -uda_admin -p$(cat /usr/local/directadmin/conf/mysql.conf | grep pass | cut -d\= -f2 );
echo "GRANT ALL PRIVILEGES ON ${wpconfigdbuser}.* TO ${wpconfigdbuser} IDENTIFIED BY '${dbpass}';" | mysql -uda_admin -p$(cat /usr/local/directadmin/conf/mysql.conf | grep pass | cut -d\= -f2);

# DOWNLOAD WORDPRESS
cd /home/$username/domains/$domain/public_html/
su -s /bin/bash -c "/usr/local/bin/wp core download" $username

# SET DATABASE DETAILS IN THE CONFIG FILE
su -s /bin/bash -c "/usr/local/bin/wp config create --dbname=$wpconfigdbuser --dbuser=$wpconfigdbuser --dbpass=$dbpass --dbhost=localhost" $username

# INSTALL WORDPRESS
if [[ $ssl == 'ON' ]]; then
su -s /bin/bash -c "/usr/local/bin/wp core install --url=https://$domain/ --admin_user=$username --admin_password=$wpadminpass --title="$domain" --admin_email=$username@$domain " $username
su -s /bin/bash -c "/usr/local/bin/wp rewrite structure '/%postname%/'" $username
printf "\n\nWORDPRESS LOGIN CREDENTIALS:\nURL: https://$domain/wp-admin/\nUSERNAME: $username\nPASSWORD: $wpadminpass\n\n"
if [[ ! -h /home/$username/domains/$domain/private_html ]]; then
echo "Making a symlink for https..."
cd /home/$username/domains/$domain/
rm -rf private_html
su -s /bin/bash -c "ln -s public_html private_html" $username
fi
else
su -s /bin/bash -c "/usr/local/bin/wp core install --url=http://$domain/ --admin_user=$username --admin_password=$wpadminpass --title="$domain" --admin_email=$username@$domain " $username
su -s /bin/bash -c "/usr/local/bin/wp rewrite structure '/%postname%/'" $username
printf "\n\nWORDPRESS LOGIN CREDENTIALS:\nURL: http://$domain/wp-admin/\nUSERNAME: $username\nPASSWORD: $wpadminpass\n\n"
fi

# ADD LOGIN DETAILS TO TEXT FILE
printf "\n\nWORDPRESS LOGIN CREDENTIALS:\nURL: http://$domain/wp-admin/\nUSERNAME: $username\nPASSWORD: $wpadminpass\n\n" >> /home/$username/domains/$domain/public_html/.wp-details.txt
chown $username. /home/$username/domains/$domain/public_html/.wp-details.txt
fi

# DELETE DOLLY PLUGIN AND INSTALL LITESPEED CACHE
su -s /bin/bash -c "/usr/local/bin/wp plugin delete hello" $username
su -s /bin/bash -c "/usr/local/bin/wp plugin install litespeed-cache --activate" $username
#su -s /bin/bash -c "/usr/local/bin/wp plugin install litespeed-cache jetpack --activate" $username

# CREATE .HTACCESS
cat << EOF > /home/$username/domains/$domain/public_html/.htaccess
# BEGIN WordPress
RewriteEngine On
RewriteRule .* - [E=HTTP_AUTHORIZATION:%{HTTP:Authorization}]
RewriteBase /
RewriteRule ^index\.php$ - [L]
RewriteCond %{REQUEST_FILENAME} !-f
RewriteCond %{REQUEST_FILENAME} !-d
RewriteRule . /index.php [L]
# END WordPress
EOF
chown $username. /home/$username/domains/$domain/public_html/.htaccess

# CHANGE FILE PERMISSIONS
cd /home/$username/domains/$domain/public_html/
find . -type d -exec chmod 0755 {} \;
find . -type f -exec chmod 0644 {} \;

# WORDPRESS SECURITY AND HARDENING
chmod 400 /home/$username/domains/$domain/public_html/.wp-details.txt
chmod 400 /home/$username/domains/$domain/public_html/wp-config.php

fi
exit 0;
Now you can save the domain_modify_post.sh file and exit. The script contains the sections we added into the domain_create_post.sh file above, such as deleting the plugin Dolly and installing Litespeed Cache, etc.
Important
In the installation script, the default admin username created for WordPress is set as the user’s DirectAdmin username. The WordPress database and admin password are randomly generated. The WordPress database password is set at 12 characters long and the admin password is set at 14 characters. They both consists of number, letters and special characters. If you want to make the randomly generated password shorter or longer you will need to edit the dbpass=$(openssl rand -base64 12) > /dev/null and wpadminpass=$(openssl rand -base64 14) > /dev/null lines under the # SET UP DATABASE VARIABLES section. Although both the passwords are randomly generated we highly recommend that you change these to passwords of your own choosing.
That’s it. You have now successfully created a domain_modify_post.sh script that will automatically run after a domain has been modified in DirectAdmin and automatically install the latest version of WordPress and any required themes or plugins using WP-CLI. Now we will need to create a new user package that will be used to automatically install WordPress when a domain is created using that user package.
Create New User Package
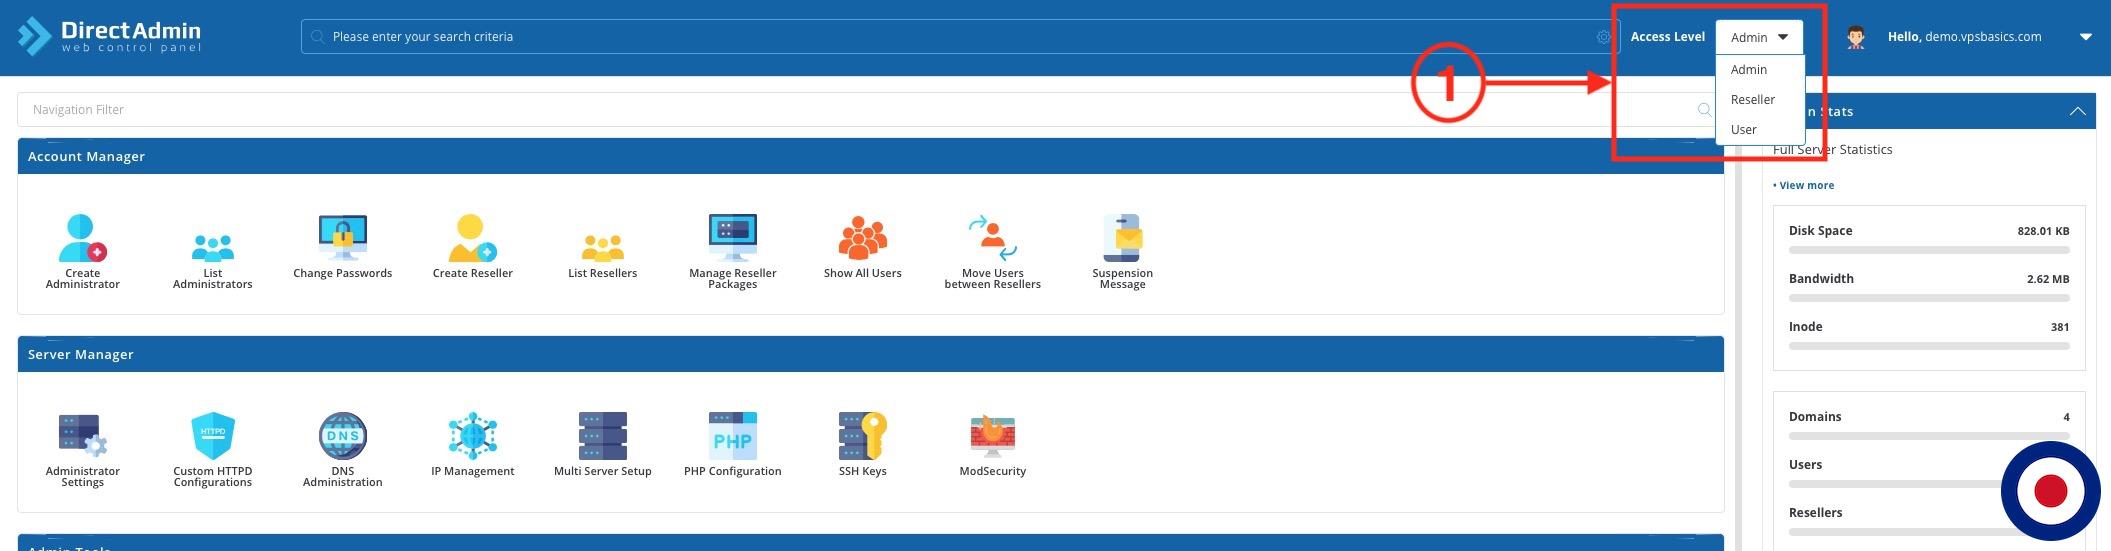
To create a New User Package so we can select the custom package option to enable WordPress installation log into your DirectAdmin dashboard and change the Access Level from Admin to Reseller.
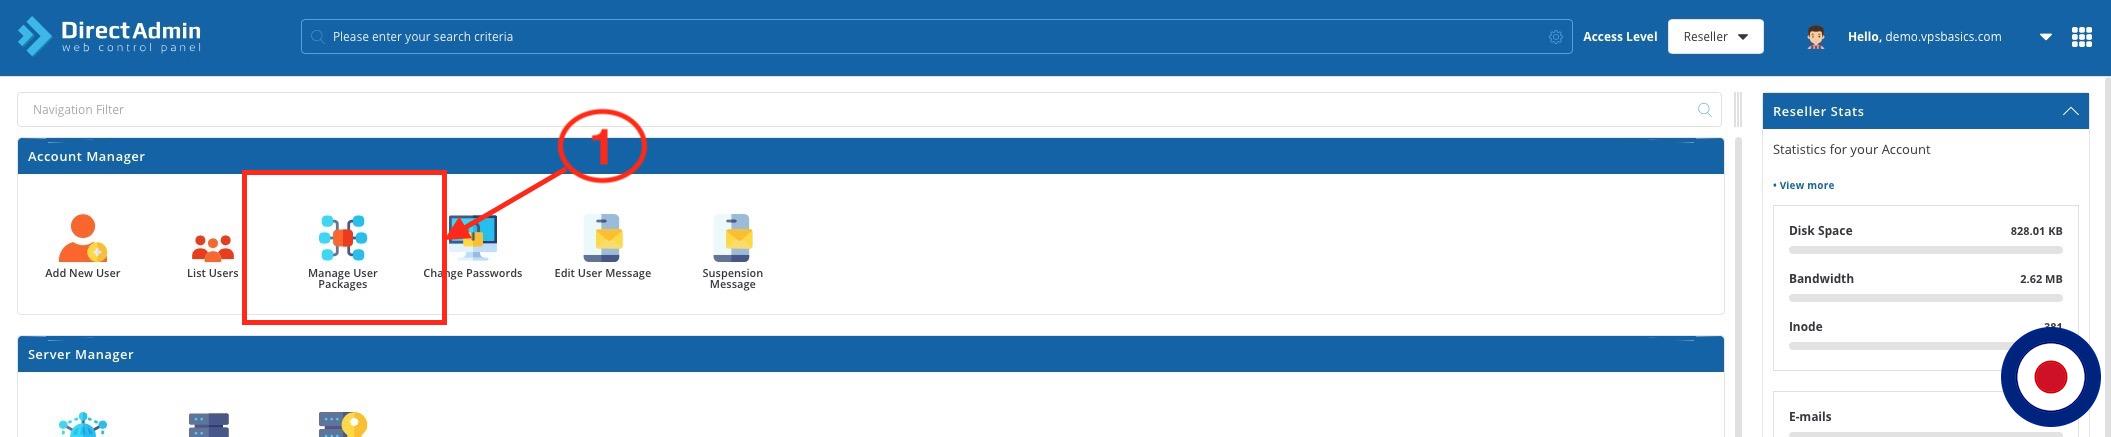
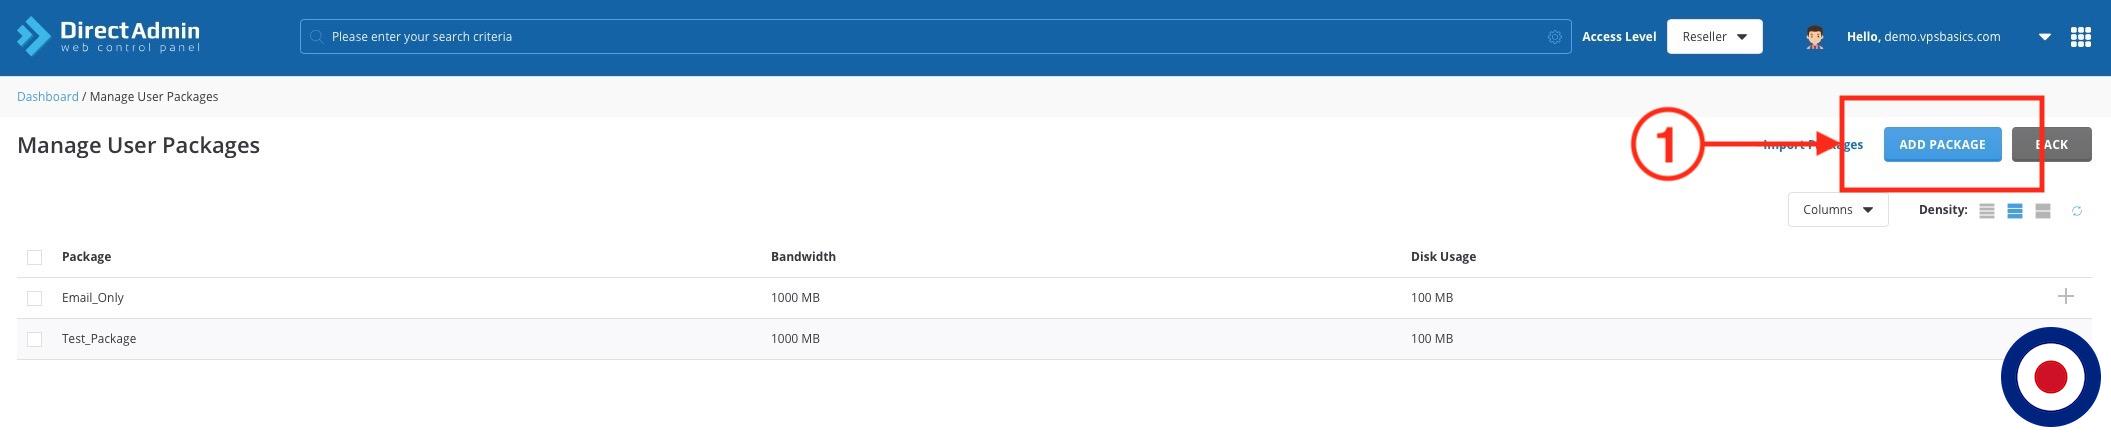
In the Reseller dashboard, select the Manage User Packages under the Account Manager section.
From the Manage User Packages dashboard, select the Add Package button in the top right of the screen.
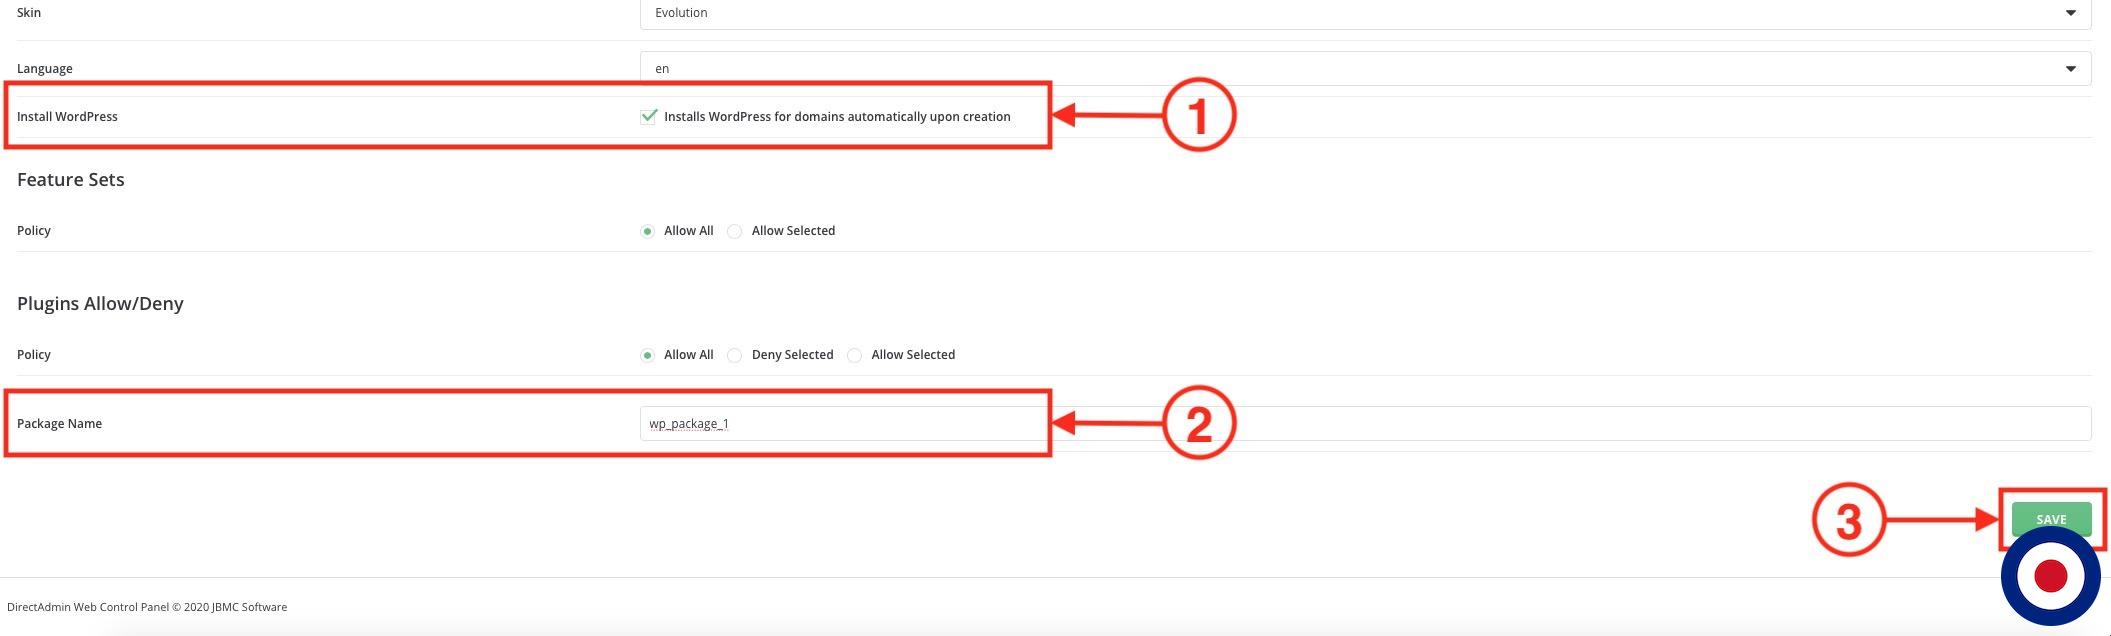
In Create New Package dashboard you can set all the required options for your package such as Disk Space, Bandwidth, Domains, Inodes, etc. If you want your user to have access to WP-CLI from the command line, don’t forget to enable SSH Access.
After setting all your required package options, you will see a new option has been added above the Feature Sets section, called Install WordPress. You will see the checkbox has already been ticked because we previously set this in the custom_package_items.conf file above. Now scroll to the bottom of the Create New Package dashboard choose a name for your new package such as wp_package_1 then click the save button.
After saving the new package you will be returned to the Manage User Packages dashboard where you will now see the package previously created has now been added to the list.
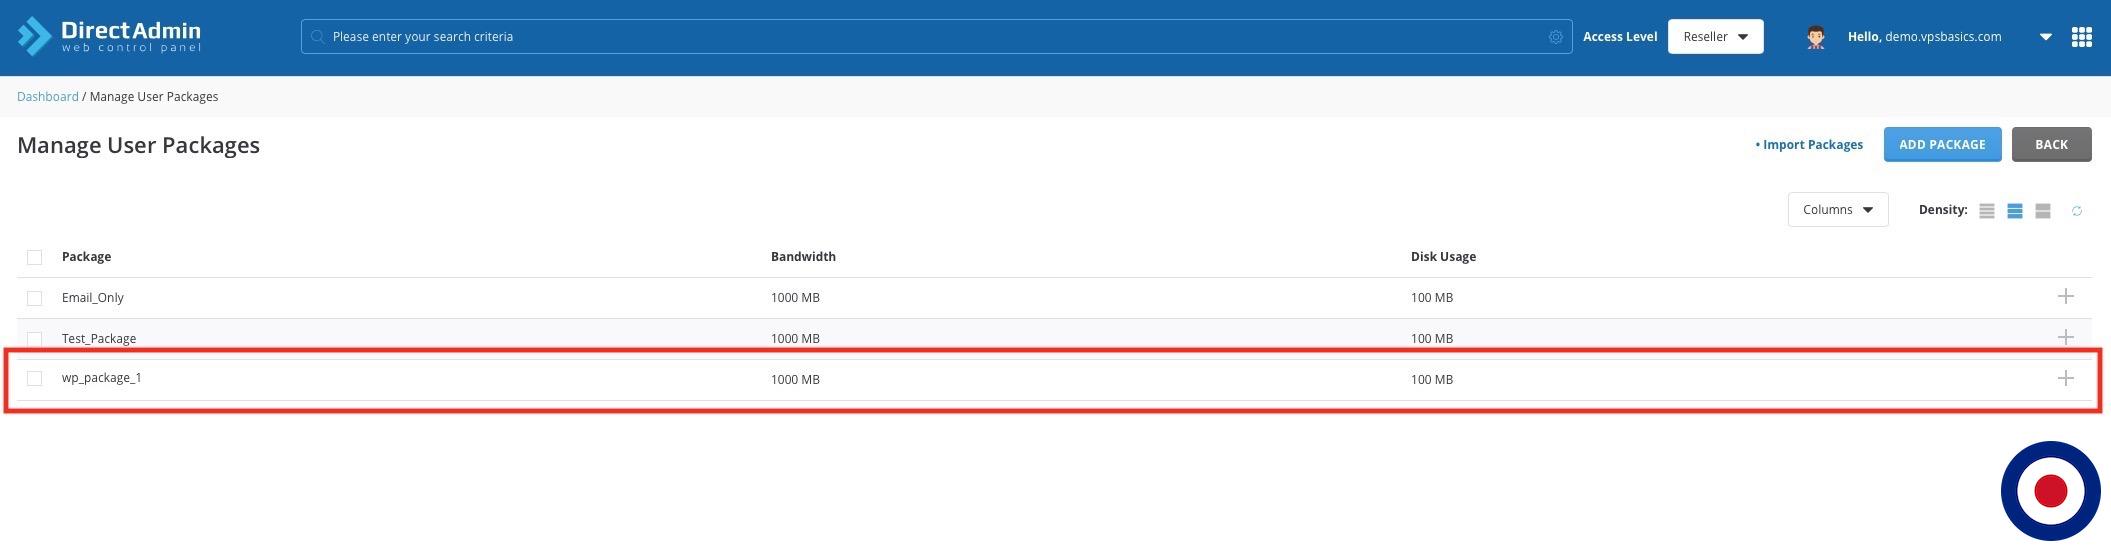
That’s it. You have now successfully created a new user package and enabled the install WordPress automatically option. Now we will create a New User Account with the User Package we have just created to automatically install WordPress.
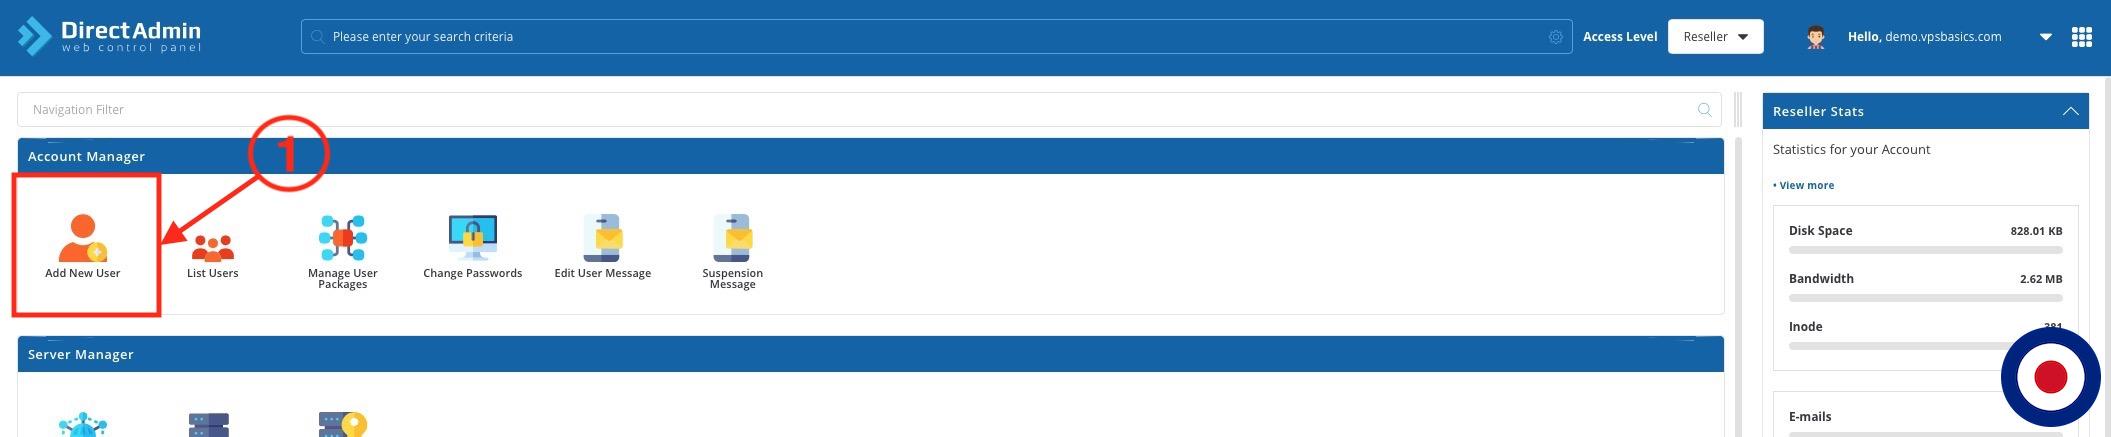
Create New User Account and Domain
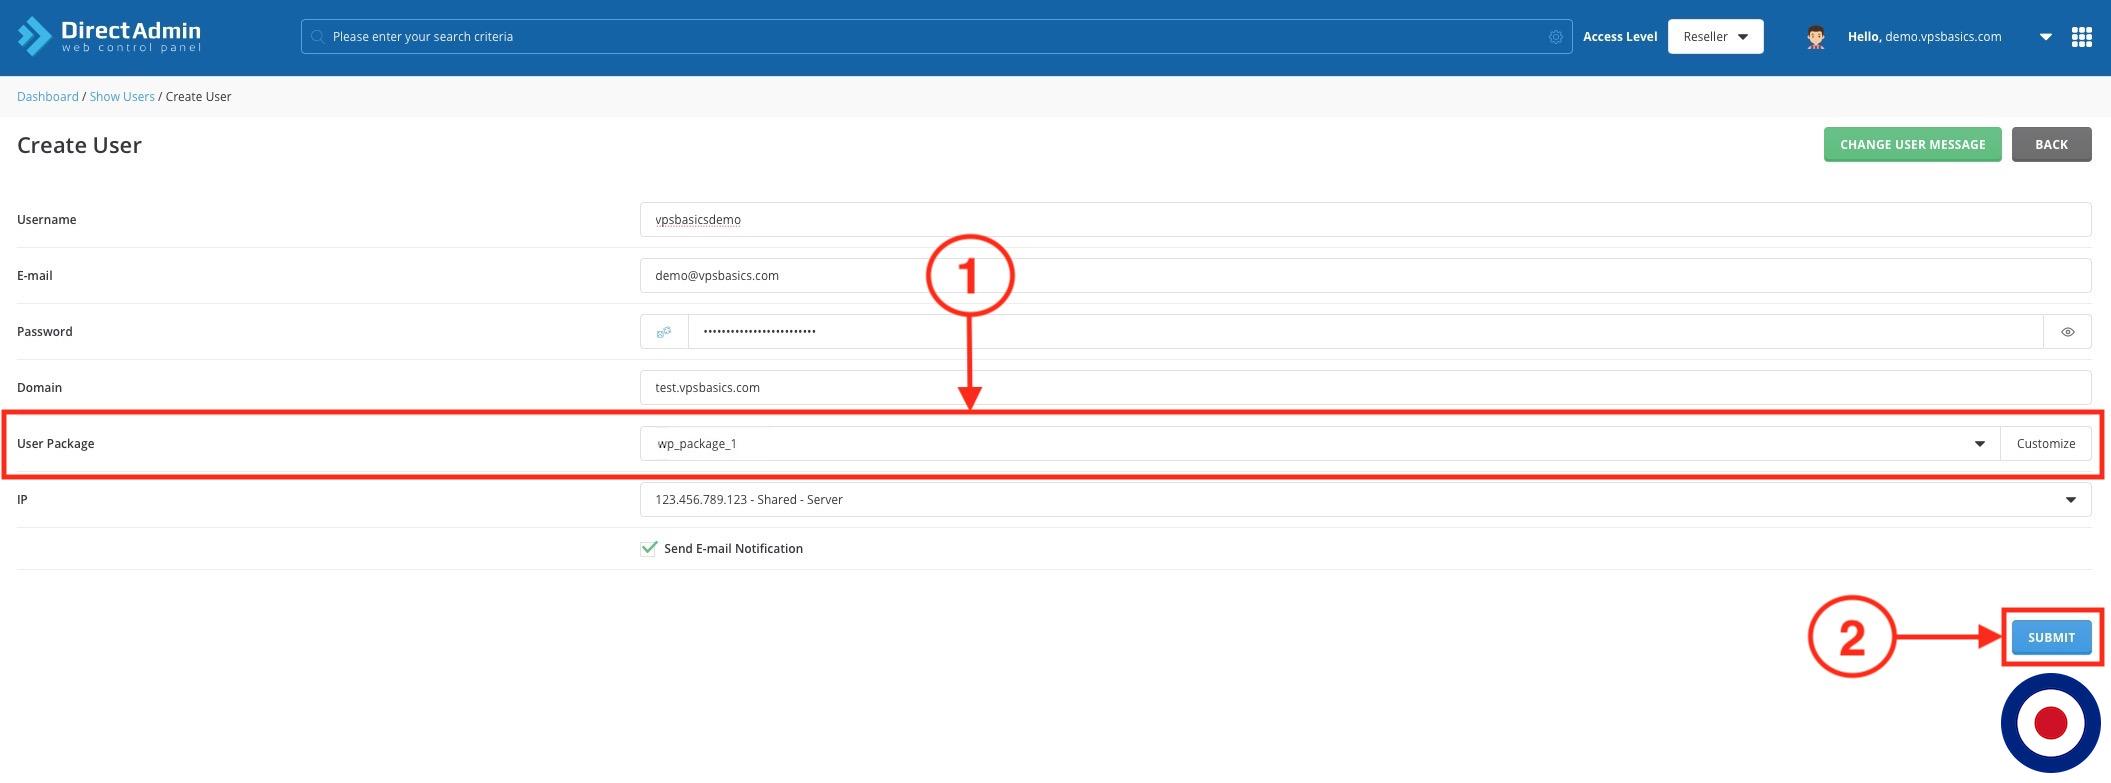
In your DirectAdmin dashboard, change the Access Level to Reseller. In the Reseller dashboard, select the Add New User option under the Account Manager section.
In the Create User dashboard, enter your account details such as username, email address, password, domain name. Under the User Package option select the package you created earlier – we used wp_package_1 as our package name. Then select the user IP address and choose whether to send an email notification on account creation but do note that the WordPress account credentials will not be sent with this email. Then click the Submit button in the bottom right corner.
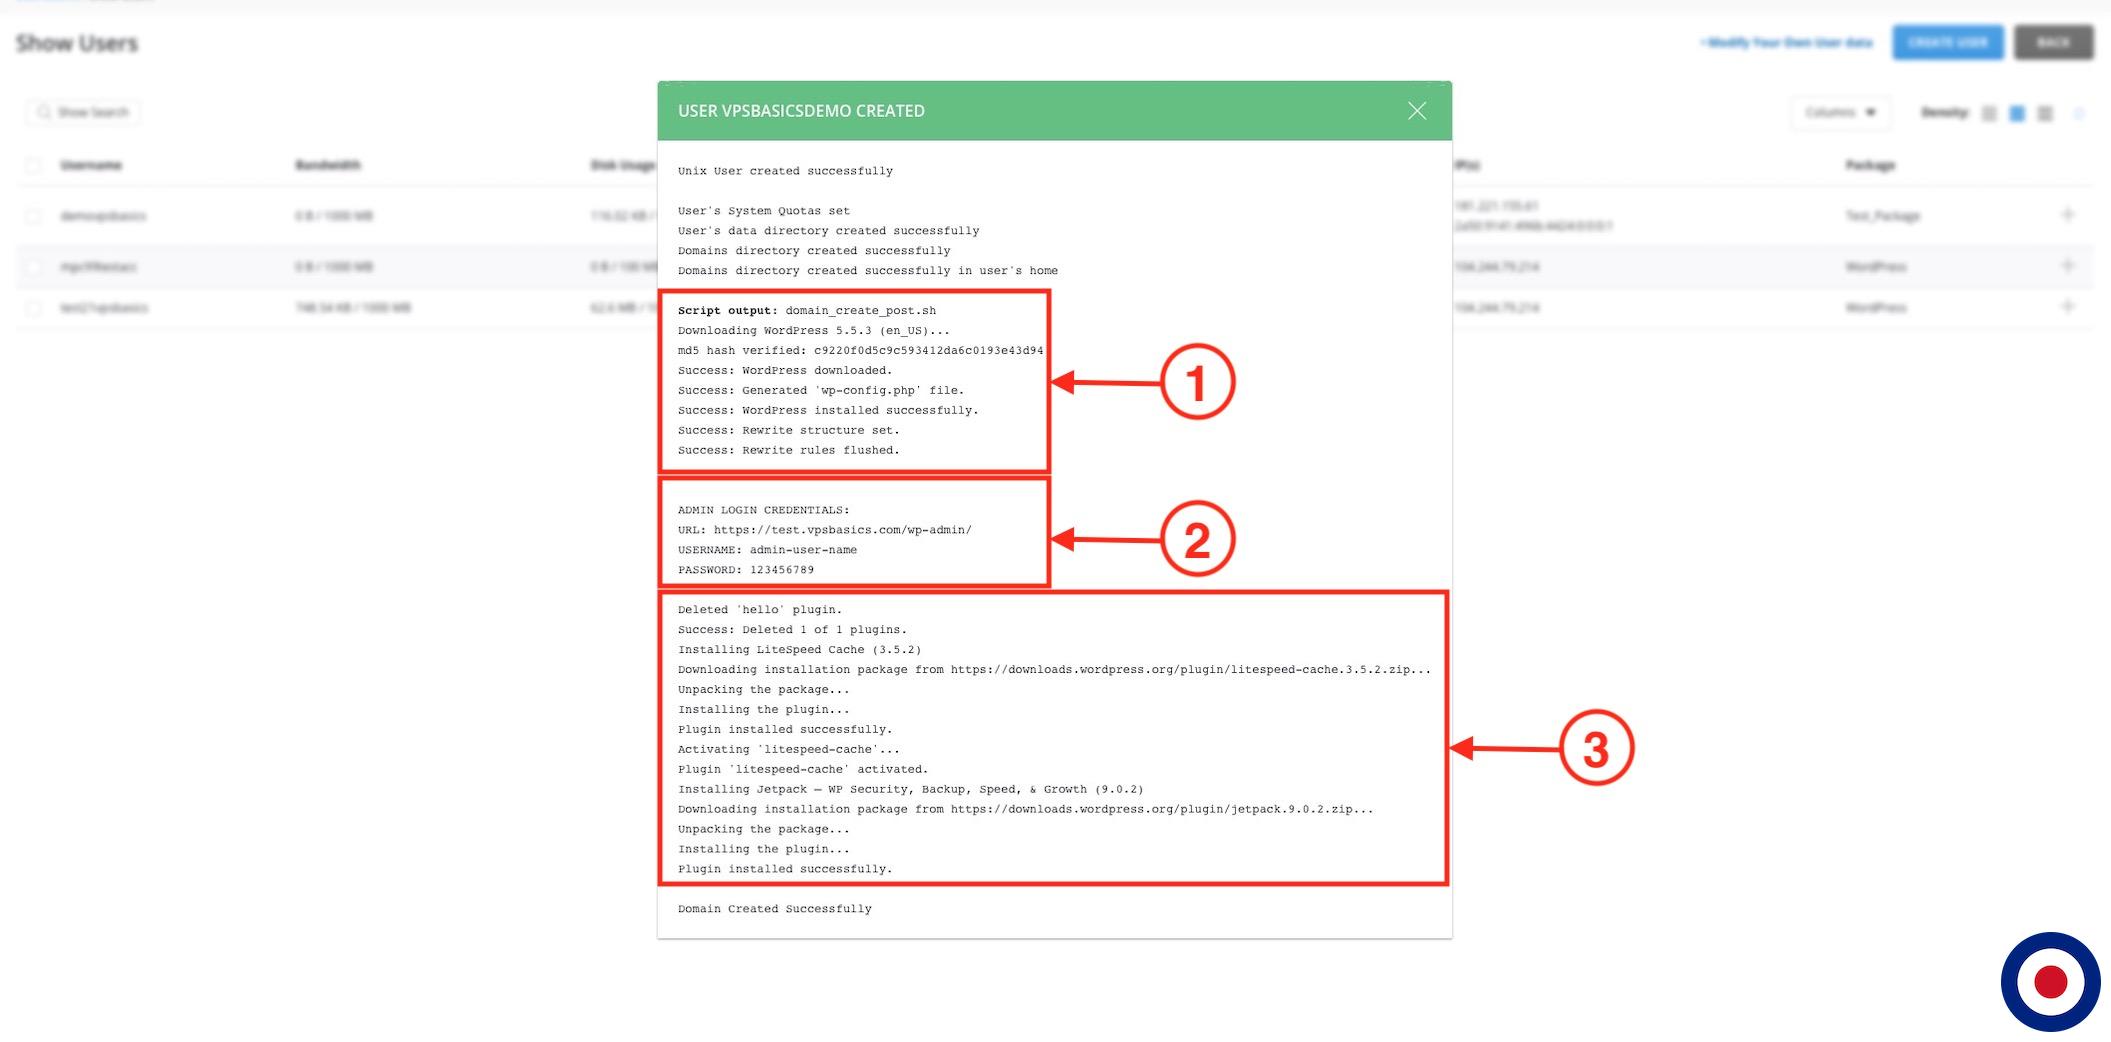
After clicking the Submit button, DirectAdmin will create the new user account, download the latest WordPress (v5.5.3 at time of writing), install it to the user directory, delete the Hello Dolly plugin and install Litespeed Cache plugin – unless you have made any changes to the scripts above. The account credentials for the WordPress installation will be displayed on the user created screen under WORDPRESS LOGIN CREDENTIALS and also saved as a .txt file in the domains public_html folder.
Important
After creating the new user account you may need to allow a few minutes before logging into the WordPress admin dashboard to enable DirectAdmin to process the task queue and restart.
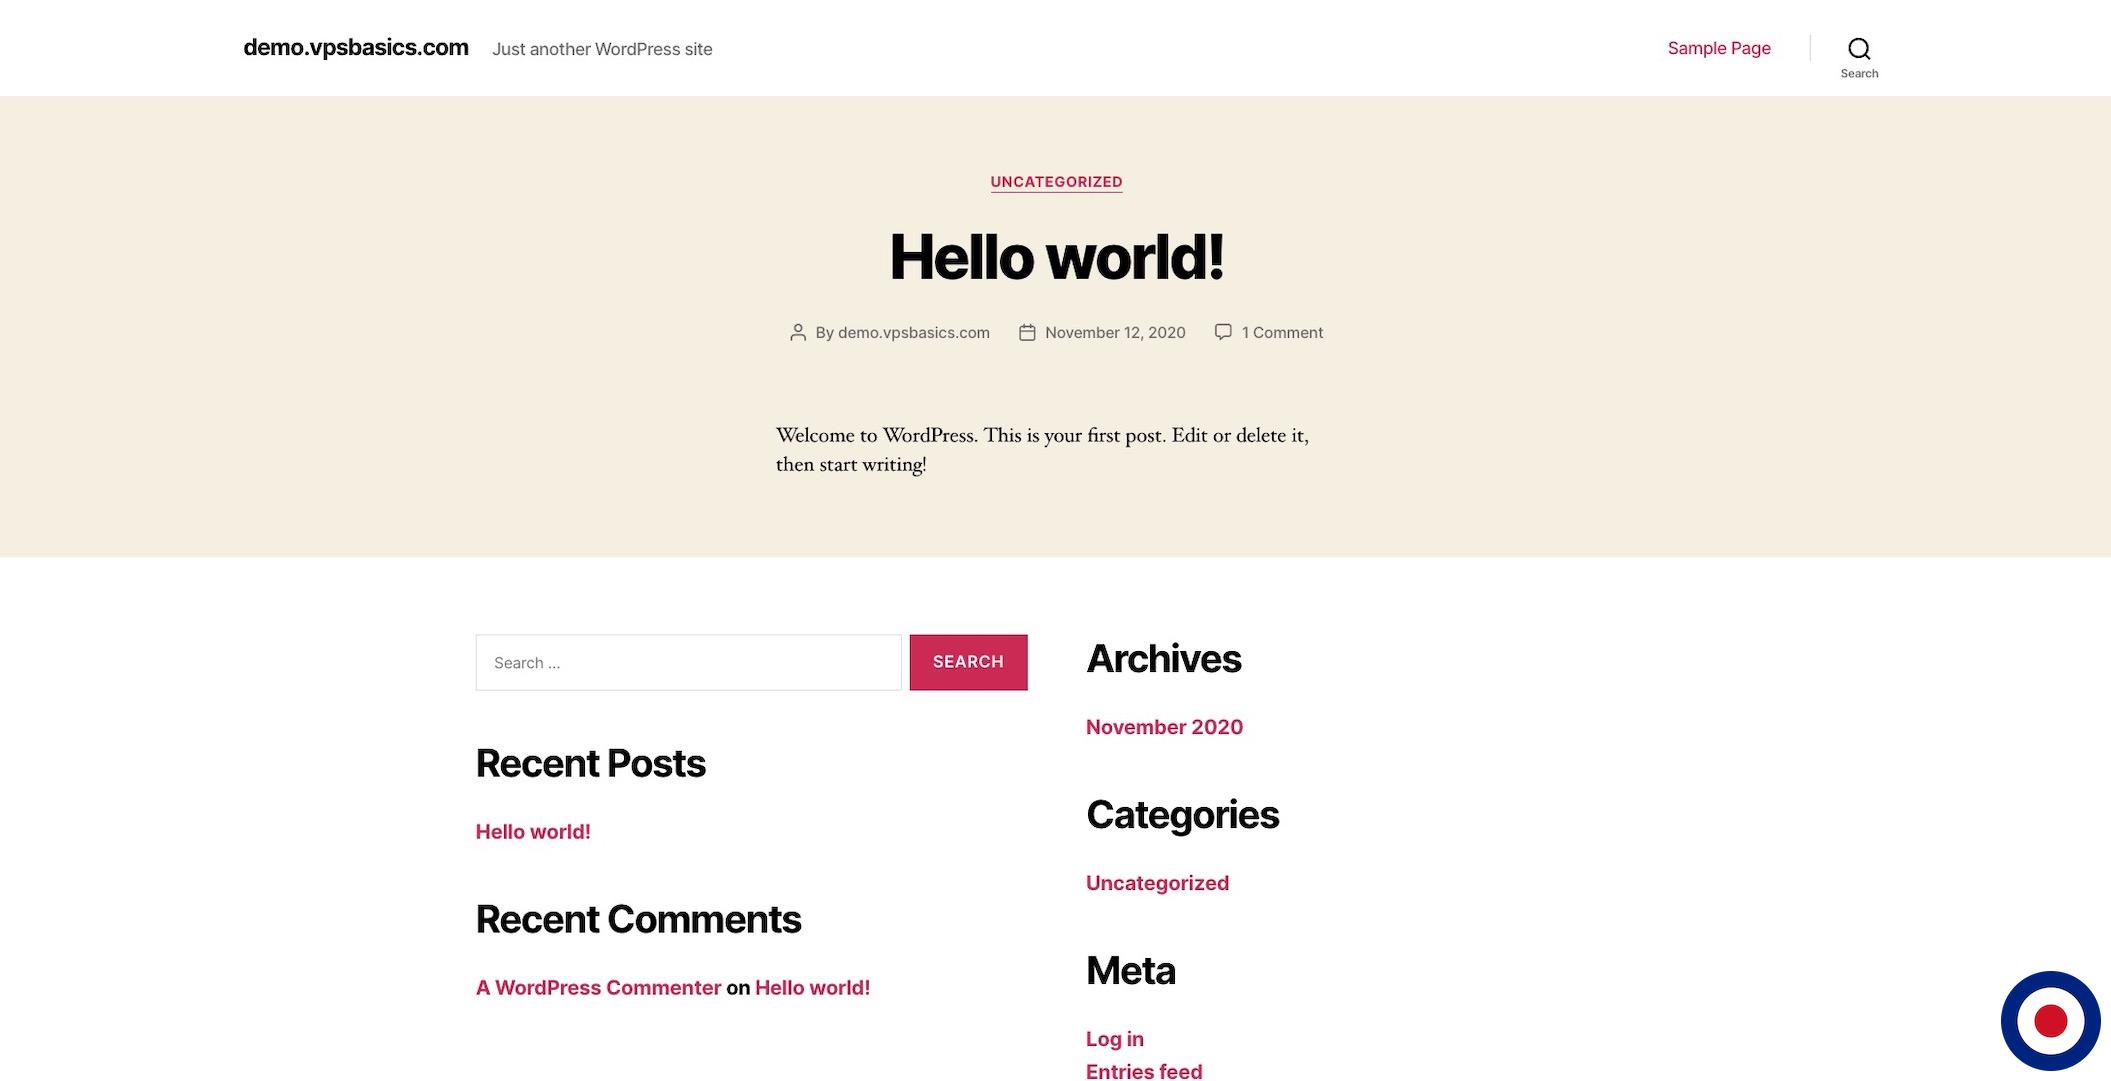
Now you can visit the website for the new user account and you will see that WordPress has been successfully installed to the account and will display the default WordPress theme, in our example it shows the theme TwentyTwenty.
That’s it. You have now successfully created a new user account and automatically installed WordPress. Now we will show you how to create a new domain with an existing user account and automatically install WordPress.
Create New Domain with Existing User Account
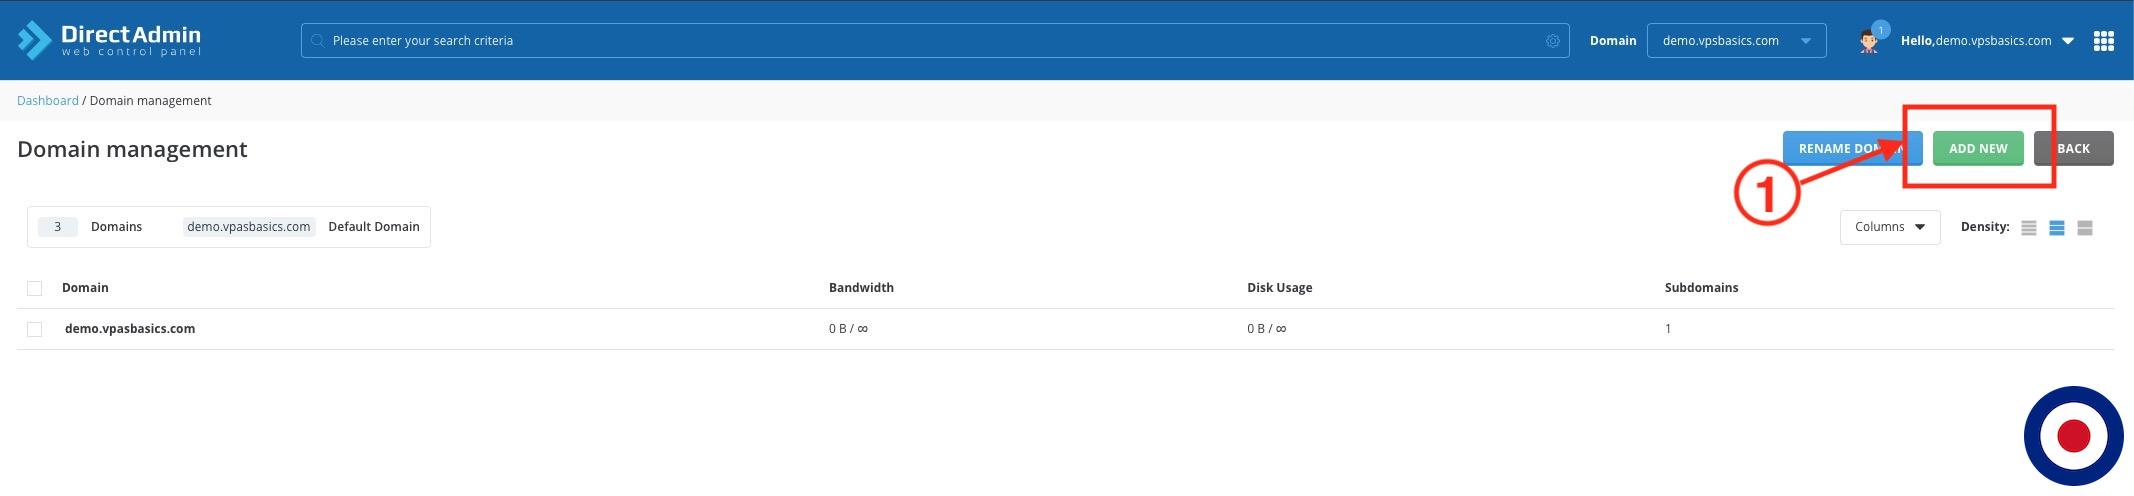
Now in order to create a new domain and automatically install WordPress, log into your DirectAdmin dashboard and select Domain Setup from the Account Manager section.
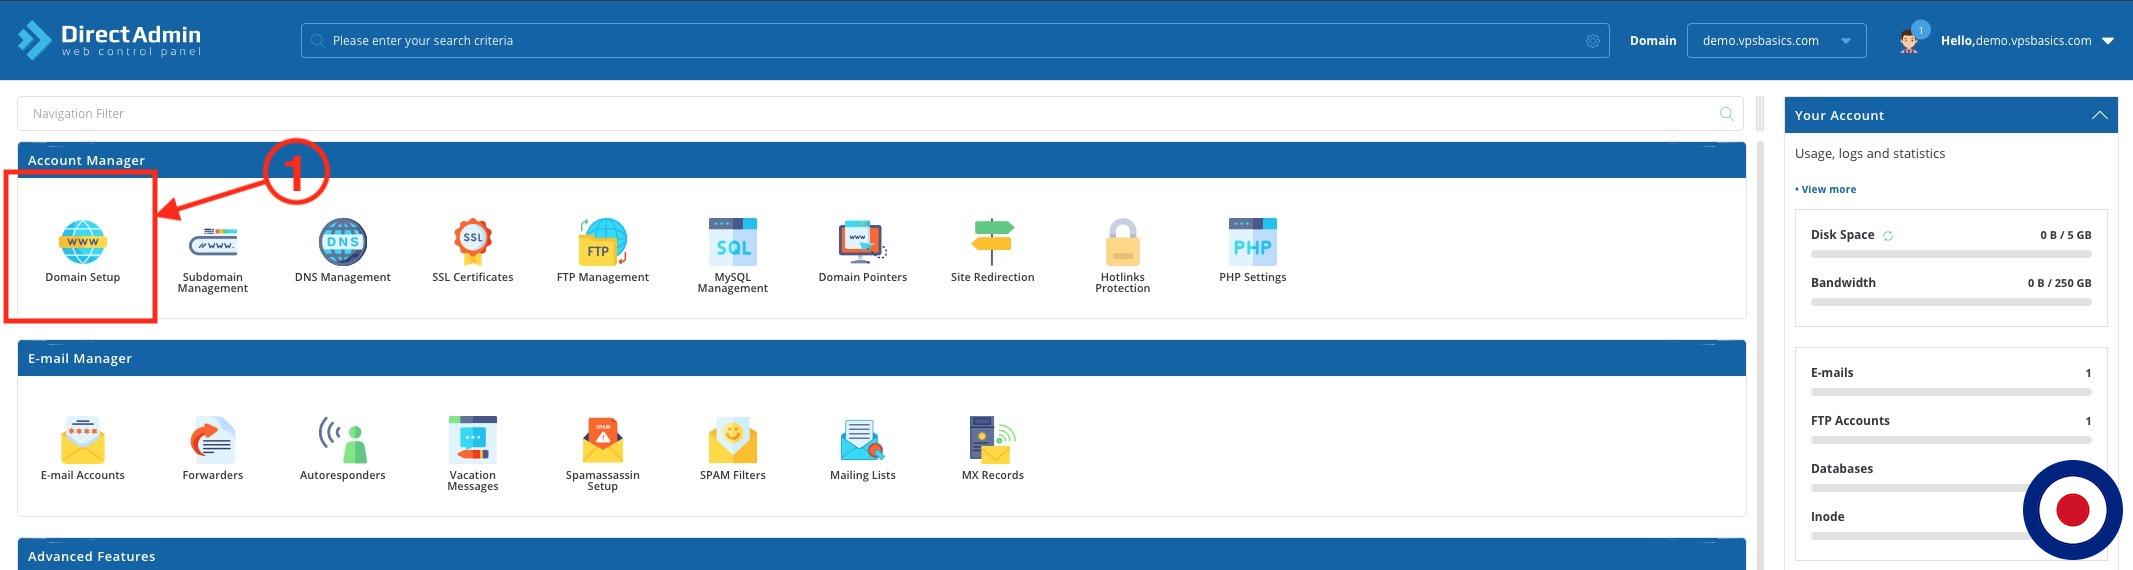
From the Domain Management dashboard select the Add New button to add a new domain to your existing DirectAdmin account.
In the Create Domain dashboard enter the new domain name and if needed you can also change the amount of Bandwidth allocated and available Disk Space for the new domain. Under the Custom Items section make sure that the Install WordPress option has been ticked and click the Create button.
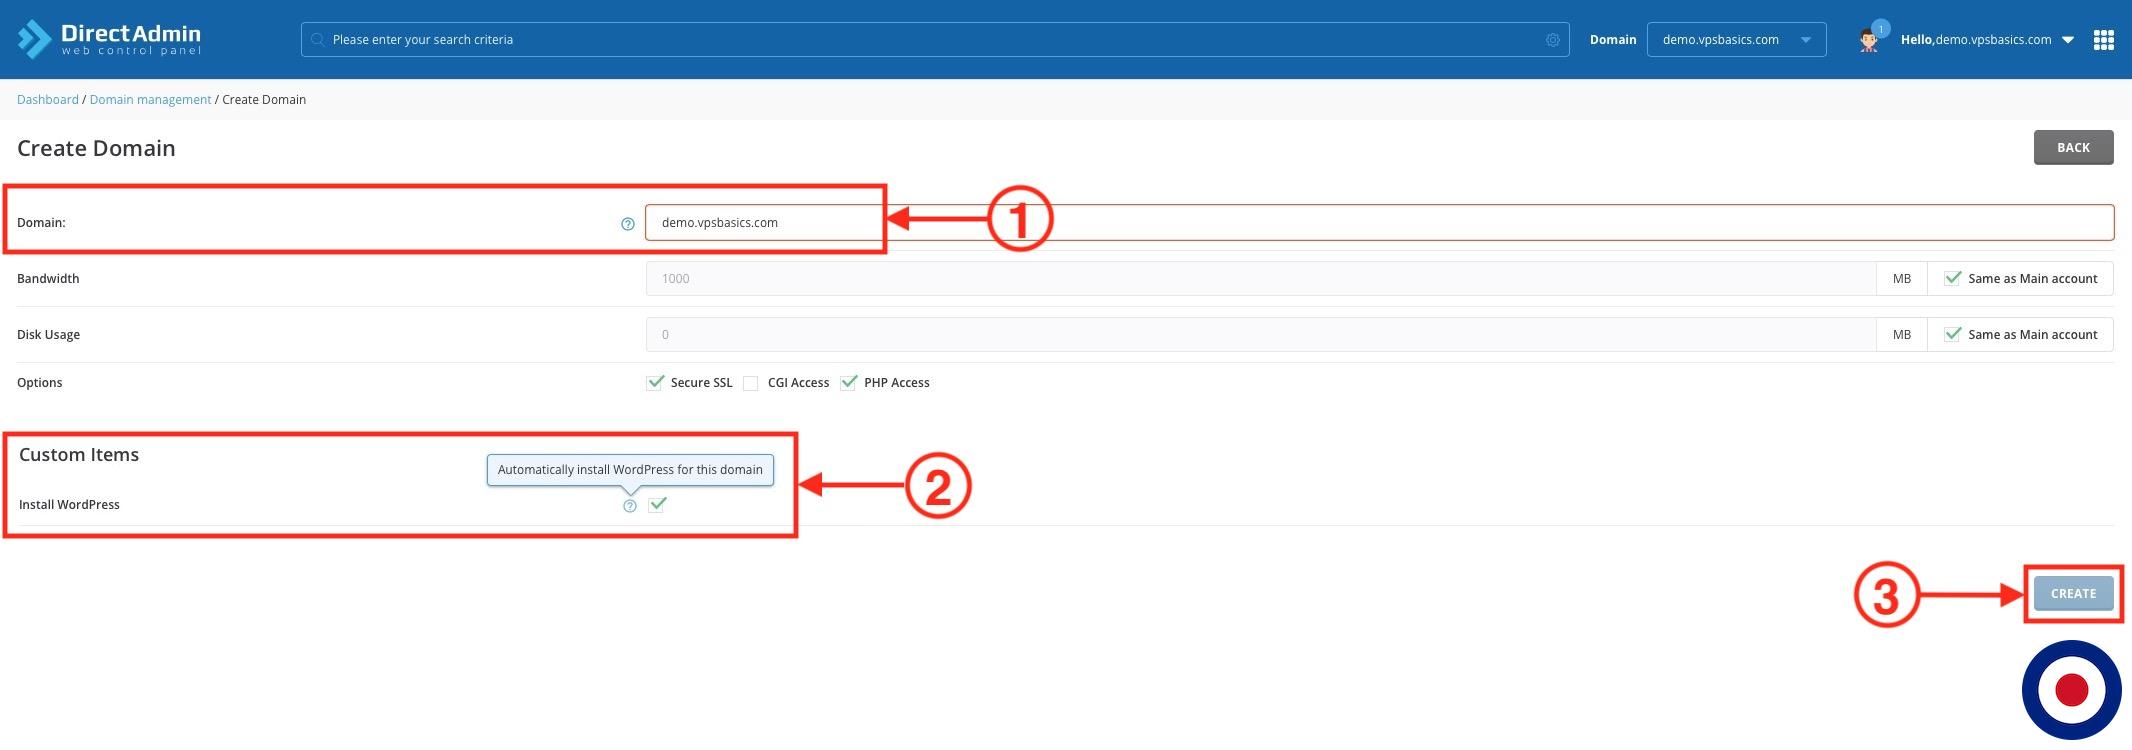
DirectAdmin will setup the new domain, download the latest WordPress (v5.5.3 at time of writing), install it to the domain directory, delete the Hello Dolly plugin and install Litespeed Cache plugin – unless you have made any changes to the scripts above. The account credentials for the WordPress installation will be displayed on the user created screen under WORDPRESS LOGIN CREDENTIALS and also saved as a .txt file in the domains public_html folder.
That’s it. You have now successfully created a new domain with an existing user account and automatically installed WordPress. Now we will show you how to modify an existing domain with an existing user account and automatically install WordPress.
Modify Existing Domain with Existing User Account
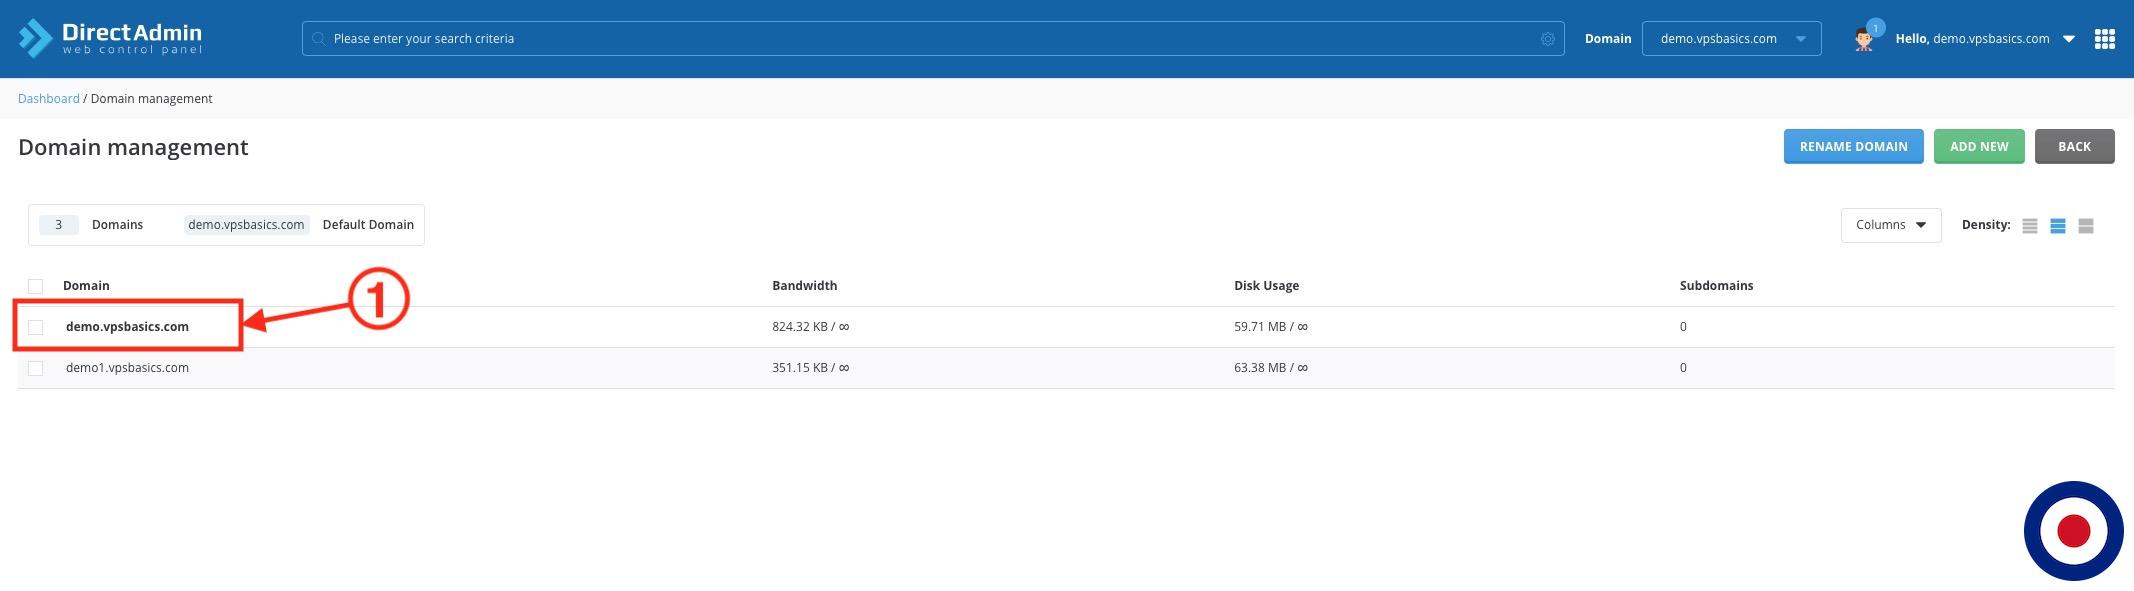
Now in order to create a modify an existing domain and automatically install WordPress, log into your DirectAdmin dashboard and select Domain Setup from the Account Manager section.
From the Domain Management dashboard click on the domain you want to edit to access the domain modify dashboard.
From the Modify Domain dashboard, select the Install WordPress option under the Custom Items section and click the Modify button.
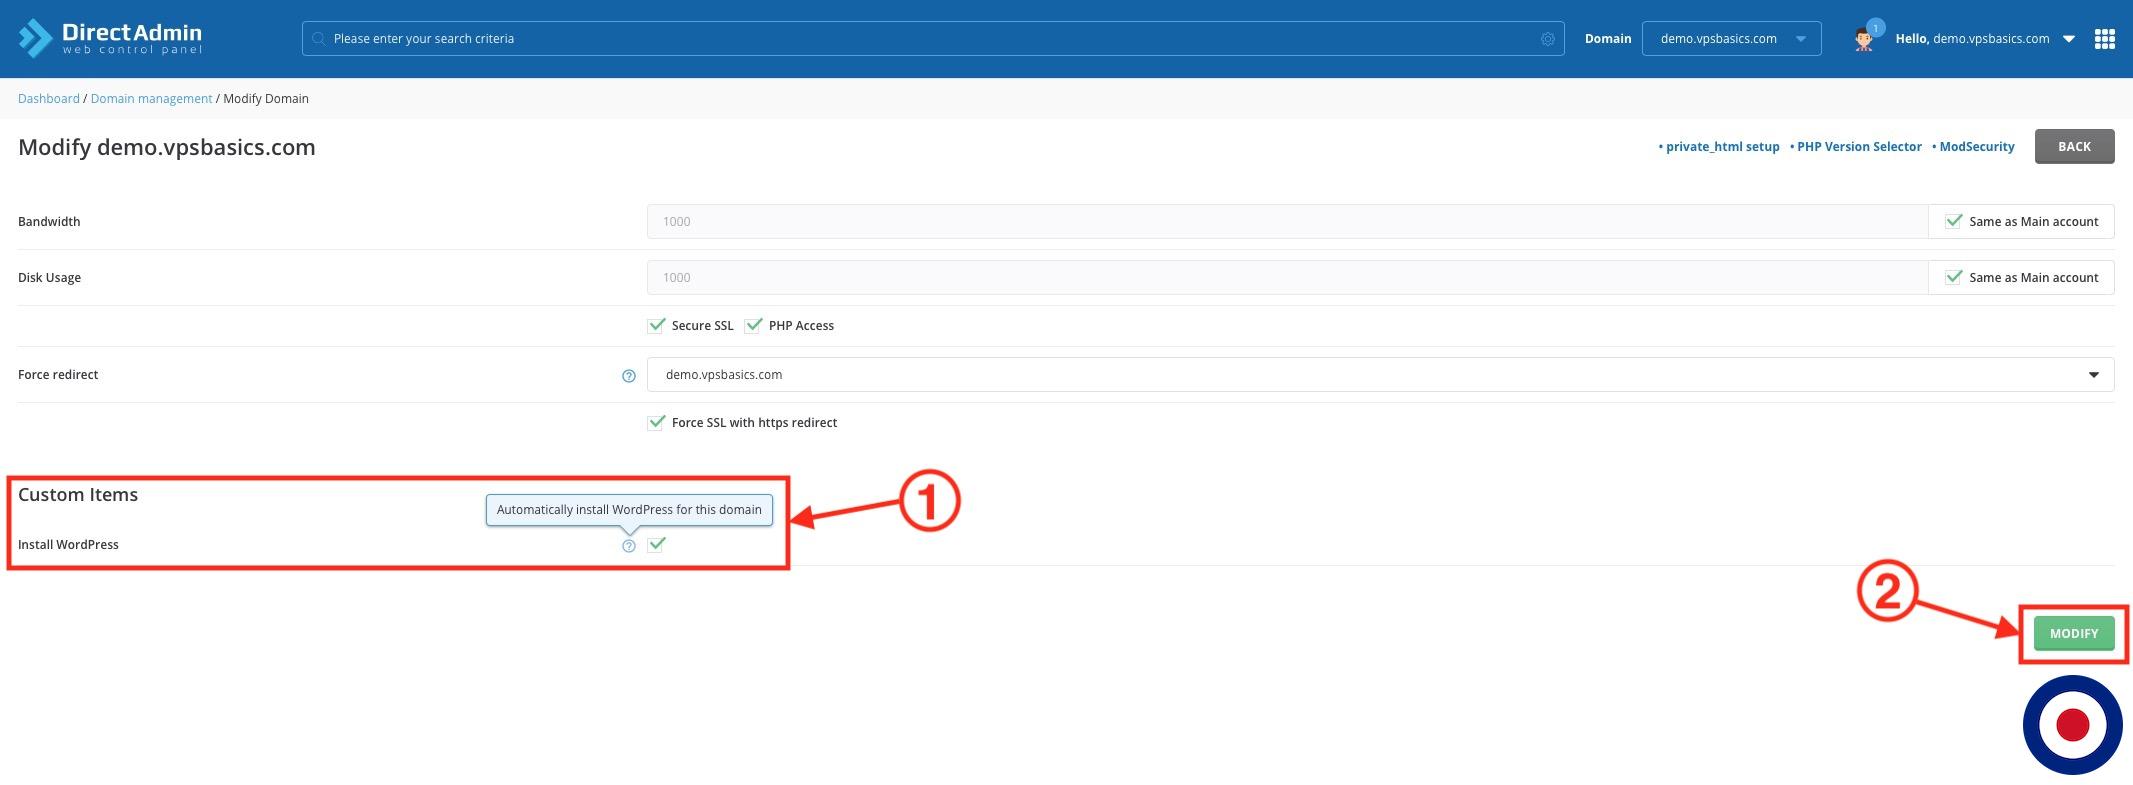
DirectAdmin will modify the existing domain by backing up the existing contents of the public_html folder to a backup folder called wp-backup, install WordPress to the domain public_html directory, delete the Hello Dolly plugin and install Litespeed Cache plugin – unless you have made any changes to the scripts above.
Important
Once you have confirmed your modifications to an existing domain in DirectAdmin you will recieve a notification in the lower right corner confirming that the domain has been modified. However, the new WordPress account credentials will not be displayed on the screen such as adding a new domain. Instead, these will be saved as a .txt file in the domain public_html folder.
That’s it. You have now successfully installed WordPress Command Line Interface more commonly know as WP-CLI and adjusted the default PHP disabled functions using custombuild. You have created the scripts required to enable automatic WordPress when creating a new domain, new subdomain or modifying an existing domain. Also created a new user package to automatically install WordPress and created custom domain option to select WordPress installation for a new domain with an existing account and when modifying an existing domain with an existing user account.


4 Comments for How to Automatically Install WordPress with DirectAdmin
Following this guide to create the script, I noticed an error in the commands. Step 2 of the last part of https://www.vpsbasics.com/cp/how-to-automatically-install-wordpress-with-directadmin/#custom-package-option refers to domain_items instead of package_items.
The installWP script still has old code for .htaccess. Please check https://wordpress.org/support/article/htaccess/
Hi Jos
Thanks for the feedback about the error in the custom package option and the updated code for htaccess. These have updated in the guide.
Kind Regards
VPSBasics
extraordinary!
does this work in Joomla and Drupal?
Hi Feby
Thank you for your kind words.
If you can install Joomla and Drupal using CLI then you could create a script to automatically install these. In fact, you could use the domain_create_post.sh, subdomain_create_post.sh and domain_modify_post.sh hooks to install just about anything you wanted.
Kind Regards
VPSBasics